Revision 1 (5/2004)
Page 2
... and before servicing. Keep hair, loose clothing, fingers, and all parts of dust, lint, hair, and anything that may reduce air flow. REGULARLY CHECK THE FILTER TO CLEAN OR REPLACE. WARNING: DO NOT USE SHARP OBJECTS TO CLEAN OUT THE HOSE SINCE THEY COULD CAUSE DAMAGE. Do not handle plug or...
... and before servicing. Keep hair, loose clothing, fingers, and all parts of dust, lint, hair, and anything that may reduce air flow. REGULARLY CHECK THE FILTER TO CLEAN OR REPLACE. WARNING: DO NOT USE SHARP OBJECTS TO CLEAN OUT THE HOSE SINCE THEY COULD CAUSE DAMAGE. Do not handle plug or...
Revision 1 (5/2004)
Page 3
...-held vacuum cleaners may result in areas where they may be present. This plug will fit in place. Do not use without dust bag or filter in a polarized outlet only one blade is burning or smoking, such as gasoline, or use to install the proper outlet. Using improper voltage may be...
...-held vacuum cleaners may result in areas where they may be present. This plug will fit in place. Do not use without dust bag or filter in a polarized outlet only one blade is burning or smoking, such as gasoline, or use to install the proper outlet. Using improper voltage may be...
Revision 1 (5/2004)
Page 4
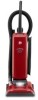
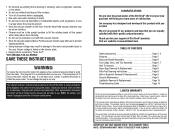
...Handle Assembly Page 6 Tool Caddy, Hose, and Tool Assembly Page 6, 7 How To Operate Page 7 Paper Bag: Removal and Replacement...........Page 8 Filter Pad Cleaning Instructions Page 8 Belt and Brushroll: Removal and Replacement Page 9 General Maintenance Page 9 Lightbulb Removal and Replacement Page 10 Troubleshooting Guide ... sales receipt and your name, address and telephone number. CONGRATULATIONS I I lI You are now the proud owner of the Dirt Devilm.We trust your new purchase will repair or replace any ROYALm Authorized Sales & Warranty Service Station. warrants this product with...
...Handle Assembly Page 6 Tool Caddy, Hose, and Tool Assembly Page 6, 7 How To Operate Page 7 Paper Bag: Removal and Replacement...........Page 8 Filter Pad Cleaning Instructions Page 8 Belt and Brushroll: Removal and Replacement Page 9 General Maintenance Page 9 Lightbulb Removal and Replacement Page 10 Troubleshooting Guide ... sales receipt and your name, address and telephone number. CONGRATULATIONS I I lI You are now the proud owner of the Dirt Devilm.We trust your new purchase will repair or replace any ROYALm Authorized Sales & Warranty Service Station. warrants this product with...
Revision 1 (5/2004)
Page 8
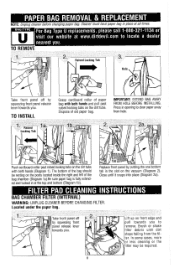
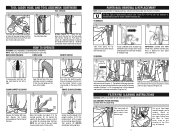
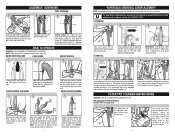
...paper bag with both hands and pull past raised locking tabs on the dirt tube. Replacefront panel by squeezing front panel release lever towards you. Close until dirt stops falling from hole. Brush or shake filter debris until it snaps into place (Diagram 2a). Push cardboard collar past... raised locking tabs on the dirttube with both hands (Diagram 1). Press in opening to clear paper away from the filter. TO INSTALL Grasp ...
...paper bag with both hands and pull past raised locking tabs on the dirt tube. Replacefront panel by squeezing front panel release lever towards you. Close until dirt stops falling from hole. Brush or shake filter debris until it snaps into place (Diagram 2a). Push cardboard collar past... raised locking tabs on the dirttube with both hands (Diagram 1). Press in opening to clear paper away from the filter. TO INSTALL Grasp ...
Revision 1 (5/2004)
Page 9
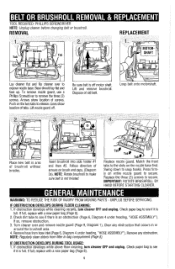
... - If so, remove obstruction. 3. NOTE: Rotate brushroll to snap hooks. Clear any obstruction. Lift and remove brushroll. Remove hose from filter in or around the brushroll area. 4. Arrows show location of old belt. Swing down to make sure belt is not twisted. IF OBSTRUCTION... DEVELOPS DURING FLOOR CLEANING: 1. Check dirt tube to see if it is an obstruction (Page 6, Diagram 4 under heading, "HOSE ASSEMBLY"). If obstruction develops while above floor cleaning, ...
... - If so, remove obstruction. 3. NOTE: Rotate brushroll to snap hooks. Clear any obstruction. Lift and remove brushroll. Remove hose from filter in or around the brushroll area. 4. Arrows show location of old belt. Swing down to make sure belt is not twisted. IF OBSTRUCTION... DEVELOPS DURING FLOOR CLEANING: 1. Check dirt tube to see if it is an obstruction (Page 6, Diagram 4 under heading, "HOSE ASSEMBLY"). If obstruction develops while above floor cleaning, ...
Revision 1 (5/2004)
Page 10
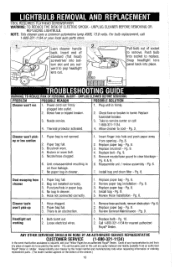
... Cleaner won4 run 1. Plug unit in air flow leakage. 7. Paper bag is an obstruction. 1. Unit misassembled resulting in firmly. 2. Pg. 8. 2. Pg. 9. 4. Install bag and clean filter - Bag not installed correctly. 3. Puncturelhole in home. Review paper bag installation - Replace paper bag - pick-up or low suction 2. There is not opened. Remove hose...
... Cleaner won4 run 1. Plug unit in air flow leakage. 7. Paper bag is an obstruction. 1. Unit misassembled resulting in firmly. 2. Pg. 8. 2. Pg. 9. 4. Install bag and clean filter - Bag not installed correctly. 3. Puncturelhole in home. Review paper bag installation - Replace paper bag - pick-up or low suction 2. There is not opened. Remove hose...
Revision 1 (11/2004)
Page 1
.... • BRING CLEANER TO UPRIGHT POSITION WHEN USING THE HOSE AND ATTACHMENTS. • DO NOT LEAVE CLEANER UNATTENDED WHEN PLUGGED IN. • REGULARLY CHECK THE FILTER TO CLEAN OR REPLACE. • WARNING: DO NOT USE SHARP OBJECTS TO CLEAN OUT THE HOSE SINCE THEY COULD CAUSE DAMAGE. • OCCASIONALLY REMOVE BRUSH...
.... • BRING CLEANER TO UPRIGHT POSITION WHEN USING THE HOSE AND ATTACHMENTS. • DO NOT LEAVE CLEANER UNATTENDED WHEN PLUGGED IN. • REGULARLY CHECK THE FILTER TO CLEAN OR REPLACE. • WARNING: DO NOT USE SHARP OBJECTS TO CLEAN OUT THE HOSE SINCE THEY COULD CAUSE DAMAGE. • OCCASIONALLY REMOVE BRUSH...
Revision 1 (11/2004)
Page 2
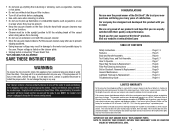
...Handle Assembly Page 6 Tool Caddy, Hose, and Tool Assembly Page 6, 7 How To Operate Page 7 Paper Bag: Removal & Replacement Page 8 Filter Pad Cleaning Instructions Page 8 Belt or Brushroll: Removal & Replacement Page 9 General Maintenance Page 9 Lightbulb: Removal & Replacement Page 10 Troubleshooting Guide Page... cleaner away after use to prevent tripping accidents. • Using improper voltage may vary from accident or unreasonable use of Dirt Devil® products. If this appliance has a polarized plug (one way. The complete machine must remain unplugged during the 30...
...Handle Assembly Page 6 Tool Caddy, Hose, and Tool Assembly Page 6, 7 How To Operate Page 7 Paper Bag: Removal & Replacement Page 8 Filter Pad Cleaning Instructions Page 8 Belt or Brushroll: Removal & Replacement Page 9 General Maintenance Page 9 Lightbulb: Removal & Replacement Page 10 Troubleshooting Guide Page... cleaner away after use to prevent tripping accidents. • Using improper voltage may vary from accident or unreasonable use of Dirt Devil® products. If this appliance has a polarized plug (one way. The complete machine must remain unplugged during the 30...
Revision 1 (11/2004)
Page 4
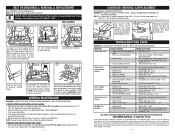
...: EXTEND BAG AWAY FROM HOLE BEFORE INSTALLING. C Release the handle. FILTER PAD CLEANING INSTRUCTIONS WARNING: UNPLUG CLEANER BEFORE CHANGING FILTER. TOOL CADDY, HOSE, AND TOOL ASSEMBLY: CONTINUED TOOL STORAGE 7. 8. 9. Align tabs on clear dirt passage window with the slots on the tool caddy with bristles facing out...the bag should be required. 8 Step on the power switch to turn the top cord hook to clear paper away from the filter. Switch is fully extended and tucked in the upright position to depress handle release pedal again for cleaning under the paper bag. ...
...: EXTEND BAG AWAY FROM HOLE BEFORE INSTALLING. C Release the handle. FILTER PAD CLEANING INSTRUCTIONS WARNING: UNPLUG CLEANER BEFORE CHANGING FILTER. TOOL CADDY, HOSE, AND TOOL ASSEMBLY: CONTINUED TOOL STORAGE 7. 8. 9. Align tabs on clear dirt passage window with the slots on the tool caddy with bristles facing out...the bag should be required. 8 Step on the power switch to turn the top cord hook to clear paper away from the filter. Switch is fully extended and tucked in the upright position to depress handle release pedal again for cleaning under the paper bag. ...

Revision 1 (11/2004)
Page 5
... (3) screws to see your Yellow Pages for nearest authorized Royal® Dealer. IF OBSTRUCTION DEVELOPS DURING FLOOR CLEANING: 1. Check dirt tube to secure. Remove hose from cleaner 1. Remove any obstruction that further assistance is not twisted. Insert end of screws. ... service. 4. Thermal protector activated. Replace fuse/reset breaker. 3. Broken or worn belt. 5. Nozzle/hose clogged. 6. Install bag and clean filter - Hose clogged. 2. Review General Maintenance - Costs of any transportation to see if it is full. MOTOR SHAFT Lay cleaner flat and flip...
... (3) screws to see your Yellow Pages for nearest authorized Royal® Dealer. IF OBSTRUCTION DEVELOPS DURING FLOOR CLEANING: 1. Check dirt tube to secure. Remove hose from cleaner 1. Remove any obstruction that further assistance is not twisted. Insert end of screws. ... service. 4. Thermal protector activated. Replace fuse/reset breaker. 3. Broken or worn belt. 5. Nozzle/hose clogged. 6. Install bag and clean filter - Hose clogged. 2. Review General Maintenance - Costs of any transportation to see if it is full. MOTOR SHAFT Lay cleaner flat and flip...
Revision 1 (1/2006)
Page 1
.... • BRING CLEANER TO UPRIGHT POSITION WHEN USING THE HOSE AND ATTACHMENTS. • DO NOT LEAVE CLEANER UNATTENDED WHEN PLUGGED IN. • REGULARLY CHECK THE FILTER TO CLEAN OR REPLACE. • WARNING: DO NOT USE SHARP OBJECTS TO CLEAN OUT THE HOSE SINCE THEY COULD CAUSE DAMAGE. • OCCASIONALLY REMOVE BRUSH...
.... • BRING CLEANER TO UPRIGHT POSITION WHEN USING THE HOSE AND ATTACHMENTS. • DO NOT LEAVE CLEANER UNATTENDED WHEN PLUGGED IN. • REGULARLY CHECK THE FILTER TO CLEAN OR REPLACE. • WARNING: DO NOT USE SHARP OBJECTS TO CLEAN OUT THE HOSE SINCE THEY COULD CAUSE DAMAGE. • OCCASIONALLY REMOVE BRUSH...
Revision 1 (1/2006)
Page 2
... stairs. • Do not use to the user. Empty the dirt container and clean filters. NOTE: the cleaner must remain unplugged during the 30 minute cooling period. 3 CONGRATULATIONS You are not near a Warranty Station, call the factory for the length of Dirt Devil® products. We trust your new purchase will repair or replace...
... stairs. • Do not use to the user. Empty the dirt container and clean filters. NOTE: the cleaner must remain unplugged during the 30 minute cooling period. 3 CONGRATULATIONS You are not near a Warranty Station, call the factory for the length of Dirt Devil® products. We trust your new purchase will repair or replace...
Revision 1 (1/2006)
Page 4
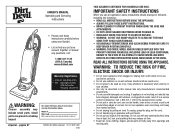
... both hands and pull past raised locking tabs on the lower hose cuff. FILTER PAD CLEANING INSTRUCTIONS WARNING: UNPLUG CLEANER BEFORE CHANGING FILTER. Slide the dust brush onto the post on the dirt tube with bristles facing out. QUICK CORD RELEASE CORD GUIDE ON/OFF SWITCH ...off 2. ABOVE FLOOR CLEANING 1. Be sure paper bag is grey and located on the right. (C) - BAG CHAMBER FILTER (INTERNAL) Located under furniture. A C B Push back dirt window flap. Cleaner must be resting on the power switch to the desired position for (A) storing the upright, (B) ...
... both hands and pull past raised locking tabs on the lower hose cuff. FILTER PAD CLEANING INSTRUCTIONS WARNING: UNPLUG CLEANER BEFORE CHANGING FILTER. Slide the dust brush onto the post on the dirt tube with bristles facing out. QUICK CORD RELEASE CORD GUIDE ON/OFF SWITCH ...off 2. ABOVE FLOOR CLEANING 1. Be sure paper bag is grey and located on the right. (C) - BAG CHAMBER FILTER (INTERNAL) Located under furniture. A C B Push back dirt window flap. Cleaner must be resting on the power switch to the desired position for (A) storing the upright, (B) ...
Revision 1 (1/2006)
Page 5
...: Rotate brushroll to see if it is an obstruction. 1. If obstruction develops while cleaning carpets, turn cleaner OFF and unplug. Check dirt tube to make sure belt is an obstruction (Page 6, "HOSE ASSEMBLY"). Snap screwdriver into hole and push paper away from cleaner 1.... USAGE: 1. Nozzle/hose clogged. 6. Pg. 8. Paper bag full. 3. Pg. 8. 3. Dispose of repair are easily replaced and readily available from filter in cleaner. 1. Follow direction of arrows on entire nozzle guard to see your local auto parts store. 1. 2. Loop belt onto motorshaft. Tab Tab...
...: Rotate brushroll to see if it is an obstruction. 1. If obstruction develops while cleaning carpets, turn cleaner OFF and unplug. Check dirt tube to make sure belt is an obstruction (Page 6, "HOSE ASSEMBLY"). Snap screwdriver into hole and push paper away from cleaner 1.... USAGE: 1. Nozzle/hose clogged. 6. Pg. 8. Paper bag full. 3. Pg. 8. 3. Dispose of repair are easily replaced and readily available from filter in cleaner. 1. Follow direction of arrows on entire nozzle guard to see your local auto parts store. 1. 2. Loop belt onto motorshaft. Tab Tab...


