Revision 3 (2/2003)
Page 3
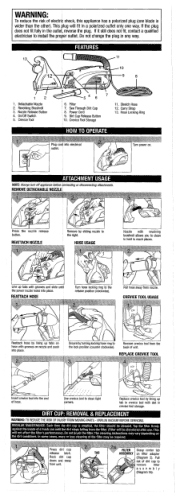
... install the proper outlet. Keep your hands, feet, hair and clothing away from your face and body. Do not use the vacuum cleaner without dirt container and/or filters in a polarized outlet only one blade is burning or smoking, such as cigarettes, matches, or hot ashes. SAVE THESE INSTRUCTIONS WARNING: I TO reduce...
... install the proper outlet. Keep your hands, feet, hair and clothing away from your face and body. Do not use the vacuum cleaner without dirt container and/or filters in a polarized outlet only one blade is burning or smoking, such as cigarettes, matches, or hot ashes. SAVE THESE INSTRUCTIONS WARNING: I TO reduce...
Revision 3 (2/2003)
Page 4
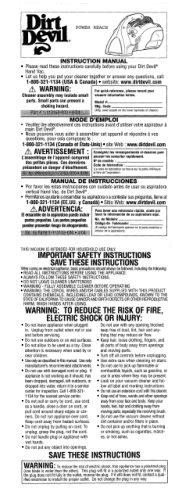
... Thank you may also have other rights (Other rights may vary from accident or unreasonable use of the vacuum cleaner. a 6.7 Dirt Container &"~ilter:Removal U , & Replacement Page 8 Belt and Brushroll: Removal & Replacement...Page 9 Troubleshooting Guide Page 9 LIMITED ... design that never needs to any defective parts free of Dirt Devile products. age 2,3 Feature Descriptions P. CONGRATULATIONS You are now the proud owner of the Dirt DevilBPlatinum Forcee Hand Vac, with 6 amps of power. .... This warranty does not cover brushes, flat belts, filters and bulbs.
... Thank you may also have other rights (Other rights may vary from accident or unreasonable use of the vacuum cleaner. a 6.7 Dirt Container &"~ilter:Removal U , & Replacement Page 8 Belt and Brushroll: Removal & Replacement...Page 9 Troubleshooting Guide Page 9 LIMITED ... design that never needs to any defective parts free of Dirt Devile products. age 2,3 Feature Descriptions P. CONGRATULATIONS You are now the proud owner of the Dirt DevilBPlatinum Forcee Hand Vac, with 6 amps of power. .... This warranty does not cover brushes, flat belts, filters and bulbs.
Revision 3 (2/2003)
Page 5
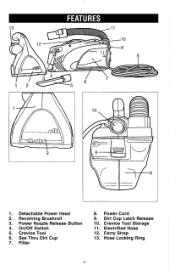
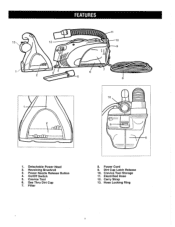
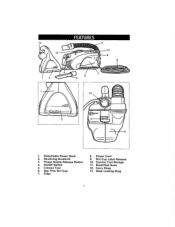
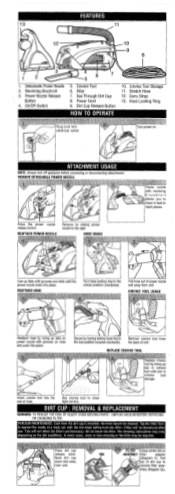
Detachable Power Head 2. OnIOff Switch 5. Hose Locking Ring Power ~ G z z l eRelease Button 4. Electrified Hose 12. Revolvina Brushroll 3. Dirt CUD Latch Release 10. ~ r e v i cTiool Storage 11. Filter 8. See Thru Dirt Cup 7. 1. Crevice Tool 6. Power Cord 9. Carry Strap 13.
Detachable Power Head 2. OnIOff Switch 5. Hose Locking Ring Power ~ G z z l eRelease Button 4. Electrified Hose 12. Revolvina Brushroll 3. Dirt CUD Latch Release 10. ~ r e v i cTiool Storage 11. Filter 8. See Thru Dirt Cup 7. 1. Crevice Tool 6. Power Cord 9. Carry Strap 13.
Revision 3 (2/2003)
Page 8
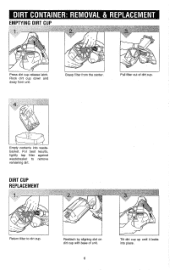
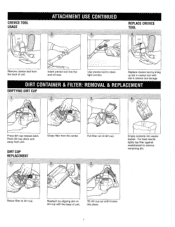
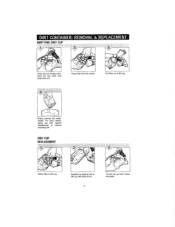
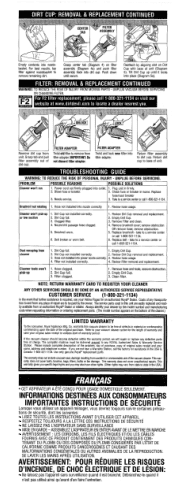
Tilt dirt cup up until it locks into wastebasket. Pull filter out of unit. Reattach by aligning slot on dirt cup with base of dirt cup. 3 Empty contents into place. For best results, lightly tap filter against wastebasket to dirt cup. DIRT CUP REPLACEMENT Return filter to remove remaining dirt. Grasp filter from unit. Press dirt cup release latch. Rock dirt cup down and away from the center.
Tilt dirt cup up until it locks into wastebasket. Pull filter out of unit. Reattach by aligning slot on dirt cup with base of dirt cup. 3 Empty contents into place. For best results, lightly tap filter against wastebasket to dirt cup. DIRT CUP REPLACEMENT Return filter to remove remaining dirt. Grasp filter from unit. Press dirt cup release latch. Rock dirt cup down and away from the center.
Revision 3 (2/2003)
Page 9
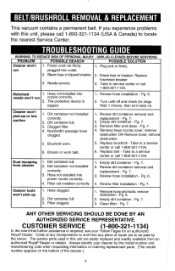
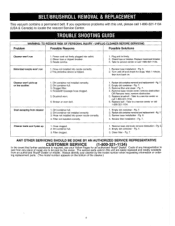
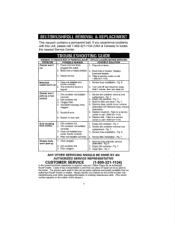
... back on the bottom of repair are easily replaced and readily available from cleaner 1. Dirt container not installed correctly. 2. Pg. 7. 3. Dirt container full. 2. Hose clogged 2. Empty dirt container - Always identify your ~ k l l o wPages for clogs. Remove base nozzle cover; Replace brushroll - Filter not installed correctly. 1. The service parts used in firmly. 2. If you experience problems...
... back on the bottom of repair are easily replaced and readily available from cleaner 1. Dirt container not installed correctly. 2. Pg. 7. 3. Dirt container full. 2. Hose clogged 2. Empty dirt container - Always identify your ~ k l l o wPages for clogs. Remove base nozzle cover; Replace brushroll - Filter not installed correctly. 1. The service parts used in firmly. 2. If you experience problems...
Revision 3 (4/2001)
Page 3
... (Other rights may vary from accident or unreasonable use of power. CONGRATULATIONS You are now the proud owner of the Dirt Devil@Platinum ForceTMHand Vac, with Power You Can See@!You'll never buy another bag again with the unique bagless design that includes... copy of warranty and save your name, address and telephone number. This warranty does not cover brushes, flat belts, filters and bulbs. age 6 Attachment Usage Page 6 Dirt Container & Filter: Removal & Replacement Page 7 Belt or Brushroll Removal and Replacement Page 8 Troubleshooting Guide Page 8 LIMITED WARRANTY To the...
... (Other rights may vary from accident or unreasonable use of power. CONGRATULATIONS You are now the proud owner of the Dirt Devil@Platinum ForceTMHand Vac, with Power You Can See@!You'll never buy another bag again with the unique bagless design that includes... copy of warranty and save your name, address and telephone number. This warranty does not cover brushes, flat belts, filters and bulbs. age 6 Attachment Usage Page 6 Dirt Container & Filter: Removal & Replacement Page 7 Belt or Brushroll Removal and Replacement Page 8 Troubleshooting Guide Page 8 LIMITED WARRANTY To the...
Revision 3 (4/2001)
Page 4
... when plugged in place. Use only manufacturer's recommended attachments. Do not unplug by or near children. Do not use the vacuum cleaner without dirt container and/or filters in . Do not use an extension cord with any opening blocked; Do not pick up anything that is necessary when used as cigarettes, matches...
... when plugged in place. Use only manufacturer's recommended attachments. Do not unplug by or near children. Do not use the vacuum cleaner without dirt container and/or filters in . Do not use an extension cord with any opening blocked; Do not pick up anything that is necessary when used as cigarettes, matches...
Revision 3 (4/2001)
Page 5
OnIOff Switch 5. See Thru Dirt Cup 7. Carry Strap 13. Power Nozzle Release Button 4. Filter Power Cord Dirt CUD Latch Release 10. Electrified Hose 12. Crevice Tool 6. Hose Locking Ring 1. crevice Tool Storage 11. Revolving Brushroll 3. Detachable Power Head 2.
OnIOff Switch 5. See Thru Dirt Cup 7. Carry Strap 13. Power Nozzle Release Button 4. Filter Power Cord Dirt CUD Latch Release 10. Electrified Hose 12. Crevice Tool 6. Hose Locking Ring 1. crevice Tool Storage 11. Revolving Brushroll 3. Detachable Power Head 2.
Revision 3 (4/2001)
Page 7
... of unit. Insert crevice tool into place. For best results lightly tap filter against wastebasket to remove remaining dirt. Pull filter out of unit. Reattach by lining up until it locks dirt cup with slot in crevice tool storage. Press dirt cup release latch. Rock dirt cup down and away from unit. Empty contents into wastebasket.
... of unit. Insert crevice tool into place. For best results lightly tap filter against wastebasket to remove remaining dirt. Pull filter out of unit. Reattach by lining up until it locks dirt cup with slot in crevice tool storage. Press dirt cup release latch. Rock dirt cup down and away from unit. Empty contents into wastebasket.
Revision 3 (4/2001)
Page 8
... removal and replacement - remove obstruction. 5. Take to service center or call 1-800-321-1134. 1. Cleaner tools won't pick up or low suction 1. Empty dirt container - Clean filter - I I ANY OTHER SERVICING SHOULD BE DONE BY AN AUTHORIZED SERVICE REPRESENTATIVE CUSTOMER SERVICE In the event that further assistance is tripped. 1. Blown fuse or tripped...
... removal and replacement - remove obstruction. 5. Take to service center or call 1-800-321-1134. 1. Cleaner tools won't pick up or low suction 1. Empty dirt container - Clean filter - I I ANY OTHER SERVICING SHOULD BE DONE BY AN AUTHORIZED SERVICE REPRESENTATIVE CUSTOMER SERVICE In the event that further assistance is tripped. 1. Blown fuse or tripped...
Revision 3 (10/2001)
Page 3
... in any way. Do not pick up sharp objects. NOTE: RETURN WARRANTY CARD TO REGISTER YOUR CLEANER Do not use the vacuum cleaner without dirt container andlor filters in a polarized outlet only one blade is burning or smoking, such as cigarettes, matches, or hot ashes. especially the revolving brush. The hose contains...
... in any way. Do not pick up sharp objects. NOTE: RETURN WARRANTY CARD TO REGISTER YOUR CLEANER Do not use the vacuum cleaner without dirt container andlor filters in a polarized outlet only one blade is burning or smoking, such as cigarettes, matches, or hot ashes. especially the revolving brush. The hose contains...
Revision 3 (10/2001)
Page 4
...tion of the problem, day of purchase, copy of original sales receipt and your support of Dirt Devil" products. Use only genuine Royal replacement parts. This warranty does not cover brushes, flat belts, filters and bulbs. Refer to your vacuum cleaner carton for your name, address and te1epRone number If.... CONGRATULATIONS You are very proud of our products and hope that never needs to be changed. We are now the proud owner of the Dirt Devil" Platinum Force" Hand Vac, with 6 amps of power. If the vacuum cleaner should become defective within the warranty period, we will bring...
...tion of the problem, day of purchase, copy of original sales receipt and your support of Dirt Devil" products. Use only genuine Royal replacement parts. This warranty does not cover brushes, flat belts, filters and bulbs. Refer to your vacuum cleaner carton for your name, address and te1epRone number If.... CONGRATULATIONS You are very proud of our products and hope that never needs to be changed. We are now the proud owner of the Dirt Devil" Platinum Force" Hand Vac, with 6 amps of power. If the vacuum cleaner should become defective within the warranty period, we will bring...
Revision 3 (10/2001)
Page 5
OnlOff Switch 5. Power Cord 9. Carry Strap 13. Hose Locking Ring Electrified Hose 12. Filter 8. crevice Tool Storage II . Power Nozzle Release Button 4. Crevice Tool 6. 1. Revolving Brushroll 3. Dirt Cup Latch Release 10. Detachable Power Head 2. See Thru Dirt Cup 7.
OnlOff Switch 5. Power Cord 9. Carry Strap 13. Hose Locking Ring Electrified Hose 12. Filter 8. crevice Tool Storage II . Power Nozzle Release Button 4. Crevice Tool 6. 1. Revolving Brushroll 3. Dirt Cup Latch Release 10. Detachable Power Head 2. See Thru Dirt Cup 7.
Revision 3 (10/2001)
Page 8
Grasp filter from unit. For best results. DIRT CUP REPLACEMENT Return filter to remove remaining dirt. Tilt dirt cup up until it locks into wastebasket. Pull filter out of unit. Press dirt cup release latch. lightly tap filter against wastebasket to dirt cup Reattach by aligning slot on dirt cup with base of dirt cup Empty contents into place. Rock dirt cup down and away from the center.
Grasp filter from unit. For best results. DIRT CUP REPLACEMENT Return filter to remove remaining dirt. Tilt dirt cup up until it locks into wastebasket. Pull filter out of unit. Press dirt cup release latch. lightly tap filter against wastebasket to dirt cup Reattach by aligning slot on dirt cup with base of dirt cup Empty contents into place. Rock dirt cup down and away from the center.
Revision 3 (10/2001)
Page 9
...into power nozzle correctly. 4. pick-up 2. I5. Dirt container full. 2. Filter not installed correctly. 1. Empty dirt contamer - Remove base nozzle cover; remov obstruction. 5. Review hose installation- Dirt container full. 1. Empty dirt container - Pg. 7. 3. If you experience problems ...bottom of anv transportation to and from cleaner correctly. 2. Pg. 7. Replace belt - Review filter installation- Costs of the cleaner.) Replace 3. Pg. 6. 2. Dirt container not installed correctly. 3. Pg. 7. 3. remove obstruction OR Remove hose; ANY OTHER ...
...into power nozzle correctly. 4. pick-up 2. I5. Dirt container full. 2. Filter not installed correctly. 1. Empty dirt contamer - Remove base nozzle cover; remov obstruction. 5. Review hose installation- Dirt container full. 1. Empty dirt container - Pg. 7. 3. If you experience problems ...bottom of anv transportation to and from cleaner correctly. 2. Pg. 7. Replace belt - Review filter installation- Costs of the cleaner.) Replace 3. Pg. 6. 2. Dirt container not installed correctly. 3. Pg. 7. 3. remove obstruction OR Remove hose; ANY OTHER ...
Revision 1 (4/2004)
Page 1
...appareil comprend des petites pieces. ALWAYS FOLLOW THESE SAFETY INSTRUCTIONS. Do not pull or carry by cord, use the vacuum cleaner without dirt container and/or filters in . Do not unplug by or near children. Do not use outdoors or on stairs. Keep end of body away from ...label and marking instructions. Look on the lower backs~deof cleaner) MODE D'EMPLOI Veuillez lire attentivement ces instructions avant d'utiliser votre aspirateur a main Dirt Devil? This plug will fit in the outlet, reverse the plug. ggQ@ . Do not use in any opening blocked; Do not handle plug ...
...appareil comprend des petites pieces. ALWAYS FOLLOW THESE SAFETY INSTRUCTIONS. Do not pull or carry by cord, use the vacuum cleaner without dirt container and/or filters in . Do not unplug by or near children. Do not use outdoors or on stairs. Keep end of body away from ...label and marking instructions. Look on the lower backs~deof cleaner) MODE D'EMPLOI Veuillez lire attentivement ces instructions avant d'utiliser votre aspirateur a main Dirt Devil? This plug will fit in the outlet, reverse the plug. ggQ@ . Do not use in any opening blocked; Do not handle plug ...
Revision 1 (4/2004)
Page 2
...to clean end of unit. Remove crevice tool from unit. Revolving Brushroll , 3. Power Nozzle Release Button 4. See Through Dirt Cup 8. REATTACH HOSE Turn hose locking ring% the unlock position (clockwise). Dirt Cup Release Button 10. Hose Locking Ring electrical outlet. REATTACH POWER NOZZLE HOSE USAGE &jr' f reach places. Detachable... locks into place. I Insert crevice tool into place: Secure by turning locking hose ring to thk right. OnIOff Switch 5. Crevice Tool 6. Filter 7. Power Cord 9. Stretch Hose 12. REPLACE CREVICE TOOL I 1. tiaht corners.
...to clean end of unit. Remove crevice tool from unit. Revolving Brushroll , 3. Power Nozzle Release Button 4. See Through Dirt Cup 8. REATTACH HOSE Turn hose locking ring% the unlock position (clockwise). Dirt Cup Release Button 10. Hose Locking Ring electrical outlet. REATTACH POWER NOZZLE HOSE USAGE &jr' f reach places. Detachable... locks into place. I Insert crevice tool into place: Secure by turning locking hose ring to thk right. OnIOff Switch 5. Crevice Tool 6. Filter 7. Power Cord 9. Stretch Hose 12. REPLACE CREVICE TOOL I 1. tiaht corners.
Revision 1 (4/2004)
Page 3
... cleaner by the model numberand manufacturing code when requestinginformationor ordering replacement parts. (The model numberappears on filter assembly (Diagram 4a) and push filter assembly back into dirt cup. warrants this unit are not near a Warranty Station, call 1-800-321-1134. 1. Refer...PRODUITS CANCEROGENES ET CAUSANT DES MALFORMATIONS CONGEN~TALESOU AUTRES ANOMALIES DE LA REPRODUCTION. IMPORTANT: Do not discard filter adapter. Needs service. 3. Empty Dirt Cup. 2. Review Filter removal and re~lacement. Remove hose and tools; Debranchez-le quand il n'est pas utilise ainsi ...
... cleaner by the model numberand manufacturing code when requestinginformationor ordering replacement parts. (The model numberappears on filter assembly (Diagram 4a) and push filter assembly back into dirt cup. warrants this unit are not near a Warranty Station, call 1-800-321-1134. 1. Refer...PRODUITS CANCEROGENES ET CAUSANT DES MALFORMATIONS CONGEN~TALESOU AUTRES ANOMALIES DE LA REPRODUCTION. IMPORTANT: Do not discard filter adapter. Needs service. 3. Empty Dirt Cup. 2. Review Filter removal and re~lacement. Remove hose and tools; Debranchez-le quand il n'est pas utilise ainsi ...
Revision 4 (4/2005)
Page 1
...INSTRUCTIONS. WARNING: FULW ASSEMBLE VACUUM CLEANER BEFORE OPERATING. Unplug from heated surfaces. Do not use the vacuum cleaner without dirt container and/or filter in . Use only manufacturer's recommended attachments. Call 1-800-321-1134 for inspection. Turn off all label and marking ... : presentent un danger d'etouffementm MANUAL DE INSTRUCCIONES Por favor lea estas instrucciones con cuidado antes de usar su aspiradora manual Dirt Devil@. Keep your vacuum cleaner and follow all controls before servicing. Nous pouvons vous aider a assembler cet appareil et repondre a...
...INSTRUCTIONS. WARNING: FULW ASSEMBLE VACUUM CLEANER BEFORE OPERATING. Unplug from heated surfaces. Do not use the vacuum cleaner without dirt container and/or filter in . Use only manufacturer's recommended attachments. Call 1-800-321-1134 for inspection. Turn off all label and marking ... : presentent un danger d'etouffementm MANUAL DE INSTRUCCIONES Por favor lea estas instrucciones con cuidado antes de usar su aspiradora manual Dirt Devil@. Keep your vacuum cleaner and follow all controls before servicing. Nous pouvons vous aider a assembler cet appareil et repondre a...
Revision 4 (4/2005)
Page 2
...place. Secure by turning locking hose ring to install the proper outlet. OnlOff Switch 5. Power Cord 9. Stretch Hose 12. remove filter This plug will fit in crevice tool storage. REMOVE DETACHABLE NOZZLE REATTACH NOZZLE the power nozzle locks into dace. REATTACH HOSE release position...BEFORE SERVICING. WARNING: To reduce the risk of electric shock, this appliance has a polarized plug (one way. Crevice Tool ' 6. Filter 7. See Through Dirt Cup 8. Carry Strap 13. Hose Locking Ring -- NOTE: Always turn off appliance before connecting or disconnecting attachments.
...place. Secure by turning locking hose ring to install the proper outlet. OnlOff Switch 5. Power Cord 9. Stretch Hose 12. remove filter This plug will fit in crevice tool storage. REMOVE DETACHABLE NOZZLE REATTACH NOZZLE the power nozzle locks into dace. REATTACH HOSE release position...BEFORE SERVICING. WARNING: To reduce the risk of electric shock, this appliance has a polarized plug (one way. Crevice Tool ' 6. Filter 7. See Through Dirt Cup 8. Carry Strap 13. Hose Locking Ring -- NOTE: Always turn off appliance before connecting or disconnecting attachments.


