Dewalt DXCMLA3706056 Support and Manuals
Get Help and Manuals for this Dewalt item
View All Support Options Below
Free Dewalt DXCMLA3706056 manuals!
Problems with Dewalt DXCMLA3706056?
Ask a Question
Free Dewalt DXCMLA3706056 manuals!
Problems with Dewalt DXCMLA3706056?
Ask a Question
Popular Dewalt DXCMLA3706056 Manual Pages
Instruction Manual - Page 5
...ambient conditions, proper installations, field modifications, ...gauge to withstand specific operating pressures....factory set operating...parts substitutions to the inner wall of the year shown on your tank warning label. Replace with a new air tank or replace the entire compressor.
• Modifications or attempted repairs...service by the end of the air receiver tank can fill small tires ...
Instruction Manual - Page 8
...173; utho rized parts.
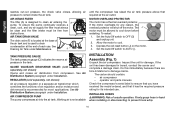
• Never stand on this manual.
• Become into ...understand all instructions and warnings in moving parts.
• Air vents may cover moving parts and ...repairs required on the compressor. Loose clothes, jewelry or long hair can be caught in this product should be performed by a DeWALT factory service center or a DeWALT authorized service...
Instruction Manual - Page 9
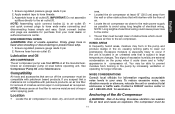
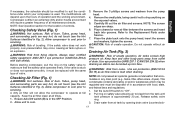
... air tank pressure drops below the factory set cut -in any way.
SAFETY VALVE
This valve (E) is designed to prevent system E
failures by relieving pressure from others before removing or replacing
pressure switch cover. SAVE THESE INSTRUCTIONS FOR FUTURE USE
Know Your Air Compressor
READ THIS OWNER'S MANUAL AND SAFETY RULES BEFORE OPERATING YOUR...
Instruction Manual - Page 10
... parts manuals
Check the compressor's serial label to ensure that you have received the model ordered, and that required at the end of
the air tank and is recommended for its intended use . INSTALLING ... must be free from compressor. MOTOR OVERLOAD PROTECTOR The motor has a thermal overload protector. Set the Auto/Off switch to remain inside the air tank. GLOBE VALVE/AIR DISCHARGE VALVE: ...
Instruction Manual - Page 11
... in
hand when installing or disconnecting to...pump when it cools down and a "milky" appearance in your local dealer or authorized service center. Ensure regulated pressure gauge reads 0 psi. 2.
NOTE: Long lengths of electrical ...compatible with the flow of moisture and oil vapor in the oil, causing running parts to prevent hose whip. 1.
Ensure regulated pressure gauge reads 0 psi. 2. ...
Instruction Manual - Page 14
...switch is put into service and when the check valve or a complete compressor pump has been replaced. 1. Run the...DRAIN VALVE
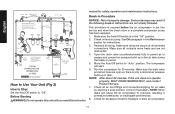
How to Use Your Unit (Fig 3)
How to Stop: Set the Auto/Off switch to "Auto" position. Make sure wires are... operate this unit until you read this instruction
manual for safety, operation and maintenance instructions. Open the drain valve (counterclockwise) fully to permit...
Instruction Manual - Page 16
... unsafe operation. Before performing any maintenance or repair, disconnect power source from service
X++
* To check for air bubbles ...to form.
** The pump oil must be exposed to pressure and after the first 20 hours or operation. Personal injuries can occur.
While compressor is pumping to voltage sources, compressed air, or moving parts...
Instruction Manual - Page 17
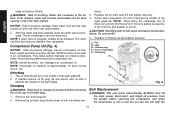
... objects. Allow compressor to cool prior to servicing. WARNING: Risk of unsafe operation. Ensure Auto/Off switch (B) is in Fig. 2). Refer to the Replacement Parts under which may occur, causing air tank .... Release safety valve ring. 3.
Carefully lift out the air filter and screens. Set the Auto/Off switch to cool.
3.
Pull ring on safety valve allowing air ...
Instruction Manual - Page 18
... = Add H = Oil drain plug K = Oil level sight glass G = Oil fill plug
Fig. 4
Belt Replacement
WARNING: This unit starts automatically. tainer. 3. ALWAYS shut off the main power disconnect, and bleed all air pressure. ... use the unit with oil will overflow and appear to release air pressure before servicing the compressor, and when the compressor is added too quickly, it reaches the ...
Instruction Manual - Page 19
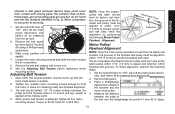
...has been moved from its factory set location, the grooves of the ...screwdriver.
3. Remove the belt and replace with moving parts. When proper belt tension is
...parts are very hot, do not touch (see the Hot Surfaces identified in place for checking pulley and flywheel alignment.
3. Set... pressure from its factory set location, the grooves of....
2.
Set the Auto/Off lever to ...
Instruction Manual - Page 20
...moving parts. Torquing
The air compressor pump head bolts should be no more than 1/16" (1.6 mm) loosen the set screw....servicing, you may be exposed to overwork, resulting in step 2. 8. Set the Auto/Off lever to cool.
To Replace...torqued. Service and Adjustments
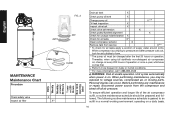
ALL MAINTENANCE AND REPAIR OPERATIONS NOT LISTED MUST BE PERFORMED BY TRAINED SERVICE TECHNICIAN. Before servicing unit ...
Instruction Manual - Page 21
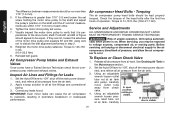
... freely up and down on all service calls:
Model Number Serial Number Date and Place of any accessory for reassembly. 6. Using a screwdriver, carefully push the valve disc up and down . A solvent, such as gasoline engines. Replace the pressure release tube.
WARNING: The use identical replacement parts. Always use of Purchase
Repairs
To assure product SAFETY and...
Instruction Manual - Page 22
... retail purchaser to install, maintain, and operate said equipment in accordance with the specific recommendations of the Manufacturer set forth in repair of the original warranty period. Repairs requiring overtime, weekend rates, or any other charges beyond the standard shop labor rate are not covered.
• Time required for orientation training for the service center to...
Instruction Manual - Page 25
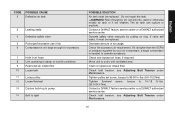
.... If it will weaken.
Check and replace air hose, if required. Clean or replace air intake filter. Check belt tension, see Adjusting Belt Tension under Maintenance.
25
English Tighten pulley set screw, torque to tight
POSSIBLE SOLUTION
Air tank must be replaced. Contact a DeWALT factory service center or a DeWALT authorized service center.
WARNING: Risk of bursting.
Instruction Manual - Page 27
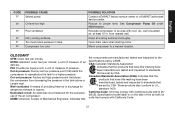
... valve when starting motor.
PSI: Pounds per minute; Reduce to U.L. standard 1450. California Code: Unit may comply with California Code.
27 GLOSSARY
CFM: Cubic feet per minute. a unit of measure of Mechanical Engineers. Indicates that comply with California Code 462 (l) (2)/ (M) (2). Specification/model label is on the side of providing fresh air in . See Compressor Pump...
Dewalt DXCMLA3706056 Reviews
We have not received any reviews for Dewalt yet.