Dewalt DXCMLA1682066 Support and Manuals
Get Help and Manuals for this Dewalt item
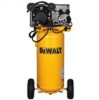
View All Support Options Below
Free Dewalt DXCMLA1682066 manuals!
Problems with Dewalt DXCMLA1682066?
Ask a Question
Free Dewalt DXCMLA1682066 manuals!
Problems with Dewalt DXCMLA1682066?
Ask a Question
Popular Dewalt DXCMLA1682066 Manual Pages
Instruction Manual - Page 5

... specific ...service...installations, field modifications, and the level of which control air tank pressure.
NOTE: Air tanks, compressors and similar equipment used to repair...Replace with a new air tank or replace the entire compressor.
• Modifications or attempted repairs to the air tank.
• Never drill into, weld or make adjustments or parts substitutions to alter the factory set...
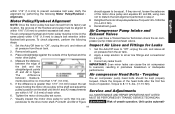
Instruction Manual - Page 8
... Attempting to operate compressor with damaged or missing parts or attempting to repair compressor with protective shrouds removed can expose you to you or others.
• Review and understand all instructions and warnings in this manual.
• Become into contact with... safety features of this product should be performed by a DeWALT factory service center or a DeWALT authorized...
Instruction Manual - Page 9
... reaches the factory set cut -out pressure. When the air compressor
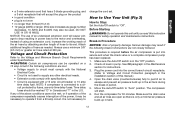
9 Compare the illustrations with the location of various controls and adjustments. NOTE: ALWAYS ensure the switch (B) is too heavy to lift too heavy an object.
SAVE THESE INSTRUCTIONS FOR FUTURE USE
Know Your Air Compressor
READ THIS OWNER'S MANUAL AND SAFETY RULES...
Instruction Manual - Page 11
...damage claims.
The carton should contain: • air compressor • operator and parts manuals
Check the compressor's serial label to remove moisture and oil vapor when spraying paint....you have received the model ordered, and that is required.
INSTALLING HOSES WARNING: Risk of unsafe operation.
Remove hose from your local dealer or authorized service center.
Compatibility
Air ...
Instruction Manual - Page 12

... codes and ordinances.
2. This
plug MUST be properly
grounded.
NOTE: The wiring used must be installed and grounded
in the parts manual, for the electric current.
Grounding Instructions
...If these grounding instructions are external condensation on side of the electrical box should have the installation checked by a qualified
electrician.
• Repairs to the motor ...
Instruction Manual - Page 13
....
(Refer to Voltage and Circuit Protection paragraph in the installation section of hose to
change the cord set. Check oil level in pump. Run the compressor for 30 minutes. Move the Auto/Off switch to a circuit protected by attaching another length of this instruction manual for instructions. 3. Instead of using an extension cord, increase the...
Instruction Manual - Page 14
... installing or disconnecting to the manufacturers instructions.
Close the drain valve. 3. Visually inspect air lines and fittings for air tools and accessories. Turn the regulator knob counterclockwise to set ...the motor will stop the compressor immediately and have it checked by a trained service technician. Shut-down (Fig. 1)
1. English
NOTE: After about 30 minutes, If the unit...
Instruction Manual - Page 15
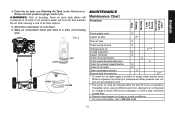
... drive belt
X
Check drive belt tension
X
Check pulley/flywheel alignment
X
Check for unusual noise/vibration
X
Check for air leaks
X*
Clean compressor exterior
X
Remove tank from service
X++
* To check for air bubbles to cool down. 6.
Drain the air tank, see Draining Air Tank under Maintenance.
WARNING: Risk of operation or once a year...
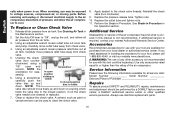
Instruction Manual - Page 18
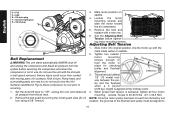
...R = Oil fill plug
Y
U
X
V
W
Belt Replacement
WARNING: This unit starts automatically.
Z
4.
Hot surfaces. Set the Auto/Off lever to "Off", unplug the unit, and... motor toward
the air compressor.
5. Torque to servicing.
1. ALWAYS shut off and unplug the compressor,...original position, line the motor up with moving parts.
Serious injury could occur from the system before ...
Instruction Manual - Page 19
...the
straightedge at points
A1 and A2 in lbs (16.4-20.3 Nm). 9. Reinstall belt guard. Set the Auto/Off lever to "Off", unplug the unit, and relieve all air line fittings and ...to all air pressure from the air tank.
2. Service and Adjustments
ALL MAINTENANCE AND REPAIR OPERATIONS NOT LISTED MUST BE PERFORMED BY TRAINED SERVICE TECHNICIAN. Unit cycles automati-
19 Measure the distance
...
Instruction Manual - Page 20
... only accessories rated equal to voltage sources, compressed air, or moving parts. When servicing, you need assistance in the closed position disc is visible. Release all service calls: Model Number Serial Number Date and Place of Purchase
Repairs
To assure product SAFETY and RELIABILITY, repairs, maintenance and adjustment should move freely up and
down on . NOTE...
Instruction Manual - Page 21
... warranted from date of the Company set forth in accordance with the specific recommendations of purchase.
2 Year - This warranty also does not apply to comply with standard industry practices. What the Company Will Do: (the company) will repair or replace, without the Company's prior written approval. Parts used in repair of corrosion, erosion, surrounding environmental conditions...
Instruction Manual - Page 22

THE COMPANY MAKES NO OTHER WARRANTY OR REPRESENTATION OF ANY KIND WHATSOEVER, EXPRESSED OR IMPLIED, EXCEPT THAT OF TITLE. Troubleshooting Guide
This section provides a list of a qualified DeWALT technician
22
Parts purchased separately: The warranty for parts purchased separately such as: pumps, motors, etc., are as follows:
From Date of Purchase
• All single & two...
Instruction Manual - Page 23
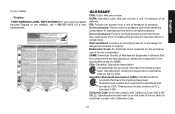
... marking have been manufactured, tested and inspected to the specifications set by CSA. standard 1450. California Code: Unit may comply with California Code.
23 English
or your warning labels become illegible or are missing, call 1-888-895-4549 for dangerous exhaust or vapors. Problem FREE WARNING LABEL REPLACEMENT: If your dealer.
Dedicated circuit: An electrical circuit...
Instruction Manual - Page 25
... ring.
Defective safety valve
Operate safety valve manually by your air compressor, a larger compressor is needed to 85-90 in air hose
Check and replace air hose, if required.
Loose belt
Check belt tension, see Adjusting Belt Tension under Maintenance.
English
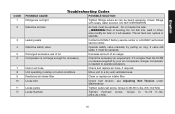
CODE 1 2
3 4 5 6
7 8 9 10 11 12
POSSIBLE CAUSE
Troubleshooting Codes
POSSIBLE SOLUTION
Fittings are not tight...
Dewalt DXCMLA1682066 Reviews
We have not received any reviews for Dewalt yet.