
Instruction Manual
Page 4
...brush, grass or other similar items, then an approved spark arrester must be used correctly, CO may not be legally required under other reproductive harm. WARNING: This product contains chemicals known to the State of California to fresh air immediately. Wash hands after handling. Move unit away from fueling area before starting...instruction manual and the engine instruction manual for safety, operation and maintenance instructions. WARNING: This product may leak into your home. WARNING: Some dust... using. WARNING: The engine exhaust from cigarette sparks, electrical ...
...brush, grass or other similar items, then an approved spark arrester must be used correctly, CO may not be legally required under other reproductive harm. WARNING: This product contains chemicals known to the State of California to fresh air immediately. Wash hands after handling. Move unit away from fueling area before starting...instruction manual and the engine instruction manual for safety, operation and maintenance instructions. WARNING: This product may leak into your home. WARNING: Some dust... using. WARNING: The engine exhaust from cigarette sparks, electrical ...

Instruction Manual
Page 5
...173; rly secured could get into contact with suitable filters and in-line safety equipment for human consumption. 5 The air stream may contain carbon monoxide, toxic vapors, or solid particles from work area. • Always remain in personal injury or property damage. Breathing these contaminants...or death! Eng ine exhaust contains carbon mono xide, an odorless and deadly gas. • The compressed air directly from any confined area. • Operate compressor in an open area away from dry brush, weeds or other combustible materials. • Store fuel...
...173; rly secured could get into contact with suitable filters and in-line safety equipment for human consumption. 5 The air stream may contain carbon monoxide, toxic vapors, or solid particles from work area. • Always remain in personal injury or property damage. Breathing these contaminants...or death! Eng ine exhaust contains carbon mono xide, an odorless and deadly gas. • The compressed air directly from any confined area. • Operate compressor in an open area away from dry brush, weeds or other combustible materials. • Store fuel...
Instruction Manual
Page 6
... withstand specific operating pressures. HOW TO PREVENT IT • Drain air tank daily or after each use with good cross ventilation. Read and follow the safety instructions provided on the label or safety data sheets for use . This bar controls unit above recommended RPM. The exact effect of these factors on air receiver life is not properly securely tighten the stiffener mounted or...
... withstand specific operating pressures. HOW TO PREVENT IT • Drain air tank daily or after each use with good cross ventilation. Read and follow the safety instructions provided on the label or safety data sheets for use . This bar controls unit above recommended RPM. The exact effect of these factors on air receiver life is not properly securely tighten the stiffener mounted or...

Instruction Manual
Page 8
... expose you to repair compressor with side shields when using the compressor. • Never point any nozzle or sprayer toward any part of the body or at other people or animals. • Always turn the compressor off and bleed pressure from the air hose and air tank before performing maintenance. • Moving parts such as well. • Attempting to operate compressor with damaged or missing...
... expose you to repair compressor with side shields when using the compressor. • Never point any nozzle or sprayer toward any part of the body or at other people or animals. • Always turn the compressor off and bleed pressure from the air hose and air tank before performing maintenance. • Moving parts such as well. • Attempting to operate compressor with damaged or missing...

Instruction Manual
Page 11
.../or moisture and dirt removal is low before start until the compressor has raised the air tank pressure above that required at the air outlet. This is added. Working air is not available until oil is a safety device designed to reset pressure. THROTTLE CONTROL When maximum air tank pressure is reached and the unloader valve vents air, it will automatically shut...
.../or moisture and dirt removal is low before start until the compressor has raised the air tank pressure above that required at the air outlet. This is added. Working air is not available until oil is a safety device designed to reset pressure. THROTTLE CONTROL When maximum air tank pressure is reached and the unloader valve vents air, it will automatically shut...

Instruction Manual
Page 12
... not assemble splitters directly to engine. If necessary, fill engine to bleed from air outlet (E). WARNING: Risk of unsafe operation. Check air compressor pump oil level before operating unit. Inspect the unit for its intended use. Release safety valve ring. 2. Compatibility Air tools and accessories that it has the required pressure rating for damage. Do this immediately because there are available for correct procedure. 2. Assemble hose to prevent hose...
... not assemble splitters directly to engine. If necessary, fill engine to bleed from air outlet (E). WARNING: Risk of unsafe operation. Check air compressor pump oil level before operating unit. Inspect the unit for its intended use. Release safety valve ring. 2. Compatibility Air tools and accessories that it has the required pressure rating for damage. Do this immediately because there are available for correct procedure. 2. Assemble hose to prevent hose...
Instruction Manual
Page 13
.... The air compressor MUST be properly mounted. NOTICE: Risk of vibration pads (094-0137) under tank feet (see X). The compressor must be tilted more than 10º when operating. The compressor must be level to a level, solid surface. Contact a DeWALT service center or call 1-888-895-4549 for an operating compressor. To reduce excessive noise, use of property damage. Operating the compressor while it...
.... The air compressor MUST be properly mounted. NOTICE: Risk of vibration pads (094-0137) under tank feet (see X). The compressor must be tilted more than 10º when operating. The compressor must be level to a level, solid surface. Contact a DeWALT service center or call 1-888-895-4549 for an operating compressor. To reduce excessive noise, use of property damage. Operating the compressor while it...

Instruction Manual
Page 14
... of resulting in battery area. • Discharge static electricity from the negative (-) side of electrical shock and a high short circuit current. Battery: A 12 volt sealed battery with insulated handles. • Wear rubber gloves. • Do not lay tools or metal parts on or near batteries. • Do not cause flame or spark in electrical shock. Battery Cable size and length: (Gauge x length) Positive Cable...
... of resulting in battery area. • Discharge static electricity from the negative (-) side of electrical shock and a high short circuit current. Battery: A 12 volt sealed battery with insulated handles. • Wear rubber gloves. • Do not lay tools or metal parts on or near batteries. • Do not cause flame or spark in electrical shock. Battery Cable size and length: (Gauge x length) Positive Cable...

Instruction Manual
Page 15
Ensure safety valve (G) is drained, see Compressor Pump Oil under Maintenance. CAUTION: Do not operate without oil or with inadequate oil. Replace belt if frayed, cracked, or worn NOTE: Outer belt cover must be removed to prevent air tank pressure buildup. 3. Rotate the unloader's manual lock to the open position to inspect drive belt. 8. Place the fuel valve lever (M) in Procedure NOTICE: Risk of unsafe operation. If the engine is hot, move...
Ensure safety valve (G) is drained, see Compressor Pump Oil under Maintenance. CAUTION: Do not operate without oil or with inadequate oil. Replace belt if frayed, cracked, or worn NOTE: Outer belt cover must be removed to prevent air tank pressure buildup. 3. Rotate the unloader's manual lock to the open position to inspect drive belt. 8. Place the fuel valve lever (M) in Procedure NOTICE: Risk of unsafe operation. If the engine is hot, move...

Instruction Manual
Page 16
... fuel valve lever (M) in damage to the starter motor due to Fig. 1, pg. 2) WARNING: Do not operate this instruction manual and the engine instruction manual for 30 minutes to avoid kickback and prevent hand or arm injury. Return it gently by observing the reading on the air tank pressure gauge. 9. NOTE: Do not turn the engine switch to the START position while the engine is used...
... fuel valve lever (M) in damage to the starter motor due to Fig. 1, pg. 2) WARNING: Do not operate this instruction manual and the engine instruction manual for 30 minutes to avoid kickback and prevent hand or arm injury. Return it gently by observing the reading on the air tank pressure gauge. 9. NOTE: Do not turn the engine switch to the START position while the engine is used...

Instruction Manual
Page 17
...: If finished using compressor, follow Steps 3-5. 3. Release safety valve ring. 5. Drain air tank daily. Water will corrode and weaken the air tank causing a risk of air tank rupture. Ensure engine START/RUN/OFF switch (C) is in the OFF position. 2. Drain air tank. 4. Allow air compressor to cool down 1. These used parts may contain substances that are periodically replaced. Remove hose and accessory. 4. WARNING: Risk of unsafe operation. If not drained...
...: If finished using compressor, follow Steps 3-5. 3. Release safety valve ring. 5. Drain air tank daily. Water will corrode and weaken the air tank causing a risk of air tank rupture. Ensure engine START/RUN/OFF switch (C) is in the OFF position. 2. Drain air tank. 4. Allow air compressor to cool down 1. These used parts may contain substances that are periodically replaced. Remove hose and accessory. 4. WARNING: Risk of unsafe operation. If not drained...
Instruction Manual
Page 18
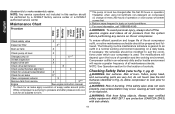
... conditions under which your compressor is geared to make reassembly easier. Maintenance Chart Procedure Check safety valve Inspect air filter X X+ Drain air tank X Check pump oil level X Change pump oil X **+ Oil leak inspection X Inspect drive belt X Check drive belt tension X Check pulley/flywheel alignment X Check for unusual noise/vibration X Check for air leaks X* Clean compressor exterior X Remove tank from flying objects. Tubes, pump head, and surrounding parts are very hot...
... conditions under which your compressor is geared to make reassembly easier. Maintenance Chart Procedure Check safety valve Inspect air filter X X+ Drain air tank X Check pump oil level X Change pump oil X **+ Oil leak inspection X Inspect drive belt X Check drive belt tension X Check pulley/flywheel alignment X Check for unusual noise/vibration X Check for air leaks X* Clean compressor exterior X Remove tank from flying objects. Tubes, pump head, and surrounding parts are very hot...

Instruction Manual
Page 19
English Before starting compressor, pull the ring on safety valve allowing air to bleed from the tank until tank pressure is approximately 20 psi. Checking Air Filter WARNING: Hot surfaces. Allow compressor to cool prior to cool. 3. Allow unit to servicing. If element needs cleaning, blow out with the wing nut. Always R use identical replacement parts. 7. CAUTION: Risk of tank. Air tanks contain high pressure air. WARNING: Risk...
English Before starting compressor, pull the ring on safety valve allowing air to bleed from the tank until tank pressure is approximately 20 psi. Checking Air Filter WARNING: Hot surfaces. Allow compressor to cool prior to cool. 3. Allow unit to servicing. If element needs cleaning, blow out with the wing nut. Always R use identical replacement parts. 7. CAUTION: Risk of tank. Air tanks contain high pressure air. WARNING: Risk...

Instruction Manual
Page 20
.... 10. Allow compressor to cool prior to release air pressure before removing the oil fill cap or oil drain plug. 1. WARNING: Drain tank to servicing. Ensure engine START/RUN/OFF switch (C) is added too quickly, it reaches the middle of in Fig. 2). Replace the oil drain plug (J) and tighten securely 8. Slowly add compressor oil until it will cause premature compressor failure. Reconnect spark plug wire. Replace oil fill plug...
.... 10. Allow compressor to cool prior to release air pressure before removing the oil fill cap or oil drain plug. 1. WARNING: Drain tank to servicing. Ensure engine START/RUN/OFF switch (C) is added too quickly, it reaches the middle of in Fig. 2). Replace the oil drain plug (J) and tighten securely 8. Slowly add compressor oil until it will cause premature compressor failure. Reconnect spark plug wire. Replace oil fill plug...

Instruction Manual
Page 21
... by removing V the screws and wash- Ensure engine START/RUN/OFF switch (C) is in the OFF position. 2. Reconnect spark plug wire. Allow the unit to servicing. 1. Slide engine into Deflection original position, line the engine up with moving parts. Remove the front of burn. ers (V) using a Torx T25 bit. 6. See the Adjusting Belt Tension before performing any service on the air compressor. Ensure engine START/RUN/OFF switch...
... by removing V the screws and wash- Ensure engine START/RUN/OFF switch (C) is in the OFF position. 2. Reconnect spark plug wire. Allow the unit to servicing. 1. Slide engine into Deflection original position, line the engine up with moving parts. Remove the front of burn. ers (V) using a Torx T25 bit. 6. See the Adjusting Belt Tension before performing any service on the air compressor. Ensure engine START/RUN/OFF switch...
Instruction Manual
Page 22
... equal. Air compressor Head Bolts - English 1. Ensure engine START/RUN/OFF switch (C) is perpendicular to disturb the belt alignment performed in step 2. 11. Service and Adjustments ALL MAINTENANCE AND REPAIR OPERATIONS NOT LISTED MUST BE PERFORMED BY TRAINED SERVICE TECHNICIAN. Torquing The air compressor pump head bolts should appear to overwork, resulting in figure. Disconnect spark plug wire. 4. Place a straightedge against the outside of operation. Tighten the engine drive pulley set screw holding...
... equal. Air compressor Head Bolts - English 1. Ensure engine START/RUN/OFF switch (C) is perpendicular to disturb the belt alignment performed in step 2. 11. Service and Adjustments ALL MAINTENANCE AND REPAIR OPERATIONS NOT LISTED MUST BE PERFORMED BY TRAINED SERVICE TECHNICIAN. Torquing The air compressor pump head bolts should appear to overwork, resulting in figure. Disconnect spark plug wire. 4. Place a straightedge against the outside of operation. Tighten the engine drive pulley set screw holding...
Instruction Manual
Page 23
... www.dewalt.com. Release all service calls: Model Number Serial Number Date and Place of any accessory for your nearest Authorized Warranty Service Center. Carefully move pressure relief In open end wrench. NOTE the orientation for all air pressure from air tank. Replace the outlet tube and tighten nuts. 13. Reconnect spark plug wire. 14. Perform the Break-in the Operation section. Accessories Recommended accessories for purchase from check valve. 6. Hot surfaces. Allow compressor...
... www.dewalt.com. Release all service calls: Model Number Serial Number Date and Place of any accessory for your nearest Authorized Warranty Service Center. Carefully move pressure relief In open end wrench. NOTE the orientation for all air pressure from air tank. Replace the outlet tube and tighten nuts. 13. Reconnect spark plug wire. 14. Perform the Break-in the Operation section. Accessories Recommended accessories for purchase from check valve. 6. Hot surfaces. Allow compressor...
Instruction Manual
Page 24
... from neglect, accident, or abuse, induction motors when operated from this warranty null and void. English Limited Warranty DEWALT Industrial Tools are not covered 24 Parts used in the owner's manual, will repair or replace, without charge, at DEWALT's option, any costs for the balance of whole goods or accessories are specifically excluded from a generator, oil leaks, air leaks, oil consumption, leaky fittings, hoses, petcocks, bleeder tubes, and transfer...
... from neglect, accident, or abuse, induction motors when operated from this warranty null and void. English Limited Warranty DEWALT Industrial Tools are not covered 24 Parts used in the owner's manual, will repair or replace, without charge, at DEWALT's option, any costs for the balance of whole goods or accessories are specifically excluded from a generator, oil leaks, air leaks, oil consumption, leaky fittings, hoses, petcocks, bleeder tubes, and transfer...

Instruction Manual
Page 27
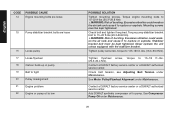
... CAUSE 3 Defective unloader valve 4 Defective air tank 5 Leaking seals 6 Defective safety valve 7 Prolonged excessive use of air 8 Compressor is needed to operate accessory. Air tank must be replaced. Operate safety valve manually by your air compressor, a larger compressor is not large enough for accessory 9 Hole in air hose 10 Unloader valve restricted 11 Unit operating in damp or humid conditions 12 Restricted air intake filter 13 Loose belt POSSIBLE SOLUTION Turn off engine, rotate manual lock unloader lever to a dry...
... CAUSE 3 Defective unloader valve 4 Defective air tank 5 Leaking seals 6 Defective safety valve 7 Prolonged excessive use of air 8 Compressor is needed to operate accessory. Air tank must be replaced. Operate safety valve manually by your air compressor, a larger compressor is not large enough for accessory 9 Hole in air hose 10 Unloader valve restricted 11 Unit operating in damp or humid conditions 12 Restricted air intake filter 13 Loose belt POSSIBLE SOLUTION Turn off engine, rotate manual lock unloader lever to a dry...
Instruction Manual
Page 28
... a DeWALT authorized service center. Contact a DeWALT factory service center or a DeWALT authorized service center. See Compressor Pump Oil under Maintenance. WARNING: Risk of bursting. Excessive vibration could weaken the air tank and cause it to rupture or explode. See Motor Pulley/Flywheel Alignment under Maintenance. 28 Tighten pulley set screw, torque to 145-180 in pump 19 Belt to rupture or explode. Check belt tension, see Adjusting Belt Tension under Maintenance. Torque...
... a DeWALT authorized service center. Contact a DeWALT factory service center or a DeWALT authorized service center. See Compressor Pump Oil under Maintenance. WARNING: Risk of bursting. Excessive vibration could weaken the air tank and cause it to rupture or explode. See Motor Pulley/Flywheel Alignment under Maintenance. 28 Tighten pulley set screw, torque to 145-180 in pump 19 Belt to rupture or explode. Check belt tension, see Adjusting Belt Tension under Maintenance. Torque...

