Instruction Manual
Page 3
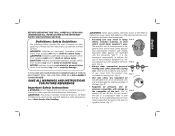
...the State of severity for safety, operation and maintenance instructions. Wash hands after handling. It is the employer's responsibility to cause cancer, birth defects or other protection during use. Use air pressure compatible with the characters "Z87.1". Definitions: Safety Guidelines The definitions below ...OR COMMENTS ABOUT THIS OR ANY DEWALT TOOL, CALL US TOLL FREE AT: 1-800-4-DEWALT (1-800-433-9258) SAVE ALL WARNINGS AND INSTRUCTIONS FOR FUTURE REFERENCE Important Safety Instructions WARNING: Do not operate this unit until you read the manual and pay attention to FIG....
...the State of severity for safety, operation and maintenance instructions. Wash hands after handling. It is the employer's responsibility to cause cancer, birth defects or other protection during use. Use air pressure compatible with the characters "Z87.1". Definitions: Safety Guidelines The definitions below ...OR COMMENTS ABOUT THIS OR ANY DEWALT TOOL, CALL US TOLL FREE AT: 1-800-4-DEWALT (1-800-433-9258) SAVE ALL WARNINGS AND INSTRUCTIONS FOR FUTURE REFERENCE Important Safety Instructions WARNING: Do not operate this unit until you read the manual and pay attention to FIG....
Instruction Manual
Page 4
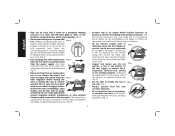
... pneumatic tools. Do not carry tool to power this tool. Do not make adjustments, remove magazine, perform maintenance or clear jammed fasteners while connected to become inoperable. The tool driving mechanism may result. (Fig. Make daily inspections for use bottled gases to another operator. I ) • Always assume that relieve all pressure FIG. Leaking air, damaged parts or missing parts should be repaired or replaced before use . (Fig. I operate a tool if...
... pneumatic tools. Do not carry tool to power this tool. Do not make adjustments, remove magazine, perform maintenance or clear jammed fasteners while connected to become inoperable. The tool driving mechanism may result. (Fig. Make daily inspections for use bottled gases to another operator. I ) • Always assume that relieve all pressure FIG. Leaking air, damaged parts or missing parts should be repaired or replaced before use . (Fig. I operate a tool if...
Instruction Manual
Page 5
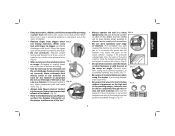
... snarled hoses can be locked in the compressor is clear of the wood (shiner), causing it should be driven completely through . (Fig. N lighted area. O) • Be aware of obstructions FIG. English • Keep bystanders, children, and visitors away while operating a power tool. Using the trigger lock-off will prevent accidental discharge. • Do not overreach. Do not use . Discharged fasteners FIG. Drive...
... snarled hoses can be locked in the compressor is clear of the wood (shiner), causing it should be driven completely through . (Fig. N lighted area. O) • Be aware of obstructions FIG. English • Keep bystanders, children, and visitors away while operating a power tool. Using the trigger lock-off will prevent accidental discharge. • Do not overreach. Do not use . Discharged fasteners FIG. Drive...

Instruction Manual
Page 6
... workpiece. • DEPTH ADJUSTMENT: To reduce risk of triggering method is allowed to adjust depth, ALWAYS; • Disconnect air supply • Avoid contact with trigger during adjustments 4 SEQUENTIAL ACTION TRIGGER • When using the contact action trigger, be fired. • Choice of serious injury from tool recoil. Unwanted fasteners may also cause a spark. (Fig. English • Keep hands and body parts clear of FIG...
... workpiece. • DEPTH ADJUSTMENT: To reduce risk of triggering method is allowed to adjust depth, ALWAYS; • Disconnect air supply • Avoid contact with trigger during adjustments 4 SEQUENTIAL ACTION TRIGGER • When using the contact action trigger, be fired. • Choice of serious injury from tool recoil. Unwanted fasteners may also cause a spark. (Fig. English • Keep hands and body parts clear of FIG...
Instruction Manual
Page 7
... WARNINGS AND INSTRUCTIONS FOR FUTURE REFERENCE Tool Specifications MODEL DWSL18CAP DESCRIPTION 18 Gauge Cap Stapler ENGINE TYPE Oil-Free OPERATION PRESSURE RANGE 70-120 psi (4.9 to 8.43 kg/cm2) MAXIMUM OPERATION PRESSURE 120 psi (8.43 kg/cm2) AIR CONSUMPTION AT A RATE OF 60 FASTENERS PER MINUTE * 2.68 cfm (75.9 lt/min) @ 80 psi (5.6 kg/cm2) FASTENER CROWN SIZE 5/16" (7.9 mm) FASTENER GAUGE 18 Gauge FASTENER...
... WARNINGS AND INSTRUCTIONS FOR FUTURE REFERENCE Tool Specifications MODEL DWSL18CAP DESCRIPTION 18 Gauge Cap Stapler ENGINE TYPE Oil-Free OPERATION PRESSURE RANGE 70-120 psi (4.9 to 8.43 kg/cm2) MAXIMUM OPERATION PRESSURE 120 psi (8.43 kg/cm2) AIR CONSUMPTION AT A RATE OF 60 FASTENERS PER MINUTE * 2.68 cfm (75.9 lt/min) @ 80 psi (5.6 kg/cm2) FASTENER CROWN SIZE 5/16" (7.9 mm) FASTENER GAUGE 18 Gauge FASTENER...
Instruction Manual
Page 8
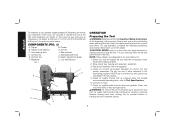
... solvents inside the tool. Depth adjustment wheel F. Low nail indicator FIG. 1 A J I . For safe operation, complete the following procedures and checks before performing maintenance, clearing a jammed fastener, leaving work area, moving tool to another location or handing the tool to operate the tool at the beginning of this tool. Connect air hose. 7. COMPONENTS (FIG. 1) A. Pusher B. Air inlet C. Adjustable belt hook E. Always wear eye and ear protection when operating this manual. Keep the...
... solvents inside the tool. Depth adjustment wheel F. Low nail indicator FIG. 1 A J I . For safe operation, complete the following procedures and checks before performing maintenance, clearing a jammed fastener, leaving work area, moving tool to another location or handing the tool to operate the tool at the beginning of this tool. Connect air hose. 7. COMPONENTS (FIG. 1) A. Pusher B. Air inlet C. Adjustable belt hook E. Always wear eye and ear protection when operating this manual. Keep the...
Instruction Manual
Page 9
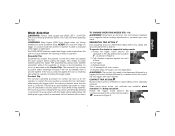
The DWSL18CAP features a selectable trigger system that allows the user to choose between the following modes of operation Sequential Trip Sequential trip requires the operator to recontact the work surface with finger on trigger. All pneumatic tools are available: place actuation and bump actuation. TO CHANGE OPERATING MODES (FIG. 1-3) WARNING: Disconnect air line from tool and remove fasteners from trigger when not driving fasteners to recoil...
The DWSL18CAP features a selectable trigger system that allows the user to choose between the following modes of operation Sequential Trip Sequential trip requires the operator to recontact the work surface with finger on trigger. All pneumatic tools are available: place actuation and bump actuation. TO CHANGE OPERATING MODES (FIG. 1-3) WARNING: Disconnect air line from tool and remove fasteners from trigger when not driving fasteners to recoil...

Instruction Manual
Page 10
.... Push the contact trip against the work surface. WARNING: Remove all fasteners from magazine before performing tool operation check. B. Pull the trigger and press the contact trip against the work surface. With finger off engaged in the locked position when the tool is not in use . CONTACT TRIP ACTION A. THE TOOL MUST NOT CYCLE. C. Load the staples. 3. As long as the...
.... Push the contact trip against the work surface. WARNING: Remove all fasteners from magazine before performing tool operation check. B. Pull the trigger and press the contact trip against the work surface. With finger off engaged in the locked position when the tool is not in use . CONTACT TRIP ACTION A. THE TOOL MUST NOT CYCLE. C. Load the staples. 3. As long as the...
Instruction Manual
Page 11
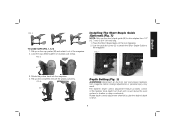
... remove the plastic pull string. Load the caps (held together on the tool magazine. 2. Pull up on the cap pusher (M) and rotate it out of drive. 9 FIG. 6 M Depth Setting (Fig. 1) WARNING: Disconnect air line from tool and remove fasteners from 1/2" (12.7 mm) to shallow or deep countersink. FIG. 5 Installing The Short Staple Guide (Optional) (Fig. 7) NOTE: Only use the short staple guide (N) to drive...
... remove the plastic pull string. Load the caps (held together on the tool magazine. 2. Pull up on the cap pusher (M) and rotate it out of drive. 9 FIG. 6 M Depth Setting (Fig. 1) WARNING: Disconnect air line from tool and remove fasteners from 1/2" (12.7 mm) to shallow or deep countersink. FIG. 5 Installing The Short Staple Guide (Optional) (Fig. 7) NOTE: Only use the short staple guide (N) to drive...
Instruction Manual
Page 12
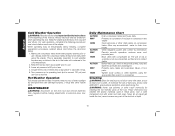
... to use . 3. Lower air pressure to lubricate o-rings. 5. However, keep tool out of direct sunlight as they tend to use . Allow any moisture in the air in the tanks will condense in these parts. English Cold Weather Operation WARNING: Read the section titled Important Safety Instructions at least once daily while using the appropriate hex wrench or screwdriver Cleaning WARNING: Blow dirt and dust out...
... to use . 3. Lower air pressure to lubricate o-rings. 5. However, keep tool out of direct sunlight as they tend to use . Allow any moisture in the air in the tanks will condense in these parts. English Cold Weather Operation WARNING: Read the section titled Important Safety Instructions at least once daily while using the appropriate hex wrench or screwdriver Cleaning WARNING: Blow dirt and dust out...

Instruction Manual
Page 13
... tool and replace worn parts caused by DEWALT, have other than those offered by normal use of such accessories with your product. • CONFIRMATION OF OWNERSHIP: In case of this product. This warranty does not apply to faulty materials or workmanship for use identical replacement parts. Always use with this section. DEWALT tools are covered by our: 1 YEAR FREE SERVICE DEWALT will repair, without charge, any adjustments or servicing this tool...
... tool and replace worn parts caused by DEWALT, have other than those offered by normal use of such accessories with your product. • CONFIRMATION OF OWNERSHIP: In case of this product. This warranty does not apply to faulty materials or workmanship for use identical replacement parts. Always use with this section. DEWALT tools are covered by our: 1 YEAR FREE SERVICE DEWALT will repair, without charge, any adjustments or servicing this tool...
Instruction Manual
Page 14
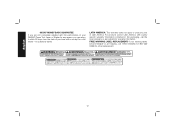
... the packaging, call 1-800-4-DEWALT (1-800-4339258) for a free replacement. 12 no questions asked. FREE WARNING LABEL REPLACEMENT: If your DEWALT Power Tool, Laser, or Stapler for any reason, you are missing, call the local company or see website for warranty information. LATIN AMERICA: This warranty does not apply to products sold in Latin America, see country specific warranty information contained in Latin...
... the packaging, call 1-800-4-DEWALT (1-800-4339258) for a free replacement. 12 no questions asked. FREE WARNING LABEL REPLACEMENT: If your DEWALT Power Tool, Laser, or Stapler for any reason, you are missing, call the local company or see website for warranty information. LATIN AMERICA: This warranty does not apply to products sold in Latin America, see country specific warranty information contained in Latin...
Instruction Manual
Page 15
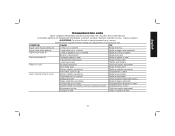
... air supply equipment Worn head valve Replace head valve Broken cylinder cap spring Replace cylinder cap spring Head valve stuck in cap Disassemble / Check Lack of serious personal injury, remove fasteners from magazine before making any adjustments or servicing this tool. English TROUBLESHOOTING GUIDE MANY COMMON PROBLEMS CAN BE SOLVED EASILY BY UTILIZING THE CHART BELOW. WARNING: To reduce the risk of power; slow to cycle Broken cylinder cap spring Replace...
... air supply equipment Worn head valve Replace head valve Broken cylinder cap spring Replace cylinder cap spring Head valve stuck in cap Disassemble / Check Lack of serious personal injury, remove fasteners from magazine before making any adjustments or servicing this tool. English TROUBLESHOOTING GUIDE MANY COMMON PROBLEMS CAN BE SOLVED EASILY BY UTILIZING THE CHART BELOW. WARNING: To reduce the risk of power; slow to cycle Broken cylinder cap spring Replace...
Instruction Manual
Page 16
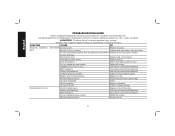
... gasket Tighten screws/replace gasket Trigger valve O-ring cut/worn Replace O-ring Broken/chipped driver Replace driver (check piston ring) Dry/dirty magazine Clean Worn magazine Replace magazine Clogged air filter Clean or replace air filter Fasteners jam in tool Driver channel worn Replace nose/check door Wrong size fasteners Use only recommended fasteners Bent fasteners Discontinue using these fasteners Loose magazine/nose screws Tighten all screws Broken/chipped driver Replace driver 14 English TROUBLESHOOTING GUIDE MANY COMMON PROBLEMS...
... gasket Tighten screws/replace gasket Trigger valve O-ring cut/worn Replace O-ring Broken/chipped driver Replace driver (check piston ring) Dry/dirty magazine Clean Worn magazine Replace magazine Clogged air filter Clean or replace air filter Fasteners jam in tool Driver channel worn Replace nose/check door Wrong size fasteners Use only recommended fasteners Bent fasteners Discontinue using these fasteners Loose magazine/nose screws Tighten all screws Broken/chipped driver Replace driver 14 English TROUBLESHOOTING GUIDE MANY COMMON PROBLEMS...

