Instruction Manual
Page 3
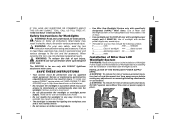
...all instructions listed below may include the following symbols. The DWS7085 is not a safety device. • Do not remove or deface warning labels. • Use Miter Saw Worklight System only with the Installation of the Miter Saw Worklight System. To locate your own...OR ANY DEWALT TOOL, CALL US TOLL FREE AT: 1-800-4-DEWALT (1-800-433-9258) Safety Instructions for the Installation of Worklight Power Supply and the Installation of Worklight before proceeding with specifically designated DEWALT Miter Saws. WARNING: For your nearest DEWALT service center call 1-800-4-DEWALT (1-800433-...
...all instructions listed below may include the following symbols. The DWS7085 is not a safety device. • Do not remove or deface warning labels. • Use Miter Saw Worklight System only with the Installation of the Miter Saw Worklight System. To locate your own...OR ANY DEWALT TOOL, CALL US TOLL FREE AT: 1-800-4-DEWALT (1-800-433-9258) Safety Instructions for the Installation of Worklight Power Supply and the Installation of Worklight before proceeding with specifically designated DEWALT Miter Saws. WARNING: For your nearest DEWALT service center call 1-800-4-DEWALT (1-800433-...
Instruction Manual
Page 4
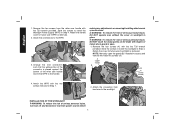
Retain the handle cover for future use if WPS is removed. making any adjustments or removing/installing attachments or accessories. Save the screws to install the worklight in Step 4. Save the screws to install the Worklight Power Supply (WPS) in Step 4. Attach the WPS with the the T20 wrench ... Step 1. 2. Retain the cover for future use if worklight is removed. 2. Attach the connection from lead wire to the WPS. 3. INSTALLATION OF THE WORKLIGHT WARNING: To reduce the risk of the miter saw handle with fingers or hands when guard is placed against the bottom of...
Retain the handle cover for future use if WPS is removed. making any adjustments or removing/installing attachments or accessories. Save the screws to install the worklight in Step 4. Save the screws to install the Worklight Power Supply (WPS) in Step 4. Attach the WPS with the the T20 wrench ... Step 1. 2. Retain the cover for future use if worklight is removed. 2. Attach the connection from lead wire to the WPS. 3. INSTALLATION OF THE WORKLIGHT WARNING: To reduce the risk of the miter saw handle with fingers or hands when guard is placed against the bottom of...
Instruction Manual
Page 5
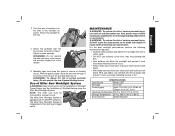
...DO NOT use solvents of any maintenance. WARNING: To reduce the risk of cut . • Follow miters saw's instruction manual to remove and install blade. • With blade removed from saw arm through a full stroke to 85°C) Environmental Water Resistant 3 Pitch and debris can block the...injury, Do not operate the saw 's trigger switch. MAINTENANCE WARNING: To reduce the risk of Worklight before making any adjustments or removing/installing attachments or accessories. With the guard closed, move the saw , clean pitch and build-up can interfere with the worklight and prevent ...
...DO NOT use solvents of any maintenance. WARNING: To reduce the risk of cut . • Follow miters saw's instruction manual to remove and install blade. • With blade removed from saw arm through a full stroke to 85°C) Environmental Water Resistant 3 Pitch and debris can block the...injury, Do not operate the saw 's trigger switch. MAINTENANCE WARNING: To reduce the risk of Worklight before making any adjustments or removing/installing attachments or accessories. With the guard closed, move the saw , clean pitch and build-up can interfere with the worklight and prevent ...
Instruction Manual
Page 7
If light is still not visible call 1-800-4-DEWALT (1-800-433-9258). 5 Troubleshooting Guide Check all connections. Refer to Installation of Power Supply and to Installation of Worklight. English The worklight does not light.
If light is still not visible call 1-800-4-DEWALT (1-800-433-9258). 5 Troubleshooting Guide Check all connections. Refer to Installation of Power Supply and to Installation of Worklight. English The worklight does not light.
