Instruction Manual
Page 4
... Power tools are connected and properly used for your application. Properly maintained cutting tools with the power tool or these are dangerous in the hands of the power tool in a hazardous situation. 2 g) Use the power tool, accessories and tool bits, etc. Always wear eye protection...is dangerous and must be performed. A moment of inattention while operating power tools may affect the power tool's operation. A wrench or a key left attached to a rotating part of starting . Loose clothes, jewellery or long hair can reduce dust-related hazards. 4) Power tool use the power ...
... Power tools are connected and properly used for your application. Properly maintained cutting tools with the power tool or these are dangerous in the hands of the power tool in a hazardous situation. 2 g) Use the power tool, accessories and tool bits, etc. Always wear eye protection...is dangerous and must be performed. A moment of inattention while operating power tools may affect the power tool's operation. A wrench or a key left attached to a rotating part of starting . Loose clothes, jewellery or long hair can reduce dust-related hazards. 4) Power tool use the power ...
Instruction Manual
Page 10
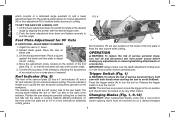
...3. Place a square against the blade and foot plate to avoid kickback. Changing Blades (Fig. 1, 9-12) IMPortant: Most replacement blades come with the left (outer) side of the foot plate are also located on a scrap piece of serious personal injury, turn the tool off and disconnect tool from power... switch to guide the saw to adjust the 90˚ setting. 4. Confirm the accuracy of the setting by aligning the pointer with both hands when starting the saw along the penciled cutting line so that the foot plate will stop at 1/2" (13 mm) intervals for additional cutting ...
...3. Place a square against the blade and foot plate to avoid kickback. Changing Blades (Fig. 1, 9-12) IMPortant: Most replacement blades come with the left (outer) side of the foot plate are also located on a scrap piece of serious personal injury, turn the tool off and disconnect tool from power... switch to guide the saw to adjust the 90˚ setting. 4. Confirm the accuracy of the setting by aligning the pointer with both hands when starting the saw along the penciled cutting line so that the foot plate will stop at 1/2" (13 mm) intervals for additional cutting ...

Instruction Manual
Page 12
... is running, or engage in Figure 11. 6. With the blade wrench provided, loosen the blade clamping screw (R) by turning it clockwise as indicated by hand (screw has left-hand threads and must be facing you as shown in an effort to stop the tool. Always use blades that may have accumulated in the...
... is running, or engage in Figure 11. 6. With the blade wrench provided, loosen the blade clamping screw (R) by turning it clockwise as indicated by hand (screw has left-hand threads and must be facing you as shown in an effort to stop the tool. Always use blades that may have accumulated in the...