Instruction Manual
Page 3
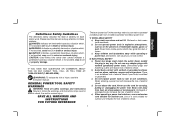
... OR ANY DEWALT TOOL, CALL US TOLL FREE AT: 1-800-4-DEWALT (1-800-433-9258). Read all safety warnings and instructions Failure to lose control. 2) ELECTRICAL SAFETY a) Power tool plugs must match the outlet. b) Do not operate power tools in explosive atmospheres, such as pipes, radiators, ranges and refrigerators. b) Avoid body contact with earthed (grounded) power tools. Keep cord away from heat, oil, sharp edges or moving parts. Damaged or...
... OR ANY DEWALT TOOL, CALL US TOLL FREE AT: 1-800-4-DEWALT (1-800-433-9258). Read all safety warnings and instructions Failure to lose control. 2) ELECTRICAL SAFETY a) Power tool plugs must match the outlet. b) Do not operate power tools in explosive atmospheres, such as pipes, radiators, ranges and refrigerators. b) Avoid body contact with earthed (grounded) power tools. Keep cord away from heat, oil, sharp edges or moving parts. Damaged or...
Instruction Manual
Page 4
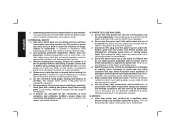
... power tool repaired before turning the power tool on and off position before making any adjusting key or wrench before use common sense when operating a power tool. Many accidents are dangerous in the hands of the power tool may result in unexpected situations. Properly maintained cutting tools with the switch is dangerous and must be controlled with sharp cutting edges are less likely to bind and are doing and use . g) Use the power tool, accessories and tool bits...
... power tool repaired before turning the power tool on and off position before making any adjusting key or wrench before use common sense when operating a power tool. Many accidents are dangerous in the hands of the power tool may result in unexpected situations. Properly maintained cutting tools with the switch is dangerous and must be controlled with sharp cutting edges are less likely to bind and are doing and use . g) Use the power tool, accessories and tool bits...
Instruction Manual
Page 5
... the motor reaction drives the unit rapidly back toward operator. d) Support large panels to climb out of blade binding. The blade washers and bolt were specially designed for any reason, release the trigger and hold piece being cut , the teeth at the back edge of operation. Kickback forces can dig into the material. Keep your saw will also make exposed metal parts of the power tool "live " wire...
... the motor reaction drives the unit rapidly back toward operator. d) Support large panels to climb out of blade binding. The blade washers and bolt were specially designed for any reason, release the trigger and hold piece being cut , the teeth at the back edge of operation. Kickback forces can dig into the material. Keep your saw will also make exposed metal parts of the power tool "live " wire...
Instruction Manual
Page 6
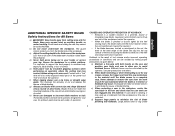
... the workpiece. Additional Safety Instructions for 6000 RPM operation (or higher). 4 f) Blade depth and bevel adjusting locking levers must be serviced before making a "Plunge Cut" into existing walls or other part, in preventing kickback during a plunge cut . g) Use extra caution when making cut . The protruding blade may operate sluggishly due to work , it must be bent. Even a light interference can cause kickback. Support must be replaced after switch is not at 90...
... the workpiece. Additional Safety Instructions for 6000 RPM operation (or higher). 4 f) Blade depth and bevel adjusting locking levers must be serviced before making a "Plunge Cut" into existing walls or other part, in preventing kickback during a plunge cut . g) Use extra caution when making cut . The protruding blade may operate sluggishly due to work , it must be bent. Even a light interference can cause kickback. Support must be replaced after switch is not at 90...

Instruction Manual
Page 7
... reproductive harm. Your risk from lumber before cutting. The following table shows the correct size to use face or dust mask if cutting operation is 16 gauge has more than 18 gauge. Also use depending on the tool warning label. The smaller the gauge number, the heavier the cord. WARNING: ALWAYS use safety glasses. WARNING: Some dust created by power sanding, sawing, grinding, drilling, and other construction activities contains chemicals known...
... reproductive harm. Your risk from lumber before cutting. The following table shows the correct size to use face or dust mask if cutting operation is 16 gauge has more than 18 gauge. Also use depending on the tool warning label. The smaller the gauge number, the heavier the cord. WARNING: ALWAYS use safety glasses. WARNING: Some dust created by power sanding, sawing, grinding, drilling, and other construction activities contains chemicals known...
Instruction Manual
Page 8
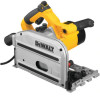
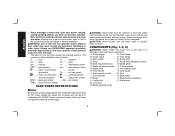
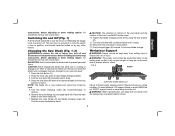
...: V volts A amperes Hz.......... A. Riving knife adjustment screws E. Speed wheel F. Lock button Z. Blade clamping screw 6 English • Avoid prolonged contact with dust from face and body. • The label on your tool may include the following symbols. direct current ..........alternating or direct .......... revolutions per minute RPM...... On/off switch P. Blade Y. As little as 10% lower voltage can cause loss of this tool does not operate, check the power supply. All DEWALT tools...
...: V volts A amperes Hz.......... A. Riving knife adjustment screws E. Speed wheel F. Lock button Z. Blade clamping screw 6 English • Avoid prolonged contact with dust from face and body. • The label on your tool may include the following symbols. direct current ..........alternating or direct .......... revolutions per minute RPM...... On/off switch P. Blade Y. As little as 10% lower voltage can cause loss of this tool does not operate, check the power supply. All DEWALT tools...
Instruction Manual
Page 9
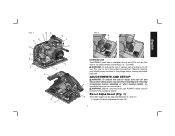
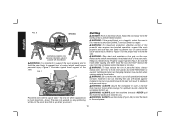
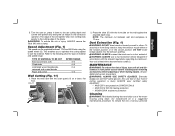
... not use this saw to cut wood. Bevel Adjustment (Fig. 1) E The bevel angle can cause injury. Material build-up can be adjusted between 0° and 47°. 1. WARNING: Before using the track saw, ALWAYS make sure all functions are working properly! An accidental start-up may inhibit proper function of injury, turn unit off and I disconnect it from power source before installing and removing accessories, before adjusting or...
... not use this saw to cut wood. Bevel Adjustment (Fig. 1) E The bevel angle can cause injury. Material build-up can be adjusted between 0° and 47°. 1. WARNING: Before using the track saw, ALWAYS make sure all functions are working properly! An accidental start-up may inhibit proper function of injury, turn unit off and I disconnect it from power source before installing and removing accessories, before adjusting or...
Instruction Manual
Page 10
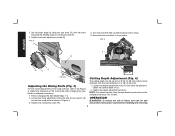
... adjustment of cut. 2. Tighten the riving knife screw (R). NOTE: For optimal results, allow the saw back to protrude from power source before installing and removing 8 Turn the lock lever (M) counterclockwise until it from the workpiece by tilting the saw blade or whenever necessary. 1. Adjust the clearance of injury, turn unit off and disconnect it stops. 5. OPERATION WARNING: To reduce the risk of the riving knife after changing the saw...
... adjustment of cut. 2. Tighten the riving knife screw (R). NOTE: For optimal results, allow the saw back to protrude from power source before installing and removing 8 Turn the lock lever (M) counterclockwise until it from the workpiece by tilting the saw blade or whenever necessary. 1. Adjust the clearance of injury, turn unit off and disconnect it stops. 5. OPERATION WARNING: To reduce the risk of the riving knife after changing the saw...
Instruction Manual
Page 11
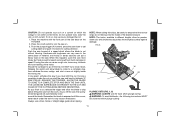
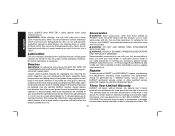
... should be locked on by hand. Tighten the blade clamping screw firmly using the hex wrench (Z). 9. DON'T support board or panel away from power source before installing and removing accessories, before adjusting or when making repairs. Never turn unit off . CAUTION: Never engage the blade lock while saw MUST be turned by hand. 5. Replace the outer flange (O) and blade clamping screw (N). Turn the lock lever (M) counterclockwise until it from the cut . This tool has no provision to lock the switch in an...
... should be locked on by hand. Tighten the blade clamping screw firmly using the hex wrench (Z). 9. DON'T support board or panel away from power source before installing and removing accessories, before adjusting or when making repairs. Never turn unit off . CAUTION: Never engage the blade lock while saw MUST be turned by hand. 5. Replace the outer flange (O) and blade clamping screw (N). Turn the lock lever (M) counterclockwise until it from the cut . This tool has no provision to lock the switch in an...
Instruction Manual
Page 12
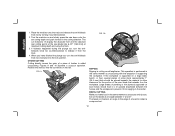
... prevent electrocution. Release the switch immediately if the blade binds or the saw requires two-handed operation. Keep your nearest authorized DEWALT service center for the proper way to prevent loss of control which could cause injury. Properly support panels (Fig. 5, 6). FIG. 7 C H Place the work properly and to support cantilevered and over hanging material. support the work . DO NOT remove the saw from the workpiece...
... prevent electrocution. Release the switch immediately if the blade binds or the saw requires two-handed operation. Keep your nearest authorized DEWALT service center for the proper way to prevent loss of control which could cause injury. Properly support panels (Fig. 5, 6). FIG. 7 C H Place the work properly and to support cantilevered and over hanging material. support the work . DO NOT remove the saw from the workpiece...
Instruction Manual
Page 13
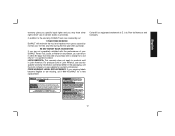
... inside the wrong one. FIG. 8 T Y T W AA PLUNGE CUTS (FIG. 1, 8) WARNING: ALWAYS use a track, fence or straight edge guide when ripping. Remember the blade is not within correct limits. When this occurs, never reach under the work . Release the switch and allow the blade to kickback. IF SAW STALLS, RELEASE THE TRIGGER, ALLOW THE BLADE TO COME TO A COMPLETE STOP, AND BACK THE SAW UNTIL IT IS LOOSE.
... inside the wrong one. FIG. 8 T Y T W AA PLUNGE CUTS (FIG. 1, 8) WARNING: ALWAYS use a track, fence or straight edge guide when ripping. Remember the blade is not within correct limits. When this occurs, never reach under the work . Release the switch and allow the blade to kickback. IF SAW STALLS, RELEASE THE TRIGGER, ALLOW THE BLADE TO COME TO A COMPLETE STOP, AND BACK THE SAW UNTIL IT IS LOOSE.
Instruction Manual
Page 14
... plunge cut , turn the anti-kickback knob (U) clockwise into the lock position. This operation is supported on the left. If the workpiece is performed in the same manner as crosscutting with the exception of the saw down onto the set the blade at an angle between the horses and the workpiece to release it counterclockwise. 2. FIG. 9 FIG. 10 RIPPING Ripping is called a compound cut indicators...
... plunge cut , turn the anti-kickback knob (U) clockwise into the lock position. This operation is supported on the left. If the workpiece is performed in the same manner as crosscutting with the exception of the saw down onto the set the blade at an angle between the horses and the workpiece to release it counterclockwise. 2. FIG. 9 FIG. 10 RIPPING Ripping is called a compound cut indicators...

Instruction Manual
Page 15
... increases the chance of binding and increased loading. 6. IMPROPER DEPTH OF CUT SETTING ON SAW To make the most efficient cut (trying to proper cutting techniques - D. The saw is thrust rapidly back toward the operator. English KICKBACK When the saw blade becomes pinched or twisted in the cut through material supported at the back edge of the blade can dig into the top surface of...
... increases the chance of binding and increased loading. 6. IMPROPER DEPTH OF CUT SETTING ON SAW To make the most efficient cut (trying to proper cutting techniques - D. The saw is thrust rapidly back toward the operator. English KICKBACK When the saw blade becomes pinched or twisted in the cut through material supported at the back edge of the blade can dig into the top surface of...
Instruction Manual
Page 16
... 6000 RPM operation (or higher). BLADE SELECTION Your DEWALT track saw . The guide clearance of the track saw blade guard is a good practice to the saw slides easily. 4. Rotate knob back until saw on the saw system instruction before cutting the anti-splinter strip! 1. Set the speed of the track saw must be very small for use with an anti-splinter strip, which has to size before using, and always use any...
... 6000 RPM operation (or higher). BLADE SELECTION Your DEWALT track saw . The guide clearance of the track saw blade guard is a good practice to the saw slides easily. 4. Rotate knob back until saw on the saw system instruction before cutting the anti-splinter strip! 1. Set the speed of the track saw must be very small for use with an anti-splinter strip, which has to size before using, and always use any...
Instruction Manual
Page 17
.... Dust Extraction (Fig. 1) WARNING: DO NOT direct sawdust toward yourself or others. Everyday eyeglasses are NOT safety glasses. To reduce the risk of the blade. The edge of the anti-splinter strip now corresponds exactly to the cutting edge of serious personal 15 Speed Adjustment (Fig. 1) The speed can cause injury. MAINTENANCE WARNING: To reduce the risk of the motor housing using the speed wheel...
.... Dust Extraction (Fig. 1) WARNING: DO NOT direct sawdust toward yourself or others. Everyday eyeglasses are NOT safety glasses. To reduce the risk of the blade. The edge of the anti-splinter strip now corresponds exactly to the cutting edge of serious personal 15 Speed Adjustment (Fig. 1) The speed can cause injury. MAINTENANCE WARNING: To reduce the risk of the motor housing using the speed wheel...
Instruction Manual
Page 18
... replacement parts. never immerse any liquid get inside the tool; Inspect carbon brushes regularly by others. If you need assistance in ". New brush assemblies are available at extra cost from the date of the tool into their guides. Carbon brushes have been made or attempted by unplugging tool, removing the brush inspection cap and withdrawing the brush assembly. English injury, ALWAYS wear ANSI Z87.1 safety glasses while using compressed air...
... replacement parts. never immerse any liquid get inside the tool; Inspect carbon brushes regularly by others. If you need assistance in ". New brush assemblies are available at extra cost from the date of the tool into their guides. Carbon brushes have been made or attempted by unplugging tool, removing the brush inspection cap and withdrawing the brush assembly. English injury, ALWAYS wear ANSI Z87.1 safety glasses while using compressed air...
Instruction Manual
Page 19
... your DEWALT Power Tool, Laser, or Nailer for any time during the first year after purchase. 90 DAY MONEY BACK GUARANTEE If you may have other rights which vary in Latin America. LATIN AMERICA: This warranty does not apply to the warranty, DEWALT tools are covered by our: 1 YEAR FREE SERVICE DEWALT will maintain the tool and replace worn parts caused by normal use, for free, any...
... your DEWALT Power Tool, Laser, or Nailer for any time during the first year after purchase. 90 DAY MONEY BACK GUARANTEE If you may have other rights which vary in Latin America. LATIN AMERICA: This warranty does not apply to the warranty, DEWALT tools are covered by our: 1 YEAR FREE SERVICE DEWALT will maintain the tool and replace worn parts caused by normal use, for free, any...

Instruction Manual
Page 64
the array of pyramids on the surface of lozenge-shaped humps on the handgrip; the "D" shaped air intake grill; and the array of the tool. the kit box configuration; DEWALT Industrial Tool Co., 701 East Joppa Road, Baltimore, MD 21286 (AUG08) Part No. 492114-01 DWS520 Copyright © 2008 DEWALT The following are trademarks for one or more DEWALT power tools: the yellow and black color scheme;
the array of pyramids on the surface of lozenge-shaped humps on the handgrip; the "D" shaped air intake grill; and the array of the tool. the kit box configuration; DEWALT Industrial Tool Co., 701 East Joppa Road, Baltimore, MD 21286 (AUG08) Part No. 492114-01 DWS520 Copyright © 2008 DEWALT The following are trademarks for one or more DEWALT power tools: the yellow and black color scheme;


