Instruction Manual
Page 2
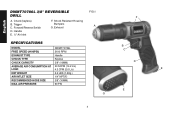
English DWMT70786L 3/8" REVERSIBLE FIG.1 DRILL F A. Exhaust A D. Handle E. ¼" Air Inlet SPECIFICATIONS MODEL FREE SPEED (@90PSI) EXHAUST TYPE CHUCK TYPE CHUCK CAPACITY AVERAGE AIR CONSUMPTION AT LOAD NET WEIGHT AIR INTLET SIZE RECOMMENDED HOSE SIZE MAX. AIR PRESSURE DWMT70786L 2100 RPM Handle Keyless 3/8" (10MM) 30 SCFM (14.2 L/s) 4.3 CFM (2.0 L/s) 2.6 LBS (1.2Kg.) 1/4" NPT(F) 3/8" (10MM) 90 PSI B C D E E G 2 Shock Resistant Housing B. Forward/Reverse Switch Bumpers G. Chuck (keyless) F. Trigger C.
English DWMT70786L 3/8" REVERSIBLE FIG.1 DRILL F A. Exhaust A D. Handle E. ¼" Air Inlet SPECIFICATIONS MODEL FREE SPEED (@90PSI) EXHAUST TYPE CHUCK TYPE CHUCK CAPACITY AVERAGE AIR CONSUMPTION AT LOAD NET WEIGHT AIR INTLET SIZE RECOMMENDED HOSE SIZE MAX. AIR PRESSURE DWMT70786L 2100 RPM Handle Keyless 3/8" (10MM) 30 SCFM (14.2 L/s) 4.3 CFM (2.0 L/s) 2.6 LBS (1.2Kg.) 1/4" NPT(F) 3/8" (10MM) 90 PSI B C D E E G 2 Shock Resistant Housing B. Forward/Reverse Switch Bumpers G. Chuck (keyless) F. Trigger C.

Instruction Manual
Page 3
... THIS OR ANY DeWALT TOOL, CALL US TOLL FREE AT: 1-800-4-DeWALT (1-800-433-9258) IMPORTANT SAFETY INSTRUCTIONS WARNING: Some dust created by power sanding, sawing, grinding, drilling, and other construction activities contains chemicals known to the State of California to cause cancer, birth defects or other reproductive harm. Read and understand all warnings and operating instructions before installing, operating or servicing this tool. Oil daily for each...
... THIS OR ANY DeWALT TOOL, CALL US TOLL FREE AT: 1-800-4-DeWALT (1-800-433-9258) IMPORTANT SAFETY INSTRUCTIONS WARNING: Some dust created by power sanding, sawing, grinding, drilling, and other construction activities contains chemicals known to the State of California to cause cancer, birth defects or other reproductive harm. Read and understand all warnings and operating instructions before installing, operating or servicing this tool. Oil daily for each...
Instruction Manual
Page 4
... all nuts, bolts and screws tight and ensure equipment is in serious injury. • Do not depress trigger when connecting the air supply hose. • Always use attachments designed for weak or worn condition before changing tools or attachments and during non-operation. • Always wear safety glasses and ear protection during operation. Which could occur. • Check air hoses for use with air powered tools. •...
... all nuts, bolts and screws tight and ensure equipment is in serious injury. • Do not depress trigger when connecting the air supply hose. • Always use attachments designed for weak or worn condition before changing tools or attachments and during non-operation. • Always wear safety glasses and ear protection during operation. Which could occur. • Check air hoses for use with air powered tools. •...

Instruction Manual
Page 5
... protection. 5 HOW TO PREVENT IT • Never operate tools near flammable substances such as gasoline, naptha, cleaning solvents, etc. • Work in a clean, well ventilated area free of combustible materials. • Never use oxygen, carbon dioxide or other bottled gases as a power source for air tools. • Exceeding the maximum pressure rating of tools accessories could cause serious injury with prolonged exposure...
... protection. 5 HOW TO PREVENT IT • Never operate tools near flammable substances such as gasoline, naptha, cleaning solvents, etc. • Work in a clean, well ventilated area free of combustible materials. • Never use oxygen, carbon dioxide or other bottled gases as a power source for air tools. • Exceeding the maximum pressure rating of tools accessories could cause serious injury with prolonged exposure...

Instruction Manual
Page 6
... hose. • Avoid unintentional starting. Keep proper footing and balance at all times. • Keep handles dry, clean, and free from work area during operation, propelling particles throughout the work area causing serious injury. • Never operate tool while under the influence of the tool. • Keep work area well lit. • Remove air hose to lubricate, add, and remove drills or accessories, etc., to injury. • Use clamps...
... hose. • Avoid unintentional starting. Keep proper footing and balance at all times. • Keep handles dry, clean, and free from work area during operation, propelling particles throughout the work area causing serious injury. • Never operate tool while under the influence of the tool. • Keep work area well lit. • Remove air hose to lubricate, add, and remove drills or accessories, etc., to injury. • Use clamps...
Instruction Manual
Page 7
... metal parts of the tool "live " wire will be propelled causing serious injury or property damage. • Maintain the tool with care. • Check for possible hidden wring before using. • Never point discharge of tool at self or others. • Do not pull trigger unless tool contact safety device is against work . 7 If damaged, have the tool serviced before performing work surface...
... metal parts of the tool "live " wire will be propelled causing serious injury or property damage. • Maintain the tool with care. • Check for possible hidden wring before using. • Never point discharge of tool at self or others. • Do not pull trigger unless tool contact safety device is against work . 7 If damaged, have the tool serviced before performing work surface...
Instruction Manual
Page 8
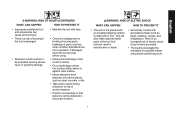
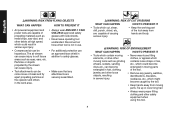
... other safety equipment when using this tool. 8 English WARNING: RISK FROM FLYING OBJECTS WHAT CAN HAPPEN HOW TO PREVENT IT • Air powered equipment and power tools are capable of propelling materials such as metal chips, saw dust, and other debris at the operator and others in moving parts of the tool away from hands and body. Disconnect air hose when tool is not in use. •...
... other safety equipment when using this tool. 8 English WARNING: RISK FROM FLYING OBJECTS WHAT CAN HAPPEN HOW TO PREVENT IT • Air powered equipment and power tools are capable of propelling materials such as metal chips, saw dust, and other debris at the operator and others in moving parts of the tool away from hands and body. Disconnect air hose when tool is not in use. •...
Instruction Manual
Page 9
... servicing the tool; 3) When tool is disconnected. If a wrong fitting is used, the tool can potentially exceed 200 PSI (13.8 bar) as accidental actuation may burst, possibly causing injury. • The connector on the tool must not hold pressure when air supply is not in use; 4) When moving to a different work area, as tool may occur, possibly causing injury. SAVE THESE INSTRUCTIONS...
... servicing the tool; 3) When tool is disconnected. If a wrong fitting is used, the tool can potentially exceed 200 PSI (13.8 bar) as accidental actuation may burst, possibly causing injury. • The connector on the tool must not hold pressure when air supply is not in use; 4) When moving to a different work area, as tool may occur, possibly causing injury. SAVE THESE INSTRUCTIONS...

Instruction Manual
Page 10
... to control the start and stop of the air tool. FORWARD/REVERSE SWITCH The forward/reverse switch (C) easily accessible with a standard 1/4" NPT American thread. TRIGGER The trigger (B) allows the operator to be direct- E G EXHAUST F The exhaust (G) is located at the bottom of the handle is a quick change keyless chuck for easy bit changing. English FEATURES CHUCK The 3/8" chuck (A) is used for connecting an air supply with one hand from the...
... to control the start and stop of the air tool. FORWARD/REVERSE SWITCH The forward/reverse switch (C) easily accessible with a standard 1/4" NPT American thread. TRIGGER The trigger (B) allows the operator to be direct- E G EXHAUST F The exhaust (G) is located at the bottom of the handle is a quick change keyless chuck for easy bit changing. English FEATURES CHUCK The 3/8" chuck (A) is used for connecting an air supply with one hand from the...
Instruction Manual
Page 11
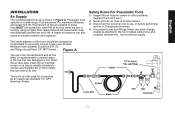
... shorten the tool's life. A higher air pressure can damage the tool. Safety Rules For Pneumatic Tools 1) Inspect the air hose for cracks or other matter that can also cause an unsafe condition and explosion. The inside diameter of air line lubricators and air line filters is shown in Figure A. Drain the air tank daily. Never use , or before performing service or changing accessories. 4) Use proper hoses and...
... shorten the tool's life. A higher air pressure can damage the tool. Safety Rules For Pneumatic Tools 1) Inspect the air hose for cracks or other matter that can also cause an unsafe condition and explosion. The inside diameter of air line lubricators and air line filters is shown in Figure A. Drain the air tank daily. Never use , or before performing service or changing accessories. 4) Use proper hoses and...

Instruction Manual
Page 12
... drill is also used frequently, or when it starts to slow or lose power. WARNING: Use a clean lubricated air supply that the tool is connected to the air supply as a hand operated tool. Putting Into Service Air Supply CAUTION: This air tool requires lubrication BEFORE initial use and aware of these safety rules. 2) Do not exceed the maximum working attachment fitted to the tool. 8) The tool is not electrically insulated. Reconnect tool...
... drill is also used frequently, or when it starts to slow or lose power. WARNING: Use a clean lubricated air supply that the tool is connected to the air supply as a hand operated tool. Putting Into Service Air Supply CAUTION: This air tool requires lubrication BEFORE initial use and aware of these safety rules. 2) Do not exceed the maximum working attachment fitted to the tool. 8) The tool is not electrically insulated. Reconnect tool...
Instruction Manual
Page 13
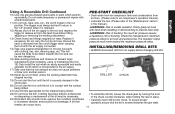
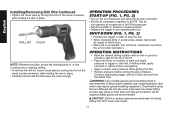
... stopped moving tool parts with hand when installing or disconnenting to release air from the on/off trigger when carrying the tool with the air supply connected. 14) Take care against entanglement of unsafe operation. The regulator output pressure must always be used as this condition contributes to the "Maintenance" section in place. • Carefully insert drill bit into chuck. INSTALLING/REMOVING DRILL BITS • ALWAYS disconnect drill from air lines. (Please refer to air compressor's operation manual...
... stopped moving tool parts with hand when installing or disconnenting to release air from the on/off trigger when carrying the tool with the air supply connected. 14) Take care against entanglement of unsafe operation. The regulator output pressure must always be used as this condition contributes to the "Maintenance" section in place. • Carefully insert drill bit into chuck. INSTALLING/REMOVING DRILL BITS • ALWAYS disconnect drill from air lines. (Please refer to air compressor's operation manual...
Instruction Manual
Page 14
.... • Apply constant, even pressure while guiding the drill. • Reduce pressure before using the tool. Safety gloves are loose enough. DO NOT touch until bit is completed, turn off the air compressor and store the air tool after lubrication. DRILL BIT CHUCK NOTE: Whenever possible, secure the working piece in a vise or clamp prior to start operating the tool. This air tool operates at a maximum of 90 PSI air pressure. • Adjust tool either in forward or reverse...
.... • Apply constant, even pressure while guiding the drill. • Reduce pressure before using the tool. Safety gloves are loose enough. DO NOT touch until bit is completed, turn off the air compressor and store the air tool after lubrication. DRILL BIT CHUCK NOTE: Whenever possible, secure the working piece in a vise or clamp prior to start operating the tool. This air tool operates at a maximum of 90 PSI air pressure. • Adjust tool either in forward or reverse...
Instruction Manual
Page 15
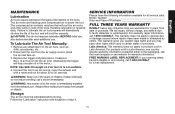
... air tool oil is required daily. Storage: The air tool must be lubricated before and after each additional use. This warranty does not apply to lubricate the air tool properly will repair, without charge, any attachment on the air tools, such as: drills, accessories, etc. 2. Connect the tool to power the tool. This warranty gives you specific legal rights and you may have other parts in Latin America. FREE WARNING LABEL REPLACEMENT...
... air tool oil is required daily. Storage: The air tool must be lubricated before and after each additional use. This warranty does not apply to lubricate the air tool properly will repair, without charge, any attachment on the air tools, such as: drills, accessories, etc. 2. Connect the tool to power the tool. This warranty gives you specific legal rights and you may have other parts in Latin America. FREE WARNING LABEL REPLACEMENT...

Instruction Manual
Page 47
the array of pyramids on the surface of lozenge-shaped humps on the handgrip; the kit box configuration; the "D" shaped air intake grill; and the array of the tool. DeWALT Industrial Tool Co., 701 Joppa Road, Baltimore, MD 21286 (SEP07) Part No.DWMT70786L 00000000 Copyright © 2013 DeWALT The following are trademarks for one or more DeWALT power tools: the yellow and black color scheme;
the array of pyramids on the surface of lozenge-shaped humps on the handgrip; the kit box configuration; the "D" shaped air intake grill; and the array of the tool. DeWALT Industrial Tool Co., 701 Joppa Road, Baltimore, MD 21286 (SEP07) Part No.DWMT70786L 00000000 Copyright © 2013 DeWALT The following are trademarks for one or more DeWALT power tools: the yellow and black color scheme;

