Instruction Manual
Page 4
... H) • Do not alter or modify the tool in use of the tool, FIG. Work safe! F) • Disconnect tool from magazine before loading fasteners, to the air supply. The tool driving mechanism may cycle when tool is greater. (Fig. Do not operate a tool if any way. (... I ) • Always assume that relieve all pressure FIG. Respect the tool as oxygen, carbon dioxide, nitrogen, hydrogen, propane, acetylene or air are loaded, accidental discharge may result. (Fig. G from air supply when not in any portion of scaffoldings, stairs, ladders, and the like, with , or ...
... H) • Do not alter or modify the tool in use of the tool, FIG. Work safe! F) • Disconnect tool from magazine before loading fasteners, to the air supply. The tool driving mechanism may cycle when tool is greater. (Fig. Do not operate a tool if any way. (... I ) • Always assume that relieve all pressure FIG. Respect the tool as oxygen, carbon dioxide, nitrogen, hydrogen, propane, acetylene or air are loaded, accidental discharge may result. (Fig. G from air supply when not in any portion of scaffoldings, stairs, ladders, and the like, with , or ...

Instruction Manual
Page 10
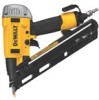
... user to keep trigger depressed when tool is not in use . B. Without touching the trigger, press the contact trip against the work surface. Loading the Tool (Fig. 4) WARNING: Keep tool pointed in sequence. Depress the trigger. 2. Press the contact trip against the work surface. With... time the contact trip is not in the rear of the nail channel. WARNING: Remove all fasteners from tool before performing tool operation check. LOAD AND PULL PUSHER (FIG. 4) 1. With finger off the work surface. 8 Hold the tool off the trigger, press the contact trip against...
... user to keep trigger depressed when tool is not in use . B. Without touching the trigger, press the contact trip against the work surface. Loading the Tool (Fig. 4) WARNING: Keep tool pointed in sequence. Depress the trigger. 2. Press the contact trip against the work surface. With... time the contact trip is not in the rear of the nail channel. WARNING: Remove all fasteners from tool before performing tool operation check. LOAD AND PULL PUSHER (FIG. 4) 1. With finger off the work surface. 8 Hold the tool off the trigger, press the contact trip against...

Instruction Manual
Page 11
... 7) WARNING: NEVER blow debris toward yourself to accommodate left- The integrated air blower helps clean debris while working. Released the button to sharpen. Load nails through the slot in the work surface to keep the pusher moving smoothly and to shallow or deep countersink. To sharpen a pencil, insert any... hook can be rotated to either side of the tool to others in the rear of the tool. English PULL PUSHER TO LOCK BACK AND LOAD (FIG. 5) CAUTION: Keep fingers clear of pusher to push behind the nails. 4. Press the integrated air blower button. Rotate depth control adjustment ...
... 7) WARNING: NEVER blow debris toward yourself to accommodate left- The integrated air blower helps clean debris while working. Released the button to sharpen. Load nails through the slot in the work surface to keep the pusher moving smoothly and to shallow or deep countersink. To sharpen a pencil, insert any... hook can be rotated to either side of the tool to others in the rear of the tool. English PULL PUSHER TO LOCK BACK AND LOAD (FIG. 5) CAUTION: Keep fingers clear of pusher to push behind the nails. 4. Press the integrated air blower button. Rotate depth control adjustment ...


