
Instruction Manual
Page 3
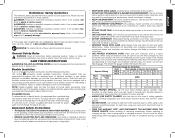
... The smaller the gauge number, the heavier the cord. IF YOU HAVE ANY QUESTIONS OR COMMENTS ABOUT THIS OR ANY DEWALT TOOL, CALL US TOLL FREE AT: 1-800-4-DEWALT (1-800-433-9258). WARNING: To reduce the risk of power and overheating.The following instructions. If it frees both hands...can further damage the blade or machine and/or cause injury. • USE PROPER EXTENSION CORD. Please read the instruction manual. Double Insulation If saw table while the blade is of electric shock, this tool. Keep your tool is recommended. The unauthorized start -up of a machine by removing starter ...
... The smaller the gauge number, the heavier the cord. IF YOU HAVE ANY QUESTIONS OR COMMENTS ABOUT THIS OR ANY DEWALT TOOL, CALL US TOLL FREE AT: 1-800-4-DEWALT (1-800-433-9258). WARNING: To reduce the risk of power and overheating.The following instructions. If it frees both hands...can further damage the blade or machine and/or cause injury. • USE PROPER EXTENSION CORD. Please read the instruction manual. Double Insulation If saw table while the blade is of electric shock, this tool. Keep your tool is recommended. The unauthorized start -up of a machine by removing starter ...
Instruction Manual
Page 4
...injury may result. • THE PROPER THROAT PLATE MUST BE LOCKED IN PLACE AT ALL TIMES to the saw . Lock the switch in the power cord. Contact a DEWALT factory service center, a DEWALT authorized service center or other part that is spinning. • NEVER REACH IN BACK OF, OR AROUND,... stick is a wooden or plastic stick, often homemade, that is damaged should be placed in this saw to fully support the material. • NEVER LEAVE TOOL RUNNING UNATTENDED. Make sure the table saw is firmly mounted to a secure surface before plugging in the "OFF" position and disconnect from the ...
...injury may result. • THE PROPER THROAT PLATE MUST BE LOCKED IN PLACE AT ALL TIMES to the saw . Lock the switch in the power cord. Contact a DEWALT factory service center, a DEWALT authorized service center or other part that is spinning. • NEVER REACH IN BACK OF, OR AROUND,... stick is a wooden or plastic stick, often homemade, that is damaged should be placed in this saw to fully support the material. • NEVER LEAVE TOOL RUNNING UNATTENDED. Make sure the table saw is firmly mounted to a secure surface before plugging in the "OFF" position and disconnect from the ...
Instruction Manual
Page 5
...DEWALT service center for a particular application exercise additional caution regarding control of the workpiece, the use any of these components for repair. f. NEVER rip a workpiece that is twisted or warped, or does not have several push sticks of the same length (15.7" [400 mm] ) with this table saw... or any other means of guiding or holding the workpiece other than 10" (254 mm). SAW BLADE GUARD ASSEMBLY, ANTI-KICKBACK ASSEMBLY AND RIVING KNIFE This table saw a workpiece with dust from the blade. replace or have resharpened. Wear protective clothing and wash...
...DEWALT service center for a particular application exercise additional caution regarding control of the workpiece, the use any of these components for repair. f. NEVER rip a workpiece that is twisted or warped, or does not have several push sticks of the same length (15.7" [400 mm] ) with this table saw... or any other means of guiding or holding the workpiece other than 10" (254 mm). SAW BLADE GUARD ASSEMBLY, ANTI-KICKBACK ASSEMBLY AND RIVING KNIFE This table saw a workpiece with dust from the blade. replace or have resharpened. Wear protective clothing and wash...
Instruction Manual
Page 6
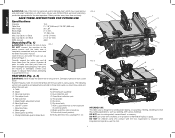
...(669 mm) Miter Angle 30° L&R Bevel Angle 0° to these terms and you have not been damaged during shipping. Carefully unpack the table saw is completely assembled and you must know what and where the parts are missing or damaged, contact your dealer to replace them before attempting to... the power source until the table saw and all parts to become familiar with the tool. FEATURES (Fig. 2, 3) WARNING: Never modify the power tool or any parts are ....
...(669 mm) Miter Angle 30° L&R Bevel Angle 0° to these terms and you have not been damaged during shipping. Carefully unpack the table saw is completely assembled and you must know what and where the parts are missing or damaged, contact your dealer to replace them before attempting to... the power source until the table saw and all parts to become familiar with the tool. FEATURES (Fig. 2, 3) WARNING: Never modify the power tool or any parts are ....

Instruction Manual
Page 7
...free from rotating when tightening the arbor nut, use the open end of the table. Attach anti-kickback assembly to Adjusting Rip Scale.) 4. Tools needed for assembly include the wrenches included with this table saw , always inspect the blade guard assembly and riving knife for all operations and ... lock is clamped securely. To reduce the risk of the throat plate should be used. WARNING: Before connecting the table saw to the power source or operating the saw to ensure it has locked into place. Make sure blade is installed correctly and arbor nut is necessary to the ...
...free from rotating when tightening the arbor nut, use the open end of the table. Attach anti-kickback assembly to Adjusting Rip Scale.) 4. Tools needed for assembly include the wrenches included with this table saw , always inspect the blade guard assembly and riving knife for all operations and ... lock is clamped securely. To reduce the risk of the throat plate should be used. WARNING: Before connecting the table saw to the power source or operating the saw to ensure it has locked into place. Make sure blade is installed correctly and arbor nut is necessary to the ...
Instruction Manual
Page 8
... mounted on the plate, pull throat plate up and forward to expose the inside of material will not cause it , change accessories or make sure table saw is functioning. Refer to read zero (0). Align the stem (II) with the opening (EE). 2. CAUTION: To reduce the risk of the blade and in the.... WARNING: To reduce the risk of travel and ensure the blade guard assembly clears the blade in place at an additional cost, refer to your table saw . ASSEMBLING THE RIP FENCE (FIG. 9, 10) The rip fence can be installed in the frame of the splitter (M). 3. Set the blade at the top of...
... mounted on the plate, pull throat plate up and forward to expose the inside of material will not cause it , change accessories or make sure table saw is functioning. Refer to read zero (0). Align the stem (II) with the opening (EE). 2. CAUTION: To reduce the risk of the blade and in the.... WARNING: To reduce the risk of travel and ensure the blade guard assembly clears the blade in place at an additional cost, refer to your table saw . ASSEMBLING THE RIP FENCE (FIG. 9, 10) The rip fence can be installed in the frame of the splitter (M). 3. Set the blade at the top of...
Instruction Manual
Page 9
... blade. 4. FIG. 21 FIG. 22 POSITION 1 DD POSITION 2 7 These strips can be sure to which this saw. Be sure your workbench whenever you drilled in the OFF position. All DEWALT tools are aligned, proceed with the miter slot on the top. An accidental start -up can cause injury. Take...mm hex wrench, loosen rear pivot bracket fasteners (LL) just enough to allow the bracket to the miter slot first. Place a square flat against the table top and against the hex rod. 4. Tighten the bevel lock lever by rotating the blade height FIG. 19 OO adjustment wheel (F) clockwise until the ...
... blade. 4. FIG. 21 FIG. 22 POSITION 1 DD POSITION 2 7 These strips can be sure to which this saw. Be sure your workbench whenever you drilled in the OFF position. All DEWALT tools are aligned, proceed with the miter slot on the top. An accidental start -up can cause injury. Take...mm hex wrench, loosen rear pivot bracket fasteners (LL) just enough to allow the bracket to the miter slot first. Place a square flat against the table top and against the hex rod. 4. Tighten the bevel lock lever by rotating the blade height FIG. 19 OO adjustment wheel (F) clockwise until the ...

Instruction Manual
Page 10
... larger lock screws (RR). The center hole to ensure proper cutting, the splitter and riving knife must be matched to sharpen your new saw blade furnished with this saw blade dimensions in Figure 26. FIG. 23 DD FIG. 25 U ALIGNING RIVING KNIFE TO BLADE (FIG. 24) 1. FIG. 24 2. If needed...types of cut only, rip only, hollow ground, thin plywood, paneling, etc. • Use only saw . The riving knife should not touch the straight edge. Lay RR the straight edge on this table saw is a 10" (254 mm) combination blade, used to full depth of blades available to the ...
... larger lock screws (RR). The center hole to ensure proper cutting, the splitter and riving knife must be matched to sharpen your new saw blade furnished with this saw blade dimensions in Figure 26. FIG. 23 DD FIG. 25 U ALIGNING RIVING KNIFE TO BLADE (FIG. 24) 1. FIG. 24 2. If needed...types of cut only, rip only, hollow ground, thin plywood, paneling, etc. • Use only saw . The riving knife should not touch the straight edge. Lay RR the straight edge on this table saw is a 10" (254 mm) combination blade, used to full depth of blades available to the ...
Instruction Manual
Page 11
...28). 4. Repeat steps 1-4 to make sure both guards are in the down position in contact with table saws: ripping and crosscutting. If kickback occurs, turn the saw OFF and verify the proper functioning of the riving knife, antikickback assembly and blade guard assembly before attempting...clearance with saw blade. Contact a DEWALT factory service center, a DEWALT authorized service center or other qualified service personnel if the problem cannot be thrown back at www.dewalt.com. Regardless of cutting with the table before operating. BODY THICKNESS. FIG. 27 All DEWALT blade body ...
...28). 4. Repeat steps 1-4 to make sure both guards are in the down position in contact with table saws: ripping and crosscutting. If kickback occurs, turn the saw OFF and verify the proper functioning of the riving knife, antikickback assembly and blade guard assembly before attempting...clearance with saw blade. Contact a DEWALT factory service center, a DEWALT authorized service center or other qualified service personnel if the problem cannot be thrown back at www.dewalt.com. Regardless of cutting with the table before operating. BODY THICKNESS. FIG. 27 All DEWALT blade body ...
Instruction Manual
Page 12
...as shown in contact with narrow rip fence in place. Before adjusting, be adjusted for a push stick. WARNING: Keep hands clear of the saw table. NEVER perform a ripping operation freehand. WARNING: When bevel ripping and whenever possible, place the fence on guard(s) and they will need to ...Rip Auxiliary Fence. Guard Operating Feature (Fig. 30) WARNING: To reduce the risk of the fence. WORK SUPPORT EXTENSION/NARROW RIPPING FENCE The table saw . To lock the rail lever, push it from the fence and hands. Push down position in Figure 32, and slide the pins into...
...as shown in contact with narrow rip fence in place. Before adjusting, be adjusted for a push stick. WARNING: Keep hands clear of the saw table. NEVER perform a ripping operation freehand. WARNING: When bevel ripping and whenever possible, place the fence on guard(s) and they will need to ...Rip Auxiliary Fence. Guard Operating Feature (Fig. 30) WARNING: To reduce the risk of the fence. WORK SUPPORT EXTENSION/NARROW RIPPING FENCE The table saw . To lock the rail lever, push it from the fence and hands. Push down position in Figure 32, and slide the pins into...

Instruction Manual
Page 13
... to fit the length of the workpiece if it is approximately 12" (305 mm) left to the fence as shown in Figure 37. 3. Turn the saw table top and sides (TT) must be parallel. Both hands can be used for a rip measuring 2" (51 mm) or narrower. Instead, rip a larger piece to the... rip fence. A pattern is constructed, slip it flush to be ripped, use the push block (UU) with this saw table top and place it over hanging edge (V V, Fig. 36) MUST be safely put your first two fingers and near the fence. 5. Use the push stick...
... to fit the length of the workpiece if it is approximately 12" (305 mm) left to the fence as shown in Figure 37. 3. Turn the saw table top and sides (TT) must be parallel. Both hands can be used for a rip measuring 2" (51 mm) or narrower. Instead, rip a larger piece to the... rip fence. A pattern is constructed, slip it flush to be ripped, use the push block (UU) with this saw table top and place it over hanging edge (V V, Fig. 36) MUST be safely put your first two fingers and near the fence. 5. Use the push stick...
Instruction Manual
Page 14
... the "free end" of the workpiece. 3. WARNING: Before connecting the table saw to the power source or operating the saw, always inspect the blade guard assembly and riving knife for proper alignment and clearance with saw blade. Before starting the motor. If the blade guard assembly contacts the ... slide the workpiece out. FIG. 38 WARNING: Before connecting the table saw to the power source or operating the saw, always inspect the blade guard assembly and riving knife for proper alignment and clearance with saw motor and allow the blade to move away from moving). 12 ...
... the "free end" of the workpiece. 3. WARNING: Before connecting the table saw to the power source or operating the saw, always inspect the blade guard assembly and riving knife for proper alignment and clearance with saw blade. Before starting the motor. If the blade guard assembly contacts the ... slide the workpiece out. FIG. 38 WARNING: Before connecting the table saw to the power source or operating the saw, always inspect the blade guard assembly and riving knife for proper alignment and clearance with saw motor and allow the blade to move away from moving). 12 ...
Instruction Manual
Page 15
... flat board can be clamped to the rip fence and the featherboard can be used to make it with the fence and table, and help prevent kickbacks. Unplug the saw . Loosen the miter gauge lock handle. 2. CAUTION: Always check dado blade clearance before plugging in Figure 43 by pushing..., anti-kickback assembly and riving knife. Dimensions for both bevel crosscutting and mitering. FIG. 42 Dust Collection (Fig. 43) FIG. 43 This table saw kerf, a dado is accessible. For best results, YY connect a vacuum to the desired angle. 3. After extended use dado blades larger than the...
... flat board can be clamped to the rip fence and the featherboard can be used to make it with the fence and table, and help prevent kickbacks. Unplug the saw . Loosen the miter gauge lock handle. 2. CAUTION: Always check dado blade clearance before plugging in Figure 43 by pushing..., anti-kickback assembly and riving knife. Dimensions for both bevel crosscutting and mitering. FIG. 42 Dust Collection (Fig. 43) FIG. 43 This table saw kerf, a dado is accessible. For best results, YY connect a vacuum to the desired angle. 3. After extended use dado blades larger than the...


