
Instruction Manual
Page 4
...Tools Required Hex key and small wrench (supplied) Socket or wrench set Contents Stand, right side Stand, left side Wheels (2) Rear axle Kickstand assembly Tube plugs (2) Handle assembly Handle feet (2) Carriage head bolts (2) M6x12 pan bolts (2) M8x40 hex head bolts (4) M8x40 pan head bolts (4) M8 lock nuts (12... DWE7491, and DWE7499 table saws. This stand has been evaluated by UL for use with Folding Legs WARNING: For your DEWALT purchase, please call 1-800-4-DEWALT (1-800-433-9258). Failure to ANSI Z87.1. • Ensure all stand fasteners are securely fastened and that all stand ...
...Tools Required Hex key and small wrench (supplied) Socket or wrench set Contents Stand, right side Stand, left side Wheels (2) Rear axle Kickstand assembly Tube plugs (2) Handle assembly Handle feet (2) Carriage head bolts (2) M6x12 pan bolts (2) M8x40 hex head bolts (4) M8x40 pan head bolts (4) M8 lock nuts (12... DWE7491, and DWE7499 table saws. This stand has been evaluated by UL for use with Folding Legs WARNING: For your DEWALT purchase, please call 1-800-4-DEWALT (1-800-433-9258). Failure to ANSI Z87.1. • Ensure all stand fasteners are securely fastened and that all stand ...
Instruction Manual
Page 5
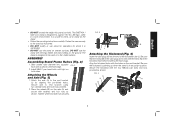
... unintended. • DO NOT use the stand on the ground. Align the kickstand holes with the holes (N) in a work environment. The DWE74911 table saw securely to the end bracket (J) by aligning the pre-drilled holes. The stand is designed to be used on the stand. &#... a flat, stable surface. FIG. 3 B B AJ Attaching the Kickstand (Fig. 4) Insert the tube plugs (K) into opposite FIG. 2 tube side as shown. ASSEMBLY Assembling Stand Frame Halves (Fig. 2) 1. Be sure the kickstand is pointing up when the stand is unsafe to end bracket using two carriage bolts and lock...
... unintended. • DO NOT use the stand on the ground. Align the kickstand holes with the holes (N) in a work environment. The DWE74911 table saw securely to the end bracket (J) by aligning the pre-drilled holes. The stand is designed to be used on the stand. &#... a flat, stable surface. FIG. 3 B B AJ Attaching the Kickstand (Fig. 4) Insert the tube plugs (K) into opposite FIG. 2 tube side as shown. ASSEMBLY Assembling Stand Frame Halves (Fig. 2) 1. Be sure the kickstand is pointing up when the stand is unsafe to end bracket using two carriage bolts and lock...
Instruction Manual
Page 6
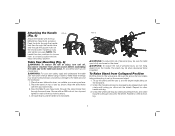
NOTE: The handle has two positions to choose from power source before assembling the table saw and the accessory. 1. An accidental start-up can cause injury. WARNING: For your own safety, read and understand the table saw frame. .... Unfold the wheel side legs by depressing leg release levers and rotate until locking pin clicks into the detent. Repeat for other bottom leg. 4 Lift assembly by stand handle onto kickstand. Place the saw, table side down, on top of personal injury, do not hang objects from Collapsed Position Roll the...
NOTE: The handle has two positions to choose from power source before assembling the table saw and the accessory. 1. An accidental start-up can cause injury. WARNING: For your own safety, read and understand the table saw frame. .... Unfold the wheel side legs by depressing leg release levers and rotate until locking pin clicks into the detent. Repeat for other bottom leg. 4 Lift assembly by stand handle onto kickstand. Place the saw, table side down, on top of personal injury, do not hang objects from Collapsed Position Roll the...

