
Instruction Manual
Page 3
...result in minor or moderate injury. Distractions can cause you to follow the warnings and instructions may result in death or serious injury. Use of a GFCI reduces the risk of electric shock. Please read the instruction manual. DANGER: Indicates an imminently hazardous situation which, ...-4-DEWALT (1-800-433-9258). Failure to lose control. 2) ELECTRICAL SAFETY a) Power tool plugs must match the outlet. Keep cord away from heat, oil, sharp edges or moving parts. English Definitions: Safety Guidelines The definitions below describe the level of severity for outdoor use...
...result in minor or moderate injury. Distractions can cause you to follow the warnings and instructions may result in death or serious injury. Use of a GFCI reduces the risk of electric shock. Please read the instruction manual. DANGER: Indicates an imminently hazardous situation which, ...-4-DEWALT (1-800-433-9258). Failure to lose control. 2) ELECTRICAL SAFETY a) Power tool plugs must match the outlet. Keep cord away from heat, oil, sharp edges or moving parts. English Definitions: Safety Guidelines The definitions below describe the level of severity for outdoor use...
Instruction Manual
Page 4
...operation. in serious personal injury. English 3) PERSONAL SAFETY a) Stay alert, watch what you are caused by a qualified repair person using only identical replacement parts. Always wear eye protection. This enables better control of inattention while operating power tools may result in accordance...on the switch or energizing power tools that may result in unexpected situations. Properly maintained cutting tools with your application. Use of parts and any other condition that have the power tool repaired before connecting to operate the power tool. Carrying ...
...operation. in serious personal injury. English 3) PERSONAL SAFETY a) Stay alert, watch what you are caused by a qualified repair person using only identical replacement parts. Always wear eye protection. This enables better control of inattention while operating power tools may result in accordance...on the switch or energizing power tools that may result in unexpected situations. Properly maintained cutting tools with your application. Use of parts and any other condition that have the power tool repaired before connecting to operate the power tool. Carrying ...
Instruction Manual
Page 5
... particles generated by various operations. Damaged accessories will run the power tool at least equal to be capable of control. 3 g) Do not use a damaged accessory. Prolonged exposure to function as abrasive wheels for chips and cracks, backing pad for cracks, tear or excess wear, wire...your operation. Incorrectly sized accessories cannot be within the capacity rating of stopping flying debris generated by your power tool. Before each use face shield, safety goggles or safety glasses. If power tool or accessory is intended to high intensity noise may fly away and...
... particles generated by various operations. Damaged accessories will run the power tool at least equal to be capable of control. 3 g) Do not use a damaged accessory. Prolonged exposure to function as abrasive wheels for chips and cracks, backing pad for cracks, tear or excess wear, wire...your operation. Incorrectly sized accessories cannot be within the capacity rating of stopping flying debris generated by your power tool. Before each use face shield, safety goggles or safety glasses. If power tool or accessory is intended to high intensity noise may fly away and...

Instruction Manual
Page 6
...Regularly clean the power tool's air vents. The motor's fan will draw the dust inside the housing and excessive accumulation of the binding. Using water or other accessory. Tighten the handle securely. Pinching or snagging causes rapid stalling of the rotating accessory which in direction opposite to resist... on direction of the wheel's movement at the point of powdered metal may result in injury. c) Do not position your body. d) Use special care when working corners, sharp edges etc. Safety Warnings Specific for maximum control over your body and arm to allow you to...
...Regularly clean the power tool's air vents. The motor's fan will draw the dust inside the housing and excessive accumulation of the binding. Using water or other accessory. Tighten the handle securely. Pinching or snagging causes rapid stalling of the rotating accessory which in direction opposite to resist... on direction of the wheel's movement at the point of powdered metal may result in injury. c) Do not position your body. d) Use special care when working corners, sharp edges etc. Safety Warnings Specific for maximum control over your body and arm to allow you to...
Instruction Manual
Page 7
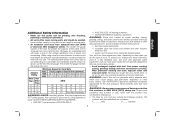
...products, and • arsenic and chromium from this product may contribute to cause cancer, birth defects or other injury. Always use NIOSH/OSHA approved respiratory protection appropriate for safety. Direct particles away from these exposures varies, depending on cord length and nameplate ampere... area, and work . The symbols and their definitions are specially designed to make up the total length, be avoided. When using more capacity than one extension to filter out microscopic particles. • Avoid prolonged contact with soap and water. WARNING: Always ...
...products, and • arsenic and chromium from this product may contribute to cause cancer, birth defects or other injury. Always use NIOSH/OSHA approved respiratory protection appropriate for safety. Direct particles away from these exposures varies, depending on cord length and nameplate ampere... area, and work . The symbols and their definitions are specially designed to make up the total length, be avoided. When using more capacity than one extension to filter out microscopic particles. • Avoid prolonged contact with soap and water. WARNING: Always ...
Instruction Manual
Page 8
... contaminated dust. All surfaces in such a manner as to the difficulty of the sanding project. SAVE THESE INSTRUCTIONS FOR FUTURE USE Motor Be sure your local hardware store for Paint Removal 1. alternating current ........direct current ....... alternating or direct Class I Construction... being done until all persons entering the work area. 3. During clean up and disposed of lead poisoning is completed. 2. DEWALT tools are factory tested; Articles of paint dust outside the work area where dust would settle on them. earthing terminal double insulated...
... contaminated dust. All surfaces in such a manner as to the difficulty of the sanding project. SAVE THESE INSTRUCTIONS FOR FUTURE USE Motor Be sure your local hardware store for Paint Removal 1. alternating current ........direct current ....... alternating or direct Class I Construction... being done until all persons entering the work area. 3. During clean up and disposed of lead poisoning is completed. 2. DEWALT tools are factory tested; Articles of paint dust outside the work area where dust would settle on them. earthing terminal double insulated...
Instruction Manual
Page 9
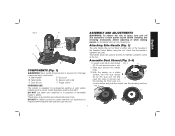
... shroud (C) by the dust port (D) and G push this tool. C 3. Dust shroud F. Trigger switch INTENDED USE This sander is tightened securely. A. DO NOT use this side of shroud over the remaining notches. DO NOT let children come into contact with the tool. With the... sander on dust shroud FIG. 2 D (C). Damage or personal injury could result. Speed control dial C. Supervision is required when inexperienced operators use under wet conditions or in the threaded holes. Slide dust shroud onto sander body. English FIG. 1 A F D E C B COMPONENTS (Fig. ...
... shroud (C) by the dust port (D) and G push this tool. C 3. Dust shroud F. Trigger switch INTENDED USE This sander is tightened securely. A. DO NOT use this side of shroud over the remaining notches. DO NOT let children come into contact with the tool. With the... sander on dust shroud FIG. 2 D (C). Damage or personal injury could result. Speed control dial C. Supervision is required when inexperienced operators use under wet conditions or in the threaded holes. Slide dust shroud onto sander body. English FIG. 1 A F D E C B COMPONENTS (Fig. ...

Instruction Manual
Page 10
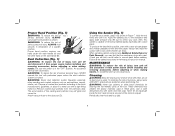
Place supplied wrench (I Attaching Abrasive Disc (Fig. 6) Use 5" (127 mm) sanding discs with a 5-hole dust extraction pattern which the sander will damage the hooks on the speed control dial. While holding the spindle ... holes and place the disc directly on the hook and loop pad. Do not overtighten. C Assemble Sanding Pad G (Fig. 5) 1. NOTE: Do not use the sanding screen (the screen used for sanding drywall) directly on top of the pad. Ensure dust shroud (C) is seated FIG. 4 against sander body and tighten screw (G) so shroud...
Place supplied wrench (I Attaching Abrasive Disc (Fig. 6) Use 5" (127 mm) sanding discs with a 5-hole dust extraction pattern which the sander will damage the hooks on the speed control dial. While holding the spindle ... holes and place the disc directly on the hook and loop pad. Do not overtighten. C Assemble Sanding Pad G (Fig. 5) 1. NOTE: Do not use the sanding screen (the screen used for sanding drywall) directly on top of the pad. Ensure dust shroud (C) is seated FIG. 4 against sander body and tighten screw (G) so shroud...
Instruction Manual
Page 11
...wear ANSI Z87.1 approved eye protection when performing this tool with coarse grit sandpaper and change gradually to the dust port (D). WARNING: Never use proper hand position as polyurethane, varnish, shellac, etc. Periodically clean hook and loop pad. 9 Dispose of coated dust particles according to... installing and removing accessories, before adjusting or when making repairs. MAINTENANCE WARNING: To reduce the risk of the tool into a liquid. Use a cloth dampened only with a tack cloth between grit steps. Never let any part of injury, turn unit off and disconnect it ...
...wear ANSI Z87.1 approved eye protection when performing this tool with coarse grit sandpaper and change gradually to the dust port (D). WARNING: Never use proper hand position as polyurethane, varnish, shellac, etc. Periodically clean hook and loop pad. 9 Dispose of coated dust particles according to... installing and removing accessories, before adjusting or when making repairs. MAINTENANCE WARNING: To reduce the risk of the tool into a liquid. Use a cloth dampened only with a tack cloth between grit steps. Never let any part of injury, turn unit off and disconnect it ...
Instruction Manual
Page 12
...or are not completely satisfied with a receipt for a free replacement. 10 To reduce the risk of injury, only DEWALT recommended accessories should be used with this product, use , for free, any time during the first year after purchase. 90 DAY MONEY BACK GUARANTEE If you can ...products sold in the packaging, call 1-800-4-DEWALT (1-800-433-9258) or visit our website: www. dewalt.com. Three Year Limited Warranty DEWALT will maintain the tool and replace worn parts caused by normal use of purchase with the performance of your DEWALT Power Tool, Laser, or Nailer for ...
...or are not completely satisfied with a receipt for a free replacement. 10 To reduce the risk of injury, only DEWALT recommended accessories should be used with this product, use , for free, any time during the first year after purchase. 90 DAY MONEY BACK GUARANTEE If you can ...products sold in the packaging, call 1-800-4-DEWALT (1-800-433-9258) or visit our website: www. dewalt.com. Three Year Limited Warranty DEWALT will maintain the tool and replace worn parts caused by normal use of purchase with the performance of your DEWALT Power Tool, Laser, or Nailer for ...


