Instruction Manual
Page 4
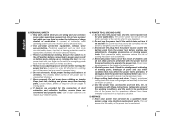
A wrench or a key left attached to operate the power tool. f) Dress properly. Loose clothes, jewelry or long hair can reduce dust-related hazards. 4) POWER TOOL USE ... when operating a power tool. Protective equipment such as dust mask, non-skid safety shoes, hard hat, or hearing protection used . d) Remove any adjusting key or wrench before turning the power tool on the switch or energizing power tools that have the power tool repaired before making any other condition that the...
A wrench or a key left attached to operate the power tool. f) Dress properly. Loose clothes, jewelry or long hair can reduce dust-related hazards. 4) POWER TOOL USE ... when operating a power tool. Protective equipment such as dust mask, non-skid safety shoes, hard hat, or hearing protection used . d) Remove any adjusting key or wrench before turning the power tool on the switch or energizing power tools that have the power tool repaired before making any other condition that the...
Instruction Manual
Page 10
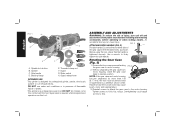
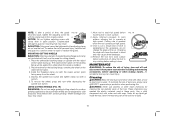
... re-assembled by more than 1/8" 90˚ 90˚ (3.17 mm), the tool must be fitted to 18 in the threaded holes, as shown. Use a wrench to motor housing. 2. Removethefourcornerscrewsattaching FIG. 3 the gear case to firmly tighten the side handle. Failure to desired position. Tighten screws to either side of the... HANDLE (FIG. 2) FIG. 2 C The side handle (C) can cause injury. Rotating the Gear Case (Fig. 3) 1. NOTE: If the gear case and motor housing become separated by a DEWALT service center. torque.
... re-assembled by more than 1/8" 90˚ 90˚ (3.17 mm), the tool must be fitted to 18 in the threaded holes, as shown. Use a wrench to motor housing. 2. Removethefourcornerscrewsattaching FIG. 3 the gear case to firmly tighten the side handle. Failure to desired position. Tighten screws to either side of the... HANDLE (FIG. 2) FIG. 2 C The side handle (C) can cause injury. Rotating the Gear Case (Fig. 3) 1. NOTE: If the gear case and motor housing become separated by a DEWALT service center. torque.
Instruction Manual
Page 14
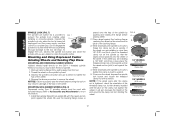
... spindle so that the raised section (pilot) fits into the center of the wheel. 4. While depressing the spindle lock button, tighten the clamp nut with a wrench. FIG. 8 D B E 1/4" WHEELS (6.35 mm) Clamp Nut Backing Flange 1/8" WHEELS (3.31 mm) Clamp Nut Backing Flange 12 Mounting and Using Depressed ...the spindle so that the raised section (pilot) is not against the wheel, it will result. Depress the spindle lock button and use a wrench to remove the wheel. To engage the lock, depress the spindle lock button and rotate the spindle until you are installing is more information....
... spindle so that the raised section (pilot) fits into the center of the wheel. 4. While depressing the spindle lock button, tighten the clamp nut with a wrench. FIG. 8 D B E 1/4" WHEELS (6.35 mm) Clamp Nut Backing Flange 1/8" WHEELS (3.31 mm) Clamp Nut Backing Flange 12 Mounting and Using Depressed ...the spindle so that the raised section (pilot) is not against the wheel, it will result. Depress the spindle lock button and use a wrench to remove the wheel. To engage the lock, depress the spindle lock button and rotate the spindle until you are installing is more information....
Instruction Manual
Page 16
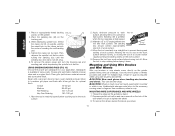
... Finishing 100 - 120 grit Very Fine Finishing 150 - 180 grit 1. Remove the tool from accessory wheel or cup. English 1. Depress spindle lock button and use a wrench on the grinder spindle without moving, or moving the tool in use of the wire wheel or brush to fragment from work surface. 5. To remove...
... Finishing 100 - 120 grit Very Fine Finishing 150 - 180 grit 1. Remove the tool from accessory wheel or cup. English 1. Depress spindle lock button and use a wrench on the grinder spindle without moving, or moving the tool in use of the wire wheel or brush to fragment from work surface. 5. To remove...
Instruction Manual
Page 18
... the plastic materials used for cleaning the non-metallic parts of the tool. Cleaning WARNING: Blow dirt and dust out of all air vents with a wrench. 5. Depress the spindle lock button and tighten clamp nut with clean, dry air at least once a week. Remove the tool from power source before installing...
... the plastic materials used for cleaning the non-metallic parts of the tool. Cleaning WARNING: Blow dirt and dust out of all air vents with a wrench. 5. Depress the spindle lock button and tighten clamp nut with clean, dry air at least once a week. Remove the tool from power source before installing...
Parts List
Page 4
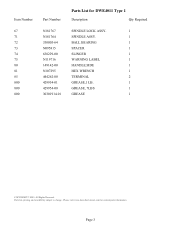
... 429954-00 30301914-01 Parts List for current parts information. Parts list, pricing, and availability subject to change. Page 3 Please visit www.dewaltservicenet.com for DWE4011 Type 1 Description Qty Required SPINDLE LOCK ASSY. 1 SPINDLE ASSY. 1 BALL BEARING 1 SPACER 1 SLINGER 1 WARNING LABEL 1 HANDLE,SIDE 1 HEX...
... 429954-00 30301914-01 Parts List for current parts information. Parts list, pricing, and availability subject to change. Page 3 Please visit www.dewaltservicenet.com for DWE4011 Type 1 Description Qty Required SPINDLE LOCK ASSY. 1 SPINDLE ASSY. 1 BALL BEARING 1 SPACER 1 SLINGER 1 WARNING LABEL 1 HANDLE,SIDE 1 HEX...
