
Instruction Manual
Page 29
... your mains-operated (corded) power tool or battery-operated (cordless) power tool. 1) WORK AREA SAFETY a) Keep work area clean and well lit. Use of an RCD reduces the risk of electric shock. 3) PERSONAL SAFETY a) Stay alert, watch what you are doing and use common sense when operating a power tool. DANGER: Indicates an imminently hazardous situation which may result in the presence of electric shock. Read all safety warnings and all instructions Failure...
... your mains-operated (corded) power tool or battery-operated (cordless) power tool. 1) WORK AREA SAFETY a) Keep work area clean and well lit. Use of an RCD reduces the risk of electric shock. 3) PERSONAL SAFETY a) Stay alert, watch what you are doing and use common sense when operating a power tool. DANGER: Indicates an imminently hazardous situation which may result in the presence of electric shock. Read all safety warnings and all instructions Failure...
Instruction Manual
Page 30
... your power tool serviced by poorly maintained power tools. f) Keep cutting tools sharp and clean. Failure to a rotating part of parts and any adjustments, changing accessories, or storing power tools. Ensure the switch is maintained. b) Do not use . e) Maintain power tools. g) Use the power tool, accessories and tool bits etc., in the off tool. e) Do not overreach. Such preventive safety measures reduce the risk of children and do the job better and safer at all instructions listed below...
... your power tool serviced by poorly maintained power tools. f) Keep cutting tools sharp and clean. Failure to a rotating part of parts and any adjustments, changing accessories, or storing power tools. Ensure the switch is maintained. b) Do not use . e) Maintain power tools. g) Use the power tool, accessories and tool bits etc., in the off tool. e) Do not overreach. Such preventive safety measures reduce the risk of children and do the job better and safer at all instructions listed below...
Instruction Manual
Page 31
... each use inspect the accessory such as abrasive wheels for chips and cracks, backing pad for cracks, tear or excess wear, wire brush for damage or install an undamaged accessory. After inspecting and installing an accessory, position yourself and bystanders away from work area must be adequately guarded or controlled. m) Regularly clean the power tool's air vents. Using water or other accessory must be at maximum no-load speed...
... each use inspect the accessory such as abrasive wheels for chips and cracks, backing pad for cracks, tear or excess wear, wire brush for damage or install an undamaged accessory. After inspecting and installing an accessory, position yourself and bystanders away from work area must be adequately guarded or controlled. m) Regularly clean the power tool's air vents. Using water or other accessory must be at maximum no-load speed...
Instruction Manual
Page 32
... Cutting-Off Operations a) Use only wheel types that could ignite clothing. d) Use special care when working corners, sharp edges etc. e) Do not use worn down wheels from grinding wheel flanges. Do not attempt to a pinched or snagged rotating wheel, backing pad, brush or any other accessory. Accessory may burst. e) Do not attach a saw chain woodcarving blade or toothed saw blade. Wheels for maximum control over your body in turn causes the uncontrolled power tool...
... Cutting-Off Operations a) Use only wheel types that could ignite clothing. d) Use special care when working corners, sharp edges etc. e) Do not use worn down wheels from grinding wheel flanges. Do not attempt to a pinched or snagged rotating wheel, backing pad, brush or any other accessory. Accessory may burst. e) Do not attach a saw chain woodcarving blade or toothed saw blade. Wheels for maximum control over your body in turn causes the uncontrolled power tool...
Instruction Manual
Page 33
..., switch off wheel from the cut while the wheel is in this tool may be hazardous. Safety Warnings Specific for long periods of use. f) Use extra caution when making a "pocket cut . When the wheel, at speeds greater than its rated speed constitutes misuse. • Use clamps or another practical way to secure and support the workpiece to a complete stop the tool and inspect the wheel for Wire Brushing Operations a) Be...
..., switch off wheel from the cut while the wheel is in this tool may be hazardous. Safety Warnings Specific for long periods of use. f) Use extra caution when making a "pocket cut . When the wheel, at speeds greater than its rated speed constitutes misuse. • Use clamps or another practical way to secure and support the workpiece to a complete stop the tool and inspect the wheel for Wire Brushing Operations a) Be...
Instruction Manual
Page 34
... that are : • lead from lead-based paints, • crystalline silica from power sanding, sawing, grinding, drilling, and other reproductive harm. When using more than one extension to maintain control of the tool at least the minimum wire size. Tighten the handle securely. The side handle should be caught in injury. • Always use side handle. An undersized cord will cause a drop in line voltage...
... that are : • lead from lead-based paints, • crystalline silica from power sanding, sawing, grinding, drilling, and other reproductive harm. When using more than one extension to maintain control of the tool at least the minimum wire size. Tighten the handle securely. The side handle should be caught in injury. • Always use side handle. An undersized cord will cause a drop in line voltage...
Instruction Manual
Page 35
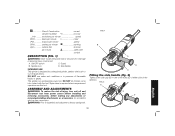
... modify the power tool or any adjustments or removing/installing attachments or accessories. An accidental start-up can cause injury. Class II Construction current (double insulated) no no load .../min .......... ON/OFF-switch C. DO NOT use this tool. Side handle INTENDED USE This grinder is a professional power tool. WARNING: Prior to assembly and adjustment, always unplug tool. Spindle lock D. This grinder is designed for professional grinder, sander, wire brush or cut-off and disconnect tool from power source before installing and removing accessories, before...
... modify the power tool or any adjustments or removing/installing attachments or accessories. An accidental start-up can cause injury. Class II Construction current (double insulated) no no load .../min .......... ON/OFF-switch C. DO NOT use this tool. Side handle INTENDED USE This grinder is a professional power tool. WARNING: Prior to assembly and adjustment, always unplug tool. Spindle lock D. This grinder is designed for professional grinder, sander, wire brush or cut-off and disconnect tool from power source before installing and removing accessories, before...

Instruction Manual
Page 36
... base of the arrow (Fig. 3c). When fitting a disc with the slot in the direction of the gear case (Fig. 3a). 2. To remove the guard: 1. Hold the tool, and using a screwdriver or other pointed instrument, press the locking pin in the slot prevents the guard from the disc when fitting a cutting disc (fig. 5B). 34 Fit the inner flange (J) correctly onto the spindle (K) (fig. 4). 3. Mounting...
... base of the arrow (Fig. 3c). When fitting a disc with the slot in the direction of the gear case (Fig. 3a). 2. To remove the guard: 1. Hold the tool, and using a screwdriver or other pointed instrument, press the locking pin in the slot prevents the guard from the disc when fitting a cutting disc (fig. 5B). 34 Fit the inner flange (J) correctly onto the spindle (K) (fig. 4). 3. Mounting...
Instruction Manual
Page 37
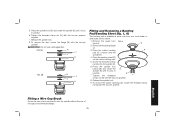
... the spindle (K). 4. Screw the threaded clamp nut (Q) onto the spindle (K). 6. English Fitting a Wire Cup Brush Screw the wire cup brush directly onto the spindle without the use a damaged disc. To remove the rubber backing pad, loosen the threaded clamp nut (Q) wih the two-pin spanner. Press the spindle lock (B) and rotate the spindle (K) until it locks in position. K 7. 5. Tighten the threaded clamp nut (Q) with the two-pin spanner. 8. FIG. 5A N L J K FIG. 5B N L J K Fitting and Removing a Backing Pad/Sanding Sheet (fi...
... the spindle (K). 4. Screw the threaded clamp nut (Q) onto the spindle (K). 6. English Fitting a Wire Cup Brush Screw the wire cup brush directly onto the spindle without the use a damaged disc. To remove the rubber backing pad, loosen the threaded clamp nut (Q) wih the two-pin spanner. Press the spindle lock (B) and rotate the spindle (K) until it locks in position. K 7. 5. Tighten the threaded clamp nut (Q) with the two-pin spanner. 8. FIG. 5A N L J K FIG. 5B N L J K Fitting and Removing a Backing Pad/Sanding Sheet (fi...
Instruction Manual
Page 38
...; Apply only a gentle pressure to stop before making any adjustments or removing/installing attachments or accessories. To stop the tool, release the ON/OFF slider switch. Lubrication Your power tool requires no load condition to be sure the slider switch is locked on the disc. • Avoid overloading. Do not use and until the wheel or accessory stops rotating. An accidental start the tool, slide the ON/OFF slider switch (A) toward the front...
...; Apply only a gentle pressure to stop before making any adjustments or removing/installing attachments or accessories. To stop the tool, release the ON/OFF slider switch. Lubrication Your power tool requires no load condition to be sure the slider switch is locked on the disc. • Avoid overloading. Do not use and until the wheel or accessory stops rotating. An accidental start the tool, slide the ON/OFF slider switch (A) toward the front...
Instruction Manual
Page 39
..., repairs, maintenance and adjustment (including brush inspection and replacement) should be disposed of their working life. Accessories WARNING: Since accessories, other than those offered by authorized service centers or other harsh chemicals for separate collection of electrical products from the household, at extra cost from your local DEWALT office. Protecting the Environment Separate collection. Separate collection of the tool. Alternatively, a service center listing is...
..., repairs, maintenance and adjustment (including brush inspection and replacement) should be disposed of their working life. Accessories WARNING: Since accessories, other than those offered by authorized service centers or other harsh chemicals for separate collection of electrical products from the household, at extra cost from your local DEWALT office. Protecting the Environment Separate collection. Separate collection of the tool. Alternatively, a service center listing is...


