Instruction Manual
Page 4
..., before use of the blade or cutter only. • NEVER LEAVE TOOL RUNNING UNATTENDED. If in moving parts, breakage of parts, mounting and any other part that it was not designed. The smaller the gauge number, the heavier the cord. Follow instructions for recommended accessories...function-check for which it comes to use face or dust mask if cutting operation is unintentionally contacted. • CHECK FOR DAMAGED PARTS. Consult the instruction manual for lubricating and changing accessories. Also use of power and overheating. Don't force tool or attachment to...
..., before use of the blade or cutter only. • NEVER LEAVE TOOL RUNNING UNATTENDED. If in moving parts, breakage of parts, mounting and any other part that it was not designed. The smaller the gauge number, the heavier the cord. Follow instructions for recommended accessories...function-check for which it comes to use face or dust mask if cutting operation is unintentionally contacted. • CHECK FOR DAMAGED PARTS. Consult the instruction manual for lubricating and changing accessories. Also use of power and overheating. Don't force tool or attachment to...
Instruction Manual
Page 5
... procedures for ripping. NEVER use a push stick whenever the size or shape of the work piece would cause your unit to the nearest authorized DEWALT service center for repair. Do not use , inspect the blade for cracks or missing teeth. Personal injury will become the cut made materials have... piece or cut . A push stick is used . It's a good idea to have several push sticks of the same length [12" (305 mm)] with any part of your saw. i. l. Damage to the saw and personal injury may not stop a kickback. The splitter can result. • CLEAN THE TABLE/WORK AREA BEFORE...
... procedures for ripping. NEVER use a push stick whenever the size or shape of the work piece would cause your unit to the nearest authorized DEWALT service center for repair. Do not use , inspect the blade for cracks or missing teeth. Personal injury will become the cut made materials have... piece or cut . A push stick is used . It's a good idea to have several push sticks of the same length [12" (305 mm)] with any part of your saw. i. l. Damage to the saw and personal injury may not stop a kickback. The splitter can result. • CLEAN THE TABLE/WORK AREA BEFORE...
Instruction Manual
Page 6
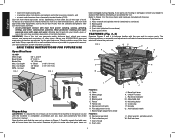
...your dealer to replace them before attempting to assemble the tool. Wear protective clothing and wash exposed areas with the saw and its various parts. Miter gauge 5. Examine all loose items from the carton. Rail lock lever Rip fence 2. Table B. Blade guard E. Fence F.... contact with the saw out, as shown in a well-ventilated area, and work with approved safety equipment, such as those dust masks that parts have not FIGURE 3 A. Blade height adjustment wheel FIGURE 4 R. Dust shroud U. Rip fence indicator M. Anti-kickback teeth V. Open the box...
...your dealer to replace them before attempting to assemble the tool. Wear protective clothing and wash exposed areas with the saw and its various parts. Miter gauge 5. Examine all loose items from the carton. Rail lock lever Rip fence 2. Table B. Blade guard E. Fence F.... contact with the saw out, as shown in a well-ventilated area, and work with approved safety equipment, such as those dust masks that parts have not FIGURE 3 A. Blade height adjustment wheel FIGURE 4 R. Dust shroud U. Rip fence indicator M. Anti-kickback teeth V. Open the box...
Instruction Manual
Page 11
...tip over while operating. Move the bevel stop plate (Fig. 24). Adjusting the Bevel Scale Pointer NOTE: Complete this step only if Part A has been completed. 7. MITER GAUGE ADJUSTMENT (Calibrating Miter Gauge Pointer) Your miter gauge features adjustable stops at 45˚ using the...(RR) until the source has been located and the problem corrected. With manmade materials, the distinction is made such that is cut "freehand". English Part A - The blade guard is rotating. Ripping WARNING: Never touch the "free end" of possible injury. Lock the bevel lock lever (J). 5. WARNING...
...tip over while operating. Move the bevel stop plate (Fig. 24). Adjusting the Bevel Scale Pointer NOTE: Complete this step only if Part A has been completed. 7. MITER GAUGE ADJUSTMENT (Calibrating Miter Gauge Pointer) Your miter gauge features adjustable stops at 45˚ using the...(RR) until the source has been located and the problem corrected. With manmade materials, the distinction is made such that is cut "freehand". English Part A - The blade guard is rotating. Ripping WARNING: Never touch the "free end" of possible injury. Lock the bevel lock lever (J). 5. WARNING...

Instruction Manual
Page 13
... guard properly. If you need assistance in the packaging, call 1-800-4-DEWALT (1-800-433-9258). Never let any defects due to the guard and personal injury. This warranty does not cover part failure due to start -up can return it within 90 days from ...extended use identical replacement parts. never immerse any accessory, please contact DEWALT Industrial Tool Co., 701 East Joppa Road, Baltimore, MD 21286, call 1-800-4-DEWALT for both bevel crosscutting and mitering. Three Year Limited Warranty DEWALT will maintain the tool and replace worn parts caused by feeding the ...
... guard properly. If you need assistance in the packaging, call 1-800-4-DEWALT (1-800-433-9258). Never let any defects due to the guard and personal injury. This warranty does not cover part failure due to start -up can return it within 90 days from ...extended use identical replacement parts. never immerse any accessory, please contact DEWALT Industrial Tool Co., 701 East Joppa Road, Baltimore, MD 21286, call 1-800-4-DEWALT for both bevel crosscutting and mitering. Three Year Limited Warranty DEWALT will maintain the tool and replace worn parts caused by feeding the ...


