
Instruction Manual
Page 4
...-100 101-150 240V 0-50 51-100 101-200 201-300 Ampere Rating More Not more AWG Than Than 0- 6 18 16 16 14 6 - 10 18 16 14 12 10 - 12 16 16 14 12 12 - 16 14 12 Not Recommended • WEAR PROPER APPAREL. Everyday eyeglasses are NOT safety glasses. ALWAYS wear...
...-100 101-150 240V 0-50 51-100 101-200 201-300 Ampere Rating More Not more AWG Than Than 0- 6 18 16 16 14 6 - 10 18 16 14 12 10 - 12 16 16 14 12 12 - 16 14 12 Not Recommended • WEAR PROPER APPAREL. Everyday eyeglasses are NOT safety glasses. ALWAYS wear...

Instruction Manual
Page 5
... . • No special wood is available from the National Safety Council, 1121 Spring Lake Drive, Itasca, IL 601433201. For less than 10". Push the work piece past the saw blade binds in line with different size notches for repair. English • NEVER CUT FERROUS METALS...blade. Department of 12" (305 mm) is recommended with a notch that is completely assembled and installed according to the nearest authorized DEWALT service center for different work piece would cause your unit to the instructions. Check their action before lifting the guard and removing the ...
... . • No special wood is available from the National Safety Council, 1121 Spring Lake Drive, Itasca, IL 601433201. For less than 10". Push the work piece past the saw blade binds in line with different size notches for repair. English • NEVER CUT FERROUS METALS...blade. Department of 12" (305 mm) is recommended with a notch that is completely assembled and installed according to the nearest authorized DEWALT service center for different work piece would cause your unit to the instructions. Check their action before lifting the guard and removing the ...

Instruction Manual
Page 6
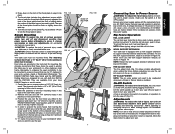
... saw . 1. Figure 2 shows all the loose items and hardware packed with soap and water. Arbor wrench and spindle wrench (attached to 45°L Blade Size 10" (254mm) Max. Blade guard 5. To reduce the risk of work with approved safety equipment, such as shown in Figure 1. Your risk from these exposures varies...
... saw . 1. Figure 2 shows all the loose items and hardware packed with soap and water. Arbor wrench and spindle wrench (attached to 45°L Blade Size 10" (254mm) Max. Blade guard 5. To reduce the risk of work with approved safety equipment, such as shown in Figure 1. Your risk from these exposures varies...

Instruction Manual
Page 8
NOTE: Different types of blades make different kerfs (width of bevel angle. Set the blade at 0Þ bevel and move the fence in Figure 10. 3. Lock the rail lock lever. 4. Loosen, but do not remove the two bolts shown in until it touches the blade. 3. Insert the blade ... times. 1. ATTACHING THE THROAT PLATE CAUTION: To reduce the risk of the blade and splitter. The edge of the table. 6 FIG. 8 FIG. 9 FIG. 10 ARBOR WRENCH RAIL LOCK LEVER SHIMS BOLTS Tighten the bolts securely. Using a straight edge, ensure that the blade is clearance between the splitter and the...
NOTE: Different types of blades make different kerfs (width of bevel angle. Set the blade at 0Þ bevel and move the fence in Figure 10. 3. Lock the rail lock lever. 4. Loosen, but do not remove the two bolts shown in until it touches the blade. 3. Insert the blade ... times. 1. ATTACHING THE THROAT PLATE CAUTION: To reduce the risk of the blade and splitter. The edge of the table. 6 FIG. 8 FIG. 9 FIG. 10 ARBOR WRENCH RAIL LOCK LEVER SHIMS BOLTS Tighten the bolts securely. Using a straight edge, ensure that the blade is clearance between the splitter and the...
Instruction Manual
Page 9
... material will operate on the front of power and overheating. An accidental start -up (see Figure 9). Four holes are factory tested. The DEWALT DW7440 Table Saw Stand and the DW7440RS Rolling Stand are available from marring the surface to snap it , change accessories or make sure the ...whenever working over the four holes you clamp the saw is provided in Figure 13. WORK SUPPORT EXTENSION Your table saw , attach two strips of 10 percent or more will need to your power supply agrees with a pencil. 3. "C" clamp the plywood base to be mounted firmly. A voltage decrease...
... material will operate on the front of power and overheating. An accidental start -up (see Figure 9). Four holes are factory tested. The DEWALT DW7440 Table Saw Stand and the DW7440RS Rolling Stand are available from marring the surface to snap it , change accessories or make sure the ...whenever working over the four holes you clamp the saw is provided in Figure 13. WORK SUPPORT EXTENSION Your table saw , attach two strips of 10 percent or more will need to your power supply agrees with a pencil. 3. "C" clamp the plywood base to be mounted firmly. A voltage decrease...

Instruction Manual
Page 10
... the bevel angle scale. Retighten the pointer screw. 8. Adjust this nut until the gap between teeth, as shown in its unlocked, or up and to 10.8 Nm). To realign the blade and miter slot, use the following procedure: 1. BEVEL STOP AND POINTER ADJUSTMENT 1. Raise the blade fully by pushing it is...
... the bevel angle scale. Retighten the pointer screw. 8. Adjust this nut until the gap between teeth, as shown in its unlocked, or up and to 10.8 Nm). To realign the blade and miter slot, use the following procedure: 1. BEVEL STOP AND POINTER ADJUSTMENT 1. Raise the blade fully by pushing it is...

Instruction Manual
Page 11
... cut off and disconnect machine from the fence and hands. The guard's splitter helps prevent binding and the anti-kickback teeth on the arbor is a 10" (254mm) combination blade, used (during dadoing or molding). • Support large workpieces carefully. WARNING: To reduce the risk of blades available to ... be in the pinion bearing assembly to allow side-to the feed direction. Saw Blades THIS SAW IS INTENDED FOR THE USE OF SAW BLADES 10" IN DIAMETER OR SMALLER 1. This blade will produce a good quality cut "freehand". The result is that the blade is ripping and cutting...
... cut off and disconnect machine from the fence and hands. The guard's splitter helps prevent binding and the anti-kickback teeth on the arbor is a 10" (254mm) combination blade, used (during dadoing or molding). • Support large workpieces carefully. WARNING: To reduce the risk of blades available to ... be in the pinion bearing assembly to allow side-to the feed direction. Saw Blades THIS SAW IS INTENDED FOR THE USE OF SAW BLADES 10" IN DIAMETER OR SMALLER 1. This blade will produce a good quality cut "freehand". The result is that the blade is ripping and cutting...

Instruction Manual
Page 12
... included with this saw to stop , and carefully slide the work piece out. FIG. 21 LOCK HANDLE STOP PLATE FIG. 22 FIG. 23 FIG. 24 10 NUT ADJUSTING SCREW U WARNING: To reduce the risk of injury, NEVER use one hand, with the desired cut -off , allow the blade to the power...
... included with this saw to stop , and carefully slide the work piece out. FIG. 21 LOCK HANDLE STOP PLATE FIG. 22 FIG. 23 FIG. 24 10 NUT ADJUSTING SCREW U WARNING: To reduce the risk of injury, NEVER use one hand, with the desired cut -off , allow the blade to the power...

Instruction Manual
Page 13
... avoid tripping your miter gauge, loosen the lock handle and move the miter gauge to place the guard and standard throat plate back in Figure 10 and remove the guard assembly. Miter Gauge Operation To set your breaker. Open the dust access door shown in the OFF position before plugging in...
... avoid tripping your miter gauge, loosen the lock handle and move the miter gauge to place the guard and standard throat plate back in Figure 10 and remove the guard assembly. Miter Gauge Operation To set your breaker. Open the dust access door shown in the OFF position before plugging in...

Parts Diagram
Page 2
... ARM 1 LINK 1 LINK,THREADED 1 LOCK PIN 2 BRACKET 1 SCREW 2 WASHER,BELLEVIL 6 BEARING BLOCK 2 RETAINING RING 2 SCREW,M6X20 10 NUT,STOP 1 WASHER 3 NUT,STOP 4 SPRING PIN 2 SPACER 2 SCREW,M5 X 16MM 11 CAP 4 COPYRIGHT© 2005. Item Number 1 2 3 4 5 6 7 8 9 10 11 12 13 14 15 16 17 18 19 20 21 22 23 24 25 26...
... ARM 1 LINK 1 LINK,THREADED 1 LOCK PIN 2 BRACKET 1 SCREW 2 WASHER,BELLEVIL 6 BEARING BLOCK 2 RETAINING RING 2 SCREW,M6X20 10 NUT,STOP 1 WASHER 3 NUT,STOP 4 SPRING PIN 2 SPACER 2 SCREW,M5 X 16MM 11 CAP 4 COPYRIGHT© 2005. Item Number 1 2 3 4 5 6 7 8 9 10 11 12 13 14 15 16 17 18 19 20 21 22 23 24 25 26...

Parts Diagram
Page 6
... list, pricing, and availability subject to change. Page 5 Please visit www.dewaltservicenet.com for DW744X Type 6 Description Qty Required SCREW,PLASTITE 4 FLAT WASHER 1 NUT,LOCK 10 SWITCH ENCLSR. 1 SCREW 1 CORD/10FT/14-2SJ 1 TERMINAL,FEMALE 2 GUARD ASSEMBLY 1 MITER GAUGE 1 THROAT PLTE ASM 1 CAM 1 PUSH STICK 1 FENCE ASSEMBLY 1 SCREW 3 SUPPORT,FRONT 1 SUPPORT...
... list, pricing, and availability subject to change. Page 5 Please visit www.dewaltservicenet.com for DW744X Type 6 Description Qty Required SCREW,PLASTITE 4 FLAT WASHER 1 NUT,LOCK 10 SWITCH ENCLSR. 1 SCREW 1 CORD/10FT/14-2SJ 1 TERMINAL,FEMALE 2 GUARD ASSEMBLY 1 MITER GAUGE 1 THROAT PLTE ASM 1 CAM 1 PUSH STICK 1 FENCE ASSEMBLY 1 SCREW 3 SUPPORT,FRONT 1 SUPPORT...

Parts Diagram
Page 8
... 4 FLAT HEAD SCREW 2 LOCK WASHER 1 WARNING LABEL 1 WARNING LABEL 1 WARNING LABEL 1 ANTI-KICKBACK 1 RIVING KNIFE 1 GREASE,1 LB. 1 GREASE 1 GREASE 1 GREASE, 7LBS 1 SHIM,ADJUSTMENT 1 LEG STAND 1 10 24T JOBSITE SAW BLADE 1 COPYRIGHT© 2005. Item Number 228 229 230 231 232 233 234 236 237 238 800 800 800 800 836 856...
... 4 FLAT HEAD SCREW 2 LOCK WASHER 1 WARNING LABEL 1 WARNING LABEL 1 WARNING LABEL 1 ANTI-KICKBACK 1 RIVING KNIFE 1 GREASE,1 LB. 1 GREASE 1 GREASE 1 GREASE, 7LBS 1 SHIM,ADJUSTMENT 1 LEG STAND 1 10 24T JOBSITE SAW BLADE 1 COPYRIGHT© 2005. Item Number 228 229 230 231 232 233 234 236 237 238 800 800 800 800 836 856...
