
Instruction Manual
Page 6
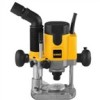
... remove the bit. FIG. 2 PLASTIC CAP FIG. 4 FINE ADJUSTMENT KNOB 0. 0.6 PLUNGE LOCK 3/4 5/8 HANDLE DEPTH STOP LOCKING BOLT English 1/2 TABS FIG. 3 SPEED CONTROL DIAL collet nut will turn approximately 3/4 of Cut QUICK ADJUSTMENT USING RACK AND PINION HEIGHT ADJUSTMENT (FIG. 4) 1) UNPLUG THE ROUTER. Use the lower settings (1-3) for large diameter cutters and the...
... remove the bit. FIG. 2 PLASTIC CAP FIG. 4 FINE ADJUSTMENT KNOB 0. 0.6 PLUNGE LOCK 3/4 5/8 HANDLE DEPTH STOP LOCKING BOLT English 1/2 TABS FIG. 3 SPEED CONTROL DIAL collet nut will turn approximately 3/4 of Cut QUICK ADJUSTMENT USING RACK AND PINION HEIGHT ADJUSTMENT (FIG. 4) 1) UNPLUG THE ROUTER. Use the lower settings (1-3) for large diameter cutters and the...
Instruction Manual
Page 7
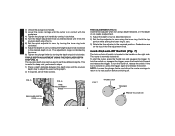
... forward and release the trigger. To lock the switch on the top of the fine adjustment knob. To turn the router off . NOTE: Loosen the plunge limiter and allow the router carriage to return to its rest position before switching off , release the switch. To start the... the exact cutting depth. 2) If required, set three different depths. English 2) Unlock the plunge lock handle. 3) Lower the router carriage until the cutter is in contact with the workpiece 4) Tighten the plunge lock handle by turning it clockwise. 5) Turn the height adjustment knob counterclockwise until it hits ...
... forward and release the trigger. To lock the switch on the top of the fine adjustment knob. To turn the router off . NOTE: Loosen the plunge limiter and allow the router carriage to return to its rest position before switching off , release the switch. To start the... the exact cutting depth. 2) If required, set three different depths. English 2) Unlock the plunge lock handle. 3) Lower the router carriage until the cutter is in contact with the workpiece 4) Tighten the plunge lock handle by turning it clockwise. 5) Turn the height adjustment knob counterclockwise until it hits ...
Instruction Manual
Page 8
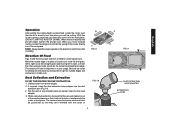
...for some typical cuts. Operation After setting the cutting depth as described, locate the router such that the bit is directly over the place you have finished routing, loosen the plunge lock and let the spring lift the router directly out of stock by moving left to right on outside edge of a ...piece of the workpiece. NOTE: Always feed the router opposite to right, c) finish the other end grain side, and ...
...for some typical cuts. Operation After setting the cutting depth as described, locate the router such that the bit is directly over the place you have finished routing, loosen the plunge lock and let the spring lift the router directly out of stock by moving left to right on outside edge of a ...piece of the workpiece. NOTE: Always feed the router opposite to right, c) finish the other end grain side, and ...
Instruction Manual
Page 9
...Recommended accessories for your tool are not using a vacuum. Be sure it should be positioned properly, it is used on vacuum cleaner before router. 5. NOTE: Use only a DRY cloth to faulty materials or workmanship. We will repair, without charge, any other rights which vary in...use of your tool, contact: DEWALT Industrial Tool Company 626 Hanover Pike, P.O. Lubricants attract dust, reducing the performance of any defects due to wipe the plunge rods. If you are available at extra cost from date of Black & Decker to plunge cut through the plastic guard. See...
...Recommended accessories for your tool are not using a vacuum. Be sure it should be positioned properly, it is used on vacuum cleaner before router. 5. NOTE: Use only a DRY cloth to faulty materials or workmanship. We will repair, without charge, any other rights which vary in...use of your tool, contact: DEWALT Industrial Tool Company 626 Hanover Pike, P.O. Lubricants attract dust, reducing the performance of any defects due to wipe the plunge rods. If you are available at extra cost from date of Black & Decker to plunge cut through the plastic guard. See...
