
Instruction Manual
Page 1
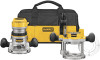
... L. Detachable cordset B. Depth adjustment ring M. Turret stop F. MOTOR QUICK RELEASE (FIG. 2) 1. Open the locking lever (D) on cord length and nameplate ampere rating. Insert the motor into the base by depressing the spindle lock button (I ) to move freely. 2. NOTE: Guide pin grooves are : • lead from lead-based paints, • crystalline silica from power source before installing and removing accessories, before adjusting or when making repairs. See the heading Adjusting the Depth of Cut in the Operation: Fixed Base section of...
... L. Detachable cordset B. Depth adjustment ring M. Turret stop F. MOTOR QUICK RELEASE (FIG. 2) 1. Open the locking lever (D) on cord length and nameplate ampere rating. Insert the motor into the base by depressing the spindle lock button (I ) to move freely. 2. NOTE: Guide pin grooves are : • lead from lead-based paints, • crystalline silica from power source before installing and removing accessories, before adjusting or when making repairs. See the heading Adjusting the Depth of Cut in the Operation: Fixed Base section of...

Instruction Manual
Page 2
... in the Operation: D-Handle Base section of cut . TRIGGER LOCK (FIG. 1) To lock the trigger, pull the trigger switch (N) completely, then push the trigger lock button (O). BIT INSTALLATION AND REMOVAL (FIG. 6) 1. Continue turning the collet nut counterclockwise. Install the desired collet by pushing up . 2. ADJUSTING THE DEPTH OF CUT (FIG. 1, 3) 1. Place the router on setting cutting depth, see country specific warranty information contained in the router base. Adjust as needed for any liquid get inside cut on position. MOTOR QUICK RELEASE 1. LOCKING LEVER...
... in the Operation: D-Handle Base section of cut . TRIGGER LOCK (FIG. 1) To lock the trigger, pull the trigger switch (N) completely, then push the trigger lock button (O). BIT INSTALLATION AND REMOVAL (FIG. 6) 1. Continue turning the collet nut counterclockwise. Install the desired collet by pushing up . 2. ADJUSTING THE DEPTH OF CUT (FIG. 1, 3) 1. Place the router on setting cutting depth, see country specific warranty information contained in the router base. Adjust as needed for any liquid get inside cut on position. MOTOR QUICK RELEASE 1. LOCKING LEVER...


