Instruction Manual
Page 6
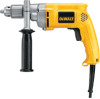
... the three holes, and tighten in the on position (Figure 3). Keyed Chucks Open chuck jaws by turning collar with the bit. Place chuck key in place of a drilled hole. Any authorized DEWALT service center can provide a lock-out key to control the twisting action of the drill. 6. NOTE: DO ...determine cause of stalling. SWITCH LOCK-ON Your drill is moving. The service center can install a keyless chuck in each of the hole. 8. RELEASE THE TRIGGER IMMEDIATELY, remove the drill bit from being overloaded or improperly used when backing out screws and jammed drill bits. Use a...
... the three holes, and tighten in the on position (Figure 3). Keyed Chucks Open chuck jaws by turning collar with the bit. Place chuck key in place of a drilled hole. Any authorized DEWALT service center can provide a lock-out key to control the twisting action of the drill. 6. NOTE: DO ...determine cause of stalling. SWITCH LOCK-ON Your drill is moving. The service center can install a keyless chuck in each of the hole. 8. RELEASE THE TRIGGER IMMEDIATELY, remove the drill bit from being overloaded or improperly used when backing out screws and jammed drill bits. Use a...


