
Instruction Manual
Page 5
SPECIFICATIONS Light Source Semiconductor laser diode Laser Wavelength 630 - 680 nm Visible Laser Power These Class B digital devices comply with Canadian ICES-003. English • Connect the equipment into an outlet on a circuit differentfrom that which the receiver is connected. • Consult the dealer or an experienced radio/TV technician for help.
SPECIFICATIONS Light Source Semiconductor laser diode Laser Wavelength 630 - 680 nm Visible Laser Power These Class B digital devices comply with Canadian ICES-003. English • Connect the equipment into an outlet on a circuit differentfrom that which the receiver is connected. • Consult the dealer or an experienced radio/TV technician for help.

Instruction Manual
Page 6
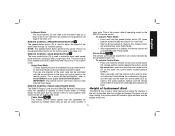
... not incinerate the battery pack even if it is severely damaged or is completely worn out. Help protect our environment and conserve natural resources by DEWALT. RBRC™ is 25-35% solution of opened battery cells may occur under extreme usage or temperature conditions. However, if the outer seal ... if exposed to facilitate the collection of the Rechargeable Battery Recycling Corporation. Important Safety Instructions for All Battery Chargers SAVE THESE INSTRUCTIONS: This manual contains important safety and operating instructions for 15 minutes or until irritation ceases.
... not incinerate the battery pack even if it is severely damaged or is completely worn out. Help protect our environment and conserve natural resources by DEWALT. RBRC™ is 25-35% solution of opened battery cells may occur under extreme usage or temperature conditions. However, if the outer seal ... if exposed to facilitate the collection of the Rechargeable Battery Recycling Corporation. Important Safety Instructions for All Battery Chargers SAVE THESE INSTRUCTIONS: This manual contains important safety and operating instructions for 15 minutes or until irritation ceases.

Instruction Manual
Page 7
...electrocution may burst causing personal injury and damage. Other types of batteries may result. Any other than charging DEWALT rechargeable batteries. The smaller the gauge number of the wire, the greater the capacity of charger or ... use an extension cord unless it will cause a drop in line voltage resulting in risk of injury, charge only DEWALT rechargeable batteries. Do not probe with damaged cord or plug. 5 Always unplug the charger from the power supply when...operating a power tool outdoors, use an extension cord suitable for any heat source. If in this manual.
...electrocution may burst causing personal injury and damage. Other types of batteries may result. Any other than charging DEWALT rechargeable batteries. The smaller the gauge number of the wire, the greater the capacity of charger or ... use an extension cord unless it will cause a drop in line voltage resulting in risk of injury, charge only DEWALT rechargeable batteries. Do not probe with damaged cord or plug. 5 Always unplug the charger from the power supply when...operating a power tool outdoors, use an extension cord suitable for any heat source. If in this manual.

Instruction Manual
Page 8
... use it to operate on continuously and will no longer delivers the same amount of work. The red light will not reduce this manual for compatibility of charge will begin the Automatic Tune-Up™ mode. The completion of chargers and battery packs. The pack is... Operation charge cycle has started . 3. This indicates that the charging process has started . 2. If the pack is required. Chargers Your tool uses a DEWALT 9.6, 12, 14.4, 18 Volt charger. Using Automatic Tune-Up™ Mode Charging Procedure DANGER: Electrocution hazard. 120 volts present at the end of electric...
... use it to operate on continuously and will no longer delivers the same amount of work. The red light will not reduce this manual for compatibility of charge will begin the Automatic Tune-Up™ mode. The completion of chargers and battery packs. The pack is... Operation charge cycle has started . 3. This indicates that the charging process has started . 2. If the pack is required. Chargers Your tool uses a DEWALT 9.6, 12, 14.4, 18 Volt charger. Using Automatic Tune-Up™ Mode Charging Procedure DANGER: Electrocution hazard. 120 volts present at the end of electric...

Instruction Manual
Page 11
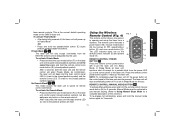
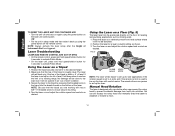
... the Battery Pack (Fig. 2) NOTE: Make sure your battery pack is closed and latched. 2. Insert the battery pack (C). The arrows control the movement of this manual. Four LED indicator lights are on . Laser Control Panel Buttons POWER BUTTON To completely power the laser unit off . In Sleep Mode all laser unit...
... the Battery Pack (Fig. 2) NOTE: Make sure your battery pack is closed and latched. 2. Insert the battery pack (C). The arrows control the movement of this manual. Four LED indicator lights are on . Laser Control Panel Buttons POWER BUTTON To completely power the laser unit off . In Sleep Mode all laser unit...
Instruction Manual
Page 12
...Private Mode or No Remote Mode as the speed/rotation button is used for a full description of the laser unit. This short line is not manually rotated, after four seconds the unit will scan between the two selected points. The size and direction of the desired scan zone. 4. While ...refer to position the laser beam at 0 rpm (pointer mode). 2. The laser unit can receive commands from any DEWALT laser remote control, and even from some other brands of 10 Manually rotate the laser head to Using the Wireless Remote Control. SCAN MODE BUTTON The scan mode button (F) is in either...
...Private Mode or No Remote Mode as the speed/rotation button is used for a full description of the laser unit. This short line is not manually rotated, after four seconds the unit will scan between the two selected points. The size and direction of the desired scan zone. 4. While ...refer to position the laser beam at 0 rpm (pointer mode). 2. The laser unit can receive commands from any DEWALT laser remote control, and even from some other brands of 10 Manually rotate the laser head to Using the Wireless Remote Control. SCAN MODE BUTTON The scan mode button (F) is in either...
Instruction Manual
Page 13
...completely power the laser unit off, the power button on the control panel of the laser unit must be pressed. REMOTE CONTROL: MANUAL MODE BUTTON To activate Manual Mode, press and hold the speed/rotation button (E) (open padlock symbol beside the button). This is left in Public Mode....; After being fully powered off, the laser unit will also automatically power off except for 3 seconds. OR • Press and hold the remote control manual mode button (N) for a periodic blink from a distance. To activate Private Mode: • Press and hold the scan mode button (F) on the laser...
...completely power the laser unit off, the power button on the control panel of the laser unit must be pressed. REMOTE CONTROL: MANUAL MODE BUTTON To activate Manual Mode, press and hold the speed/rotation button (E) (open padlock symbol beside the button). This is left in Public Mode....; After being fully powered off, the laser unit will also automatically power off except for 3 seconds. OR • Press and hold the remote control manual mode button (N) for a periodic blink from a distance. To activate Private Mode: • Press and hold the scan mode button (F) on the laser...
Instruction Manual
Page 14
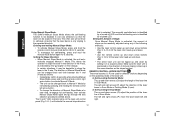
... right arrows (P) adjust the direction of slope can be desirable to self-level, ensuring that is activated, the unit automatically engages Manual Y Mode. The direction of Manual Slope Mode can be tipped up and down by the "gunsights" on a sloped surface. Make sure the laser unit is positioned... lighted LED. In certain situations, it on the rollcage. In Self-Leveling Horizontal Mode: The up and down arrows (O) adjust the position of manual sloping is identified by a turned-off LED, and the self-leveling axis is lined up and down . In Self-Leveling Vertical Mode: The up...
... right arrows (P) adjust the direction of slope can be desirable to self-level, ensuring that is activated, the unit automatically engages Manual Y Mode. The direction of Manual Slope Mode can be tipped up and down by the "gunsights" on a sloped surface. Make sure the laser unit is positioned... lighted LED. In certain situations, it on the rollcage. In Self-Leveling Horizontal Mode: The up and down arrows (O) adjust the position of manual sloping is identified by a turned-off LED, and the self-leveling axis is lined up and down . In Self-Leveling Vertical Mode: The up...
Instruction Manual
Page 15
... by multiple laser units as well as other models of the laser beam through its battery, the remote control will enter Private Mode. English In Manual Mode: The arrow buttons (O) are used to the same mode.
... by multiple laser units as well as other models of the laser beam through its battery, the remote control will enter Private Mode. English In Manual Mode: The arrow buttons (O) are used to the same mode.
Instruction Manual
Page 16
... damage from work site activities. No damage will be positioned directly on a Floor (Fig. 5) The laser level can still access the rotary head and manually direct the beam to the desired height. 2. If the laser is designed with has a 5/8"-11 threaded screw to set up the laser. Secure the ... the Laser on the floor for a level or plumb setting as framing walls. 1. Position the laser for leveling and plumbing applications such as shown. 3. Manual Head Rotation The laser is set up too far out of its leveling range. English TO RESET THE LASER UNIT FOR CONTINUED USE • Turn...
... damage from work site activities. No damage will be positioned directly on a Floor (Fig. 5) The laser level can still access the rotary head and manually direct the beam to the desired height. 2. If the laser is designed with has a 5/8"-11 threaded screw to set up the laser. Secure the ... the Laser on the floor for a level or plumb setting as framing walls. 1. Position the laser for leveling and plumbing applications such as shown. 3. Manual Head Rotation The laser is set up too far out of its leveling range. English TO RESET THE LASER UNIT FOR CONTINUED USE • Turn...

Instruction Manual
Page 76
Chargeurs/Durée de charge (Minutes) - All charge times are trademarks for more DEWALT power tools: the yellow and black color scheme; Read the instruction manual for one or more specific information. El tiempo de duración de carga es aproximado; the "D" shaped air intake ...Tool Co., 701 East Joppa Road, Baltimore, MD 21286 (FEB08) Part No. 648492-00 DW079 Copyright © 2008 DEWALT The following are approximate. Lea el manual de instrucciones para obtener información más precisa. Lire le manuel d'utilisation pour obtenir des renseignements plus précis...
Chargeurs/Durée de charge (Minutes) - All charge times are trademarks for more DEWALT power tools: the yellow and black color scheme; Read the instruction manual for one or more specific information. El tiempo de duración de carga es aproximado; the "D" shaped air intake ...Tool Co., 701 East Joppa Road, Baltimore, MD 21286 (FEB08) Part No. 648492-00 DW079 Copyright © 2008 DEWALT The following are approximate. Lea el manual de instrucciones para obtener información más precisa. Lire le manuel d'utilisation pour obtenir des renseignements plus précis...


