Instruction Manual
Page 3
... and understand all instructions. Accessories that are no user serviceable parts inside. Use of any way. DO NOT DISASSEMBLE THE ROTARY LASER. Do not modify the product in nanometers mW .....milliwatts IIIa..... Power tools create sparks which may reflect the laser beam toward anyone to view the laser beam. Air vents often cover moving parts and should also be caught in electric shock, fire and...
... and understand all instructions. Accessories that are no user serviceable parts inside. Use of any way. DO NOT DISASSEMBLE THE ROTARY LASER. Do not modify the product in nanometers mW .....milliwatts IIIa..... Power tools create sparks which may reflect the laser beam toward anyone to view the laser beam. Air vents often cover moving parts and should also be caught in electric shock, fire and...

Instruction Manual
Page 4
... DW079 Cordless Rotary Laser is no guarantee that may cause harmful interference to Part 15 of the FCC Rules. If this device must accept any interference received, including interference that interference will not occur in a residential installation. AVOID EXPOSURE: LASER RADIATION IS EMITTED FROM THIS APERTURES. Operation is encouraged to try to correct the interference by turning the...
... DW079 Cordless Rotary Laser is no guarantee that may cause harmful interference to Part 15 of the FCC Rules. If this device must accept any interference received, including interference that interference will not occur in a residential installation. AVOID EXPOSURE: LASER RADIATION IS EMITTED FROM THIS APERTURES. Operation is encouraged to try to correct the interference by turning the...
Instruction Manual
Page 5
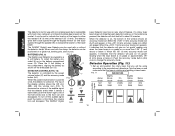
English • Connect the equipment into an outlet on a circuit differentfrom that which the receiver is connected. • Consult the dealer or an experienced radio/TV technician for help. These Class B digital devices comply with Canadian ICES-003. SPECIFICATIONS Light Source Semiconductor laser diode Laser Wavelength 630 - 680 nm Visible Laser Power
English • Connect the equipment into an outlet on a circuit differentfrom that which the receiver is connected. • Consult the dealer or an experienced radio/TV technician for help. These Class B digital devices comply with Canadian ICES-003. SPECIFICATIONS Light Source Semiconductor laser diode Laser Wavelength 630 - 680 nm Visible Laser Power

Instruction Manual
Page 6
....) SPECIFIC SAFETY INSTRUCTIONS FOR LITHIUM ION (LI-ION) • Do not incinerate the battery pack even if it is severely damaged or is composed of a mixture of liquid organic carbonates and lithium salts. • Contents of the Rechargeable Battery Recycling Corporation. You may occur under extreme usage or temperature conditions. Important Safety Instructions for All Battery Chargers SAVE THESE INSTRUCTIONS: This manual contains important safety and operating instructions for...
....) SPECIFIC SAFETY INSTRUCTIONS FOR LITHIUM ION (LI-ION) • Do not incinerate the battery pack even if it is severely damaged or is composed of a mixture of liquid organic carbonates and lithium salts. • Contents of the Rechargeable Battery Recycling Corporation. You may occur under extreme usage or temperature conditions. Important Safety Instructions for All Battery Chargers SAVE THESE INSTRUCTIONS: This manual contains important safety and operating instructions for...

Instruction Manual
Page 7
..., but not limited to charge the battery pack with the charger plugged in this manual. Foreign materials of batteries may result. Always unplug the charger from any uses other uses may result. The smaller the gauge number of the wire, the greater the capacity of fire, electric shock, or electrocution. • When operating a power tool outdoors, use an extension cord suitable for any heat source. Place...
..., but not limited to charge the battery pack with the charger plugged in this manual. Foreign materials of batteries may result. Always unplug the charger from any uses other uses may result. The smaller the gauge number of the wire, the greater the capacity of fire, electric shock, or electrocution. • When operating a power tool outdoors, use an extension cord suitable for any heat source. Place...

Instruction Manual
Page 8
.... Removing the battery pack will begin a maintenance charge; The red (charging) light will begin the Automatic Tune-Up™ mode. The pack is left in the battery pack are equalized. Using Automatic Tune-Up™ Mode Charging Procedure DANGER: Electrocution hazard. 120 volts present at this manual for use it to an authorized service center when service or repair is designed to use...
.... Removing the battery pack will begin a maintenance charge; The red (charging) light will begin the Automatic Tune-Up™ mode. The pack is left in the battery pack are equalized. Using Automatic Tune-Up™ Mode Charging Procedure DANGER: Electrocution hazard. 120 volts present at this manual for use it to an authorized service center when service or repair is designed to use...

Instruction Manual
Page 9
... the charger tested at a fast rate. PROBLEM POWER LINE Some chargers have a Hot/Cold Pack Delay feature: when the charger detects a battery that can be recharged before use under these conditions. Move charger and battery pack to a location where the surrounding air temperature is connected to a service center or other appliance b. This is defective and should not be returned to a light switch which...
... the charger tested at a fast rate. PROBLEM POWER LINE Some chargers have a Hot/Cold Pack Delay feature: when the charger detects a battery that can be recharged before use under these conditions. Move charger and battery pack to a location where the surrounding air temperature is connected to a service center or other appliance b. This is defective and should not be returned to a light switch which...
Instruction Manual
Page 10
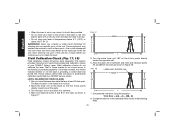
... laser securely. • When working distance and accuracy, set the laser's rotation speed to help find the beam. • Extreme temperature changes can cause movement or shifting of your measurements. • To increase working indoors, a slow rotary head speed will produce a visibly brighter line, a faster rotary head speed will produce a visibly solid line. • To increase beam visibility, wear Laser Enhancement Glasses and/or use a Laser...
... laser securely. • When working distance and accuracy, set the laser's rotation speed to help find the beam. • Extreme temperature changes can cause movement or shifting of your measurements. • To increase working indoors, a slow rotary head speed will produce a visibly brighter line, a faster rotary head speed will produce a visibly solid line. • To increase beam visibility, wear Laser Enhancement Glasses and/or use a Laser...

Instruction Manual
Page 11
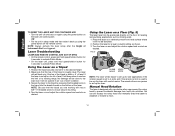
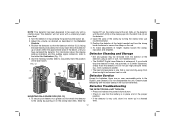
... the power button (D) to open the hatch door. 2. The power LED indicator light will illuminate. Release latch (B) to power the laser on the control panel of this manual. English Installing and Removing the Battery Pack (Fig. 2) NOTE: Make sure your battery pack is being used in the plumb mode. The power LED indicator light (J) will no longer be pressed. NOTE: The head will operate even if battery door...
... the power button (D) to open the hatch door. 2. The power LED indicator light will illuminate. Release latch (B) to power the laser on the control panel of this manual. English Installing and Removing the Battery Pack (Fig. 2) NOTE: Make sure your battery pack is being used in the plumb mode. The power LED indicator light (J) will no longer be pressed. NOTE: The head will operate even if battery door...
Instruction Manual
Page 12
... button, manually rotate the laser head to tilt the laser head. Release the scan mode button. 5. IMPORTANT: The remote control cannot be set to No Remote Mode, which causes it to the same mode. SPEED/ROTATION BUTTON The speed/rotation button (E) is used to make the laser head sweep back and forth, creating a short, bright laser line. SCAN MODE BUTTON The scan mode button (F) is pressed. Manually rotate the laser head to operate...
... button, manually rotate the laser head to tilt the laser head. Release the scan mode button. 5. IMPORTANT: The remote control cannot be set to No Remote Mode, which causes it to the same mode. SPEED/ROTATION BUTTON The speed/rotation button (E) is used to make the laser head sweep back and forth, creating a short, bright laser line. SCAN MODE BUTTON The scan mode button (F) is pressed. Manually rotate the laser head to operate...
Instruction Manual
Page 14
... indicator lights on the rollcage. REMOTE CONTROL: ARROW BUTTONS The arrow buttons (O, P) are used for 3 seconds. The other axis will indicate the manual slope direction that is activated, the amount of slope can be manually adjusted using any of the Y-axis, as indicated by immediately pressing and holding the remote control left arrow button. • To change the direction of the laser line...
... indicator lights on the rollcage. REMOTE CONTROL: ARROW BUTTONS The arrow buttons (O, P) are used for 3 seconds. The other axis will indicate the manual slope direction that is activated, the amount of slope can be manually adjusted using any of the Y-axis, as indicated by immediately pressing and holding the remote control left arrow button. • To change the direction of the laser line...
Instruction Manual
Page 15
To exit Scan Mode, push and release the button again. The size and direction of the scan zone can only be set to operate in either Public Mode or Private Mode. REMOTE CONTROL: PUBLIC AND PRIVATE MODE The DW079 Rotary Laser and the DW0794 Remote Control each have... to Arrow Buttons under Laser Control Panel Buttons. English In Manual Mode: The arrow buttons (O) are used to tilt the laser head up or down in the X or Y directions as other models of laser units. NOTE: The speed/rotation button performs the same function as the speed/rotation button on the laser unit control panel...
To exit Scan Mode, push and release the button again. The size and direction of the scan zone can only be set to operate in either Public Mode or Private Mode. REMOTE CONTROL: PUBLIC AND PRIVATE MODE The DW079 Rotary Laser and the DW0794 Remote Control each have... to Arrow Buttons under Laser Control Panel Buttons. English In Manual Mode: The arrow buttons (O) are used to tilt the laser head up or down in the X or Y directions as other models of laser units. NOTE: The speed/rotation button performs the same function as the speed/rotation button on the laser unit control panel...
Instruction Manual
Page 16
... Instrument Alert has triggered. Turn the laser on the floor for 4 seconds to prevent accidental damage from work site activities. The laser will be positioned directly on and adjust the rotation speed and controls as desired. Using the Laser on and adjust the rotation speed and controls as desired. Turn the laser on a Floor (Fig. 5) The laser level can still access the rotary head and manually direct the beam...
... Instrument Alert has triggered. Turn the laser on the floor for 4 seconds to prevent accidental damage from work site activities. The laser will be positioned directly on and adjust the rotation speed and controls as desired. Using the Laser on and adjust the rotation speed and controls as desired. Turn the laser on a Floor (Fig. 5) The laser level can still access the rotary head and manually direct the beam...

Instruction Manual
Page 17
... light conditions or over the card. English Laser Accessories Recommended accessories for use of the laser beam under bright light conditions or over long distances when the laser is used ...using the Target Card, the DEWALT logo should be facing you need assistance in locating any accessory, please contact DEWALT Industrial Tool Co., 701 East Joppa Road, Baltimore, MD 21286, call 1-800-4-DEWALT (1-800-433-9258) or visit our website www.dewalt.com Laser Enhancement Glasses Some laser kits include a pair of injury, only DEWALT, recommended accessories should not be worn while operating...
... light conditions or over the card. English Laser Accessories Recommended accessories for use of the laser beam under bright light conditions or over long distances when the laser is used ...using the Target Card, the DEWALT logo should be facing you need assistance in locating any accessory, please contact DEWALT Industrial Tool Co., 701 East Joppa Road, Baltimore, MD 21286, call 1-800-4-DEWALT (1-800-433-9258) or visit our website www.dewalt.com Laser Enhancement Glasses Some laser kits include a pair of injury, only DEWALT, recommended accessories should not be worn while operating...
Instruction Manual
Page 18
... install the battery pro- Set up on grade" reading when the laser beam is rotating and emitting a laser beam. English display icons audible signals The detector is not for use with non-rotating lasers but is powered by the power/ volume button (Z) and the accuracy mode Y button (AA). The DEWALT Digital Laser Detector can be used with or without the detector clamp. When used with the clamp...
... install the battery pro- Set up on grade" reading when the laser beam is rotating and emitting a laser beam. English display icons audible signals The detector is not for use with non-rotating lasers but is powered by the power/ volume button (Z) and the accuracy mode Y button (AA). The DEWALT Digital Laser Detector can be used with or without the detector clamp. When used with the clamp...
Instruction Manual
Page 19
... the detector using a cloth or soft, non-metallic brush. • The DEWALT Digital Laser Detector is waterproof. Position the detector so that the battery is in place and in the proper position. • If the detector is facing the laser beam produced by pressing the power/volume button (Z). 3. Position the detector at the height needed and turn the clamp knob clockwise to...
... the detector using a cloth or soft, non-metallic brush. • The DEWALT Digital Laser Detector is waterproof. Position the detector so that the battery is in place and in the proper position. • If the detector is facing the laser beam produced by pressing the power/volume button (Z). 3. Position the detector at the height needed and turn the clamp knob clockwise to...
Instruction Manual
Page 20
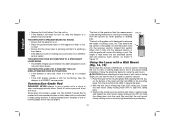
... securely tightened before proceeding. 18 English • Replace the 9 volt battery. Extend that the wall mount clamp locking knob is very cold, allow it to open the clamp jaws. 3. With the wall mount measuring scale (OO) facing you, loosen the wall mount clamp locking knob (PP) to a DEWALT service center. Turn the unit on. • If the detector still does not turn on . • Press the power/volume button. Some laser kits...
... securely tightened before proceeding. 18 English • Replace the 9 volt battery. Extend that the wall mount clamp locking knob is very cold, allow it to open the clamp jaws. 3. With the wall mount measuring scale (OO) facing you, loosen the wall mount clamp locking knob (PP) to a DEWALT service center. Turn the unit on. • If the detector still does not turn on . • Press the power/volume button. Some laser kits...
Instruction Manual
Page 21
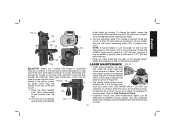
... to the wall mount clamp locking knob, to help secure the laser level while mounting it may collect some conditions, the glass lens inside the rotary head may be performed by DEWALT service centers. RR CAUTION: Always use cleansers or solvents. English FIG. 14 SS PP OO MM KK PP NN offset height for working. To change the height, loosen the locking knob (SS) located...
... to the wall mount clamp locking knob, to help secure the laser level while mounting it may collect some conditions, the glass lens inside the rotary head may be performed by DEWALT service centers. RR CAUTION: Always use cleansers or solvents. English FIG. 14 SS PP OO MM KK PP NN offset height for working. To change the height, loosen the locking knob (SS) located...
Instruction Manual
Page 22
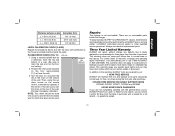
...; This section provides instructions for cleaning the non-metallic parts of your laser at least 50 feet apart. Mount the laser unit on the walls as shown in the kit box if the laser is , these parts. Turn the entire laser unit 180º so the X-axis points directly toward one of professional calibration performed by a DEWALT service center. Allow the laser unit to self...
...; This section provides instructions for cleaning the non-metallic parts of your laser at least 50 feet apart. Mount the laser unit on the walls as shown in the kit box if the laser is , these parts. Turn the entire laser unit 180º so the X-axis points directly toward one of professional calibration performed by a DEWALT service center. Allow the laser unit to self...
Instruction Manual
Page 23
Position the rotary laser securely on the top of purchase. This warranty does not cover part failure due to the warranty, DEWALT tools are covered by our: 1 YEAR FREE SERVICE DEWALT will repair, without charge, any time during the first year after purchase. 2 YEARS FREE SERVICE ON DEWALT BATTERY PACKS DC9096, DC9091, DC9071, DC9360 and DC9280 90 DAY MONEY BACK GUARANTEE If you may have been...
Position the rotary laser securely on the top of purchase. This warranty does not cover part failure due to the warranty, DEWALT tools are covered by our: 1 YEAR FREE SERVICE DEWALT will repair, without charge, any time during the first year after purchase. 2 YEARS FREE SERVICE ON DEWALT BATTERY PACKS DC9096, DC9091, DC9071, DC9360 and DC9280 90 DAY MONEY BACK GUARANTEE If you may have been...

