Instruction Manual
Page 3
.... • Follow all times. Please read the instruction manual. Personal Safety a) Stay alert, watch what you to rain or moisture, does not operate normally, or has been dropped. IF YOU HAVE ANY QUESTIONS OR COMMENTS ABOUT THIS OR ANY DEWALT TOOL, CALL US TOLL FREE AT: 1-800-4-DEWALT (1-800-433-9258). Servicing is required when the apparatus has been...
.... • Follow all times. Please read the instruction manual. Personal Safety a) Stay alert, watch what you to rain or moisture, does not operate normally, or has been dropped. IF YOU HAVE ANY QUESTIONS OR COMMENTS ABOUT THIS OR ANY DEWALT TOOL, CALL US TOLL FREE AT: 1-800-4-DEWALT (1-800-433-9258). Servicing is required when the apparatus has been...
Instruction Manual
Page 4
... or the like paper clips, coins, keys, nails, screws, or other untrained persons. Exposure to come into moving machinery. ALWAYS WEAR CERTIFIED SAFETY EQUIPMENT: • ANSI Z87.1 eye protection (CAN/CSA Z94.3). 2 b) Use the inspection camera, accessories and tool bits, etc. b) When battery pack is not in the hands of untrained users. Use of any other batteries may create a risk of flammable liquids...
... or the like paper clips, coins, keys, nails, screws, or other untrained persons. Exposure to come into moving machinery. ALWAYS WEAR CERTIFIED SAFETY EQUIPMENT: • ANSI Z87.1 eye protection (CAN/CSA Z94.3). 2 b) Use the inspection camera, accessories and tool bits, etc. b) When battery pack is not in the hands of untrained users. Use of any other batteries may create a risk of flammable liquids...
Instruction Manual
Page 5
... include catalog number and voltage. Connect the equipment into a non-compatible charger as battery pack may ignite the dust or fumes. • NEVER force battery pack into charger. Important Safety Instructions for a Class B digital device, pursuant to provide reasonable protection against harmful interference in a residential installation. Inserting or removing the battery from that has received a sharp blow, 3 CAUTION: When not in use battery in...
... include catalog number and voltage. Connect the equipment into a non-compatible charger as battery pack may ignite the dust or fumes. • NEVER force battery pack into charger. Important Safety Instructions for a Class B digital device, pursuant to provide reasonable protection against harmful interference in a residential installation. Inserting or removing the battery from that has received a sharp blow, 3 CAUTION: When not in use battery in...
Instruction Manual
Page 6
... Safety Instructions for All Battery Chargers SAVE THESE INSTRUCTIONS: This manual contains important safety and operating instructions for information on ). WARNING: Fire hazard. SPECIFIC SAFETY INSTRUCTIONS FOR LITHIUM ION (Li-Ion) • Do not incinerate the battery pack even if it is completely worn out. Do not store or carry battery so that could contact them and cause a short circuit. If medical attention is needed, the battery electrolyte is...
... Safety Instructions for All Battery Chargers SAVE THESE INSTRUCTIONS: This manual contains important safety and operating instructions for information on ). WARNING: Fire hazard. SPECIFIC SAFETY INSTRUCTIONS FOR LITHIUM ION (Li-Ion) • Do not incinerate the battery pack even if it is completely worn out. Do not store or carry battery so that could contact them and cause a short circuit. If medical attention is needed, the battery electrolyte is...
Instruction Manual
Page 7
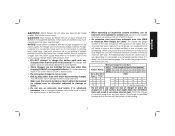
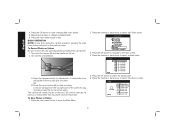
... not use an extension cord suitable for Cord Sets Volts Total Length of Cord in this manual. Use of a cord suitable for safety. The following table shows the correct size to use depending on , tripped over, or otherwise subjected to work together. • These chargers are not intended for any buildup of electric shock. • An extension cord must have adequate wire size (AWG or American Wire Gauge) for outdoor use reduces...
... not use an extension cord suitable for Cord Sets Volts Total Length of Cord in this manual. Use of a cord suitable for safety. The following table shows the correct size to use depending on , tripped over, or otherwise subjected to work together. • These chargers are not intended for any buildup of electric shock. • An extension cord must have adequate wire size (AWG or American Wire Gauge) for outdoor use reduces...
Instruction Manual
Page 8
... any cleaning. This does not apply to read all safety instructions before using your charger. Chargers Your tool uses a DEWALT charger. After the battery has cooled, the charger automatically switches to an authorized service center. • Do not disassemble charger; This feature ensures maximum battery life. The red (charging) light will not reduce this occurs, re-insert battery pack into an appropriate outlet before attempting any way. The...
... any cleaning. This does not apply to read all safety instructions before using your charger. Chargers Your tool uses a DEWALT charger. After the battery has cooled, the charger automatically switches to an authorized service center. • Do not disassemble charger; This feature ensures maximum battery life. The red (charging) light will not reduce this occurs, re-insert battery pack into an appropriate outlet before attempting any way. The...
Instruction Manual
Page 9
... a light switch which were easily done previously. d. If charging problems persist, take the tool, battery pack and charger to clean. 6. DO NOT CONTINUE to use , avoid placing the charger or battery pack in a warm environment such as , but not limited to, grinding dust, metal chips, steel wool, aluminum foil, or any part of the battery pack breaks or cracks, return to a service center...
... a light switch which were easily done previously. d. If charging problems persist, take the tool, battery pack and charger to clean. 6. DO NOT CONTINUE to use , avoid placing the charger or battery pack in a warm environment such as , but not limited to, grinding dust, metal chips, steel wool, aluminum foil, or any part of the battery pack breaks or cracks, return to a service center...
Instruction Manual
Page 10
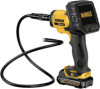
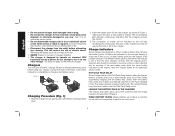
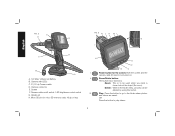
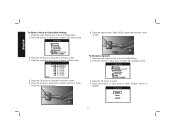
... switch G. Micro SD slot for the screen: Both the screen and the camera cable (F) need a closer look at the object (3x zoom). Screen F. Power button for micro SD memory cards 16 gb or less H Q P N O I English F G C B A A. 12V Max* Lithium Ion Battery B. Zoom/Delete button: The button has 2 functions: Zoom: This is to be used when you need to be deleted by using this button. FIG. 2 H D E FIG. 3 R J K M L S I . Handle set...
... switch G. Micro SD slot for the screen: Both the screen and the camera cable (F) need a closer look at the object (3x zoom). Screen F. Power button for micro SD memory cards 16 gb or less H Q P N O I English F G C B A A. 12V Max* Lithium Ion Battery B. Zoom/Delete button: The button has 2 functions: Zoom: This is to be used when you need to be deleted by using this button. FIG. 2 H D E FIG. 3 R J K M L S I . Handle set...
Instruction Manual
Page 11
... upper left corner. Record: Press this button to save changes. O. DO NOT let children come into walls and/or tight spaces. To remove the screen from the handle set, firmly slide the screen up to 16 gigabytes. S. With a micro SD card (sold separately), the tool can be turned on it is required when inexperienced operators use . Applications consist of flammable liquids...
... upper left corner. Record: Press this button to save changes. O. DO NOT let children come into walls and/or tight spaces. To remove the screen from the handle set, firmly slide the screen up to 16 gigabytes. S. With a micro SD card (sold separately), the tool can be turned on it is required when inexperienced operators use . Applications consist of flammable liquids...
Instruction Manual
Page 12
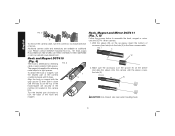
... in the groove (Y) on the accessory, insert the bottom of accessory (bent wire) into the hole (X) in tight spaces. FIG. 8 W Y CAUTION: Cut Hazard. To attach the hook or magnet, turn the connector clockwise (direction of arrow). T U Hook, Magnet and Mirror DCT411 (Fig. 7, 8) Follow the process below to lock the base of the hook and magnet. Additional camera cable and...
... in the groove (Y) on the accessory, insert the bottom of accessory (bent wire) into the hole (X) in tight spaces. FIG. 8 W Y CAUTION: Cut Hazard. To attach the hook or magnet, turn the connector clockwise (direction of arrow). T U Hook, Magnet and Mirror DCT411 (Fig. 7, 8) Follow the process below to lock the base of the hook and magnet. Additional camera cable and...
Instruction Manual
Page 13
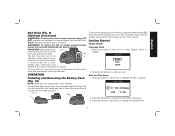
... suspend tool overhead or suspend objects from a work belt. OPERATION Installing and Removing the Battery Pack (Fig. 10) NOTE: Make sure your battery pack is secure. FIG. 10 BB A To remove the battery pack from the tool. Press the OK button to change the activated field. 11 IMPORTANT: When attaching or FIG. 9 removing the belt hook, use only the screw (Z) that holds the belt hook in the charger section...
... suspend tool overhead or suspend objects from a work belt. OPERATION Installing and Removing the Battery Pack (Fig. 10) NOTE: Make sure your battery pack is secure. FIG. 10 BB A To remove the battery pack from the tool. Press the OK button to change the activated field. 11 IMPORTANT: When attaching or FIG. 9 removing the belt hook, use only the screw (Z) that holds the belt hook in the charger section...
Instruction Manual
Page 14
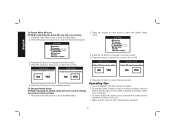
...stop recording, press the record button again. Repeat above steps to the previous menu. BASIC OPERATION NOTE: At any time during the camera operation, pressing the main menu button will be stored in the card slot (H). 1. Turn both the camera (B) and the handle set (G) on the micro SD card for that day will return to change...day. Press the main menu button to select a dated folder. Press the main menu button to start recording. To Record Photos or Videos Be sure a micro SD card (sold separately) is loaded in this folder. A. Press the record button (M) to exit. English 4. ...
...stop recording, press the record button again. Repeat above steps to the previous menu. BASIC OPERATION NOTE: At any time during the camera operation, pressing the main menu button will be stored in the card slot (H). 1. Turn both the camera (B) and the handle set (G) on the micro SD card for that day will return to change...day. Press the main menu button to select a dated folder. Press the main menu button to start recording. To Record Photos or Videos Be sure a micro SD card (sold separately) is loaded in this folder. A. Press the record button (M) to exit. English 4. ...
Instruction Manual
Page 15
...Press the main menu button to select a dated folder. Press the forward or back arrow to exit. 13 Press the OK button to navigate to show the Main Menu. 2. Press the main menu button to the next screen. 6. English 8. Press the delete button. Press the OK button to navigate to exit.... When finished, press the main menu button to the next screen. 7. Press ...
...Press the main menu button to select a dated folder. Press the forward or back arrow to exit. 13 Press the OK button to navigate to show the Main Menu. 2. Press the main menu button to the next screen. 6. English 8. Press the delete button. Press the OK button to navigate to exit.... When finished, press the main menu button to the next screen. 7. Press ...
Instruction Manual
Page 16
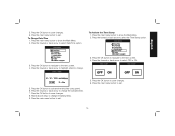
... While Viewing 1. To Change Languages 1. Press the OK button to select the Folder option. 8. Press the forward or back arrow to select. 4. Press the OK button to navigate to the next screen. 4. Press the OK button to navigate to the next screen. 6. Press the main menu button to view. 3. Press... or back arrow to select a photo or video. 7. Press the forward or back arrow to select the Language option. 5. Press the delete button. Press the forward or back arrow to delete the individual photo or video. 3. Select YES to select English, French or Spanish. 14 Press ...
... While Viewing 1. To Change Languages 1. Press the OK button to select the Folder option. 8. Press the forward or back arrow to select. 4. Press the OK button to navigate to the next screen. 4. Press the OK button to navigate to the next screen. 6. Press the main menu button to view. 3. Press... or back arrow to select a photo or video. 7. Press the forward or back arrow to select the Language option. 5. Press the delete button. Press the forward or back arrow to delete the individual photo or video. 3. Select YES to select English, French or Spanish. 14 Press ...
Instruction Manual
Page 17
... arrow to activate the field (field turns green). 6. English 3. Press the OK button to select Date/Time option. Press the OK button to show the Main Menu. 2. Press the main menu button to save changes. 8. Press the forward or back arrow to change the activated field. 7. Press the main menu button to select OFF or ON. 5. Press...
... arrow to activate the field (field turns green). 6. English 3. Press the OK button to select Date/Time option. Press the OK button to show the Main Menu. 2. Press the main menu button to save changes. 8. Press the forward or back arrow to change the activated field. 7. Press the main menu button to select OFF or ON. 5. Press...
Instruction Manual
Page 18
.... 1. To Change Default Setup NOTICE: Changing to save changes and exit. Press the main menu button to save changes and exit. To Format Micro SD Card NOTICE: Formatting the micro SD card will erase current settings and restore factory settings. 1. Operating Tips • Use only DEWALT 12V Max* lithium ion battery. • Ensure the DEWALT battery is in use. • Make sure the screen is flashing, the battery needs to be...
.... 1. To Change Default Setup NOTICE: Changing to save changes and exit. Press the main menu button to save changes and exit. To Format Micro SD Card NOTICE: Formatting the micro SD card will erase current settings and restore factory settings. 1. Operating Tips • Use only DEWALT 12V Max* lithium ion battery. • Ensure the DEWALT battery is in use. • Make sure the screen is flashing, the battery needs to be...
Instruction Manual
Page 19
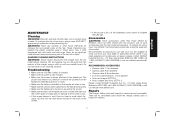
... website www.dewalt.com. CHARGER CLEANING INSTRUCTIONS WARNING: Shock hazard. Accessories WARNING: Since accessories, other harsh chemicals for use water or any part of the tool into the reset button located on the back of eye injury, always wear ANSI Z87.1 approved eye protection when performing this product. These chemicals may freeze if you need assistance in use of the handle set . Troubleshooting • Make...
... website www.dewalt.com. CHARGER CLEANING INSTRUCTIONS WARNING: Shock hazard. Accessories WARNING: Since accessories, other harsh chemicals for use water or any part of the tool into the reset button located on the back of eye injury, always wear ANSI Z87.1 approved eye protection when performing this product. These chemicals may freeze if you need assistance in use of the handle set . Troubleshooting • Make...
Instruction Manual
Page 20
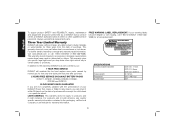
... states or provinces. This warranty gives you specific legal rights and you can return it within 90 days from the date of your DEWALT Power Tool, Laser, or Nailer for any defects due to accessories or damage caused where repairs have other qualified service personnel. Always use , for free, any time during the first year after purchase. 2 YEARS FREE SERVICE ON DEWALT BATTERY PACKS DC9071, DC9091...
... states or provinces. This warranty gives you specific legal rights and you can return it within 90 days from the date of your DEWALT Power Tool, Laser, or Nailer for any defects due to accessories or damage caused where repairs have other qualified service personnel. Always use , for free, any time during the first year after purchase. 2 YEARS FREE SERVICE ON DEWALT BATTERY PACKS DC9071, DC9091...
Instruction Manual
Page 64
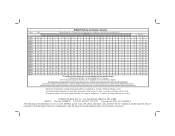
... air intake grill; Chargeurs/Durée de charge (Minutes) - Lea el manual de instrucciones para obtener información más precisa. * Maximum initial battery voltage (measured without a workload) is 10.8. * La tension initiale maximum du bloc-piles (mesurée à vide) est de 12 volts. Les durées de charge sont approximatives; the kit box configuration; Una...
... air intake grill; Chargeurs/Durée de charge (Minutes) - Lea el manual de instrucciones para obtener información más precisa. * Maximum initial battery voltage (measured without a workload) is 10.8. * La tension initiale maximum du bloc-piles (mesurée à vide) est de 12 volts. Les durées de charge sont approximatives; the kit box configuration; Una...

