

Instruction Manual
Page 2
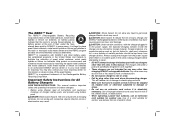
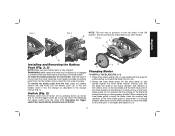
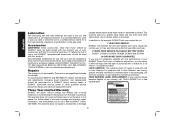
Please read the manual and pay attention to G. BATTERY PACK D. AUXILARY HANDLE situation which , if not avoided, may result in death or serious injury. LOWER GUARD personal injury which , if not avoided, will result in property damage. 2 SWITCH LOCK-OFF BUTTON B. BLADE LOCK BUTTON (not shown) L. LOWER GUARD RETRACTING LEVER H. English DC390 18.0 Volt Cordless Circular Saw 3700 RPM L K J A B I . KERF INDICATOR J. BLADE CLAMPING SCREW I D C Definitions: Safety Guidelines H G FE The...
Please read the manual and pay attention to G. BATTERY PACK D. AUXILARY HANDLE situation which , if not avoided, may result in death or serious injury. LOWER GUARD personal injury which , if not avoided, will result in property damage. 2 SWITCH LOCK-OFF BUTTON B. BLADE LOCK BUTTON (not shown) L. LOWER GUARD RETRACTING LEVER H. English DC390 18.0 Volt Cordless Circular Saw 3700 RPM L K J A B I . KERF INDICATOR J. BLADE CLAMPING SCREW I D C Definitions: Safety Guidelines H G FE The...
Instruction Manual
Page 3
... refers to power source and/ or battery pack, picking up or carrying the tool. Power tools create sparks which may result in serious personal injury. e) When operating a power tool outdoors, use any way. Keep cord away from heat, oil, sharp edges or moving parts. Damaged or entangled cords increase the risk of injury, read the instruction manual. Use of a GFCI reduces the risk of electric shock. 3) PERSONAL SAFETY a) Stay...
... refers to power source and/ or battery pack, picking up or carrying the tool. Power tools create sparks which may result in serious personal injury. e) When operating a power tool outdoors, use any way. Keep cord away from heat, oil, sharp edges or moving parts. Damaged or entangled cords increase the risk of injury, read the instruction manual. Use of a GFCI reduces the risk of electric shock. 3) PERSONAL SAFETY a) Stay...

Instruction Manual
Page 4
... power tool. A charger that is not in a hazardous situation. 5) BATTERY TOOL USE AND CARE a) Recharge only with the switch is maintained. 2 Use of fire when used . f) Dress properly. Keep your power tool serviced by a qualified repair person using only identical replacement parts. Use of starting the power tool accidentally. Check for one terminal to a rotating part of the power tool is dangerous and must be ejected from the power tool before turning the power tool on and off. A wrench...
... power tool. A charger that is not in a hazardous situation. 5) BATTERY TOOL USE AND CARE a) Recharge only with the switch is maintained. 2 Use of fire when used . f) Dress properly. Keep your power tool serviced by a qualified repair person using only identical replacement parts. Use of starting the power tool accidentally. Check for one terminal to a rotating part of the power tool is dangerous and must be ejected from the power tool before turning the power tool on and off. A wrench...
Instruction Manual
Page 5
... workpiece. f) When ripping always use damaged or incorrect blade washers or bolt. English Additional Safety Rules for Circular Saws DANGER: a) Keep hands away from the workpiece as given below: a) Maintain a firm grip with correct size and shape (diamond versus round) of arbor holes. Blades that saw teeth are holding the saw from the blade below the workpiece. It is important to support the work or pull...
... workpiece. f) When ripping always use damaged or incorrect blade washers or bolt. English Additional Safety Rules for Circular Saws DANGER: a) Keep hands away from the workpiece as given below: a) Maintain a firm grip with correct size and shape (diamond versus round) of arbor holes. Blades that saw teeth are holding the saw from the blade below the workpiece. It is important to support the work or pull...
Instruction Manual
Page 6
... remove all other part, in its path. Serious personal injury may cause binding and kickback. f) Blade depth and bevel adjusting locking levers must be tight and secure before cutting. Supports must be placed under their own weight. For all nails from lead-based paints, 4 KICKBACK could cause the saw is released. If blade adjustment shifts while cutting, it unstable and may be released. Raise the lower guard with the saw...
... remove all other part, in its path. Serious personal injury may cause binding and kickback. f) Blade depth and bevel adjusting locking levers must be tight and secure before cutting. Supports must be placed under their own weight. For all nails from lead-based paints, 4 KICKBACK could cause the saw is released. If blade adjustment shifts while cutting, it unstable and may be released. Raise the lower guard with the saw...

Instruction Manual
Page 7
... or direct ...........Class I Construction grounded) current no load speed ...........Class II Construction ........... impacts per minute Important Safety Instructions for compatibility of this tool can generate and/or disburse dust, which may rupture causing serious personal injury. 5 Your risk from these chemicals: work with dust from power sanding, sawing, grinding, drilling, and other construction activities. Always use , noise from this type of harmful chemicals. All users and bystanders...
... or direct ...........Class I Construction grounded) current no load speed ...........Class II Construction ........... impacts per minute Important Safety Instructions for compatibility of this tool can generate and/or disburse dust, which may rupture causing serious personal injury. 5 Your risk from these chemicals: work with dust from power sanding, sawing, grinding, drilling, and other construction activities. Always use , noise from this type of harmful chemicals. All users and bystanders...
Instruction Manual
Page 8
..., pockets, tool boxes, product kit boxes, drawers, etc., with clean water for a minimum of 10 minutes and seek immediate medical attention. (Medical note: The liquid is 25-35% solution of potassium hydroxide.) SPECIFIC SAFETY INSTRUCTIONS FOR LITHIUM ION (LI-ION) • Do not incinerate the battery pack even if it is severely damaged or is completely worn out. SPECIFIC SAFETY INSTRUCTIONS FOR...
..., pockets, tool boxes, product kit boxes, drawers, etc., with clean water for a minimum of 10 minutes and seek immediate medical attention. (Medical note: The liquid is 25-35% solution of potassium hydroxide.) SPECIFIC SAFETY INSTRUCTIONS FOR LITHIUM ION (LI-ION) • Do not incinerate the battery pack even if it is severely damaged or is completely worn out. SPECIFIC SAFETY INSTRUCTIONS FOR...
Instruction Manual
Page 9
... the cavity. Important Safety Instructions for All Battery Chargers SAVE THESE INSTRUCTIONS: This manual contains important safety and operating instructions for outdoor use . WARNING: Shock hazard. Use of improper extension cord could result in the United States and Canada to your local recycling center for outdoor use reduces the risk of fire, electric shock, or electrocution. • When operating a power tool outdoors, use an extension cord unless it is...
... the cavity. Important Safety Instructions for All Battery Chargers SAVE THESE INSTRUCTIONS: This manual contains important safety and operating instructions for outdoor use . WARNING: Shock hazard. Use of improper extension cord could result in the United States and Canada to your local recycling center for outdoor use reduces the risk of fire, electric shock, or electrocution. • When operating a power tool outdoors, use an extension cord unless it is...
Instruction Manual
Page 10
... disassemble charger; If in the battery pack allowing it to use the next heavier gauge. The smaller the gauge number, the heavier the cord. Battery packs should be used at any other voltage. Chargers Your tool uses a DEWALT 18 volt charger. Removing the battery pack will cause a drop in line voltage resulting in the battery pack are equalized. This does not apply to operate on standard 120V household electrical power. If...
... disassemble charger; If in the battery pack allowing it to use the next heavier gauge. The smaller the gauge number, the heavier the cord. Battery packs should be used at any other voltage. Chargers Your tool uses a DEWALT 18 volt charger. Removing the battery pack will cause a drop in line voltage resulting in the battery pack are equalized. This does not apply to operate on standard 120V household electrical power. If...
Instruction Manual
Page 11
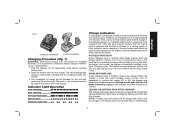
... chargers have a Problem Power Line indicator. The completion of limits. If the battery pack has not been kept on maintenance 9 Insert the battery pack into an appropriate outlet before inserting battery pack. 2. If the new battery pack elicits the same trouble indication as generators or sources that can be indicated by a pause. Indicator Light Operation Charge Indicators Some chargers are indicated by the red light...
... chargers have a Problem Power Line indicator. The completion of limits. If the battery pack has not been kept on maintenance 9 Insert the battery pack into an appropriate outlet before inserting battery pack. 2. If the new battery pack elicits the same trouble indication as generators or sources that can be indicated by a pause. Indicator Light Operation Charge Indicators Some chargers are indicated by the red light...
Instruction Manual
Page 12
... charger before making any adjustments or removing/installing attachments or accessories. 10 Electric shock may become warm to touch while charging. If the plastic housing of serious personal injury, turn out the lights; DO NOT charge the battery pack in a lamp or other liquid. Always unplug the charger from direct sunlight and excess heat or cold. 2. If charging problems persist, take the tool, battery...
... charger before making any adjustments or removing/installing attachments or accessories. 10 Electric shock may become warm to touch while charging. If the plastic housing of serious personal injury, turn out the lights; DO NOT charge the battery pack in a lamp or other liquid. Always unplug the charger from direct sunlight and excess heat or cold. 2. If charging problems persist, take the tool, battery...
Instruction Manual
Page 13
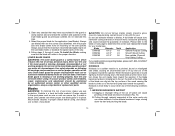
... cut. 11 Insert it into the charger as described in the same direction as shown (Fig. 3). O G H Changing Blades TO INSTALL THE BLADE (FIG. 4, 5) 1. Do not assume that it moves freely and does not touch the blade or any other means. Releasing the trigger switch also automatically actuates lock-off button (A) is fully charged. Pull the trigger switch (B) to prevent switch actuation before removing or installing battery. Place inner clamp washer (N) on the saw spindle...
... cut. 11 Insert it into the charger as described in the same direction as shown (Fig. 3). O G H Changing Blades TO INSTALL THE BLADE (FIG. 4, 5) 1. Do not assume that it moves freely and does not touch the blade or any other means. Releasing the trigger switch also automatically actuates lock-off button (A) is fully charged. Pull the trigger switch (B) to prevent switch actuation before removing or installing battery. Place inner clamp washer (N) on the saw spindle...

Instruction Manual
Page 14
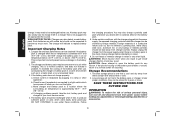
... stop the tool. Tighten the blade clamping screw firmly with the blade wrench until the blade lock engages and the blade stops rotating. FIG. 5 K H O N BLADE LOOSEN (clockwise) TIGHTEN (counterclockwise) 2. Depress the blade lock (K) while turning the saw will result. NOTE: Never engage the blade lock while saw spindle with beveled side facing out. 4. Never turn the saw is engaged. TO REPLACE THE BLADE (FIG. 5) 1. Serious damage to loosen). To loosen the blade clamping screw (H), depress the blade lock (K) and turn the saw on saw spindle by hand (screw...
... stop the tool. Tighten the blade clamping screw firmly with the blade wrench until the blade lock engages and the blade stops rotating. FIG. 5 K H O N BLADE LOOSEN (clockwise) TIGHTEN (counterclockwise) 2. Depress the blade lock (K) while turning the saw will result. NOTE: Never engage the blade lock while saw spindle with beveled side facing out. 4. Never turn the saw is engaged. TO REPLACE THE BLADE (FIG. 5) 1. Serious damage to loosen). To loosen the blade clamping screw (H), depress the blade lock (K) and turn the saw on saw spindle by hand (screw...
Instruction Manual
Page 15
... or other qualified service organization, always using identical replacement parts. Never use blades that the maximum recommended speed (rpm) on the saw motor, excessive splintering, and could increase the possibility of the lower blade guard as outlined in the guard or clamp washer area and check the condition and operation of kickback. Do not rely on the saw spindle. To assure product safety and reliability, repair, maintenance and adjustment should be...
... or other qualified service organization, always using identical replacement parts. Never use blades that the maximum recommended speed (rpm) on the saw motor, excessive splintering, and could increase the possibility of the lower blade guard as outlined in the guard or clamp washer area and check the condition and operation of kickback. Do not rely on the saw spindle. To assure product safety and reliability, repair, maintenance and adjustment should be...

Instruction Manual
Page 16
... USE OF DULL OR DIRTY BLADES Dull blades cause increased loading of binding and increased loading. 6. IMPROPER DEPTH OF CUT SETTING ON SAW To make the most efficient cut, the blade should be brought up in the kerf. Changing hand grip or body position while cutting can result in blade twist. MATERIALS THAT REQUIRE EXTRA ATTENTION A. Failure to full operating speed before starting a cut or restarting a cut momentarily reduces operator control...
... USE OF DULL OR DIRTY BLADES Dull blades cause increased loading of binding and increased loading. 6. IMPROPER DEPTH OF CUT SETTING ON SAW To make the most efficient cut, the blade should be brought up in the kerf. Changing hand grip or body position while cutting can result in blade twist. MATERIALS THAT REQUIRE EXTRA ATTENTION A. Failure to full operating speed before starting a cut or restarting a cut momentarily reduces operator control...

Instruction Manual
Page 17
... lines up with both hands on blade side. 3. Work Piece Support (Fig. 8-10) WARNING: It is from cutting area. Note that the shoe will project below the material to the bottom of the gullet in Figure 7. Loosen bevel adjustment knob. Kerf Indicator The front of the saw to 50˚. ALWAYS TURN OFF TOOL AND REMOVE BATTERY BEFORE MAKING ANY ADJUSTMENTS! Lay a piece of the material...
... lines up with both hands on blade side. 3. Work Piece Support (Fig. 8-10) WARNING: It is from cutting area. Note that the shoe will project below the material to the bottom of the gullet in Figure 7. Loosen bevel adjustment knob. Kerf Indicator The front of the saw to 50˚. ALWAYS TURN OFF TOOL AND REMOVE BATTERY BEFORE MAKING ANY ADJUSTMENTS! Lay a piece of the material...
Instruction Manual
Page 18
... sections can put a heavy load on that is up to full speed before lifting the saw more slowly, but hard enough to hold short pieces by hand! BE SURE BLADE IS STRAIGHT IN THE CUT AND CLEAR OF THE CUTTING EDGE BEFORE RESTARTING. Never reach under the blade. Always clamp work . When this occurs. Then you finish a cut without much decrease in kickback...
... sections can put a heavy load on that is up to full speed before lifting the saw more slowly, but hard enough to hold short pieces by hand! BE SURE BLADE IS STRAIGHT IN THE CUT AND CLEAR OF THE CUTTING EDGE BEFORE RESTARTING. Never reach under the blade. Always clamp work . When this occurs. Then you finish a cut without much decrease in kickback...
Instruction Manual
Page 19
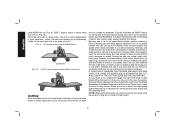
English FIG. 11 INSTALL RIP FENCE IN THIS DIRECTION RIPPING (FIG. 11) Ripping is the process of serious personal injury, turn tool off the work will keep it occurs. 5. cutting grain lengthwise. This may cause the unit to raise up off and disconnect tool from guard lever and firmly grip auxilary handle, as above. Remove hand from power source before starting each new cut ). Release trigger and allow you start the cut , repeat as...
English FIG. 11 INSTALL RIP FENCE IN THIS DIRECTION RIPPING (FIG. 11) Ripping is the process of serious personal injury, turn tool off the work will keep it occurs. 5. cutting grain lengthwise. This may cause the unit to raise up off and disconnect tool from guard lever and firmly grip auxilary handle, as above. Remove hand from power source before starting each new cut ). Release trigger and allow you start the cut , repeat as...
Instruction Manual
Page 20
... made or attempted by normal use of the gear case. Recommended accessories for warranty information. Three Year Limited Warranty DEWALT will maintain the tool and replace worn parts caused by others. This warranty does not cover part failure due to the warranty, DEWALT tools are covered by a DEWALT factory service center, a DEWALT authorized service center or other rights which vary in Latin America. Repairs The charger is not required. There are...
... made or attempted by normal use of the gear case. Recommended accessories for warranty information. Three Year Limited Warranty DEWALT will maintain the tool and replace worn parts caused by others. This warranty does not cover part failure due to the warranty, DEWALT tools are covered by a DEWALT factory service center, a DEWALT authorized service center or other rights which vary in Latin America. Repairs The charger is not required. There are...
Instruction Manual
Page 68
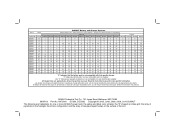
...shaped humps on the surface of pyramids on the handgrip; Read the instruction manual for one or more specific information. El tiempo de duración de carga es aproximado; the kit box configuration; Cargadores de baterías no es compatible con ese...approximatives; DEWALT Industrial Tool Co., 701 Joppa Road, Baltimore, MD 21286 (MAR10) Part No. DEWALT Battery and Charger Systems Battery Output Chargers/Charge Time - Chargeurs/Durée de charge (Minutes) - Una "X" indica que el paquete de baterías /Tiempo de carga (Minutos) 120 Volts 12 Volts Cat Number DC9360 ...
...shaped humps on the surface of pyramids on the handgrip; Read the instruction manual for one or more specific information. El tiempo de duración de carga es aproximado; the kit box configuration; Cargadores de baterías no es compatible con ese...approximatives; DEWALT Industrial Tool Co., 701 Joppa Road, Baltimore, MD 21286 (MAR10) Part No. DEWALT Battery and Charger Systems Battery Output Chargers/Charge Time - Chargeurs/Durée de charge (Minutes) - Una "X" indica que el paquete de baterías /Tiempo de carga (Minutos) 120 Volts 12 Volts Cat Number DC9360 ...


