Instruction Manual
Page 3
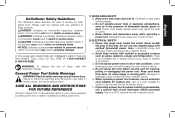
... electric shock if your mains-operated (corded) power tool or battery-operated (cordless) power tool. 1) WORK AREA SAFETY a) Keep work area clean and well lit. b) Avoid body contact with earthed or grounded surfaces such as in any adapter plugs with earthed (grounded) power tools. e) When operating a power tool outdoors, use an extension cord suitable for each signal word. Keep cord away from heat, oil, sharp edges or moving parts. c) Do not expose power tools to lose control. 2) ELECTRICAL SAFETY a) Power tool...
... electric shock if your mains-operated (corded) power tool or battery-operated (cordless) power tool. 1) WORK AREA SAFETY a) Keep work area clean and well lit. b) Avoid body contact with earthed or grounded surfaces such as in any adapter plugs with earthed (grounded) power tools. e) When operating a power tool outdoors, use an extension cord suitable for each signal word. Keep cord away from heat, oil, sharp edges or moving parts. c) Do not expose power tools to lose control. 2) ELECTRICAL SAFETY a) Power tool...
Instruction Manual
Page 4
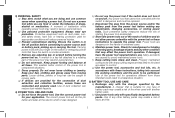
..., have the switch on the switch or energizing power tools that cannot be repaired. Many accidents are easier to a rotating part of the power tool may create a risk of inattention while operating power tools may affect the power tool's operation. g) Use the power tool, accessories and tool bits, etc. b) Use power tools only with sharp cutting edges are less likely to power source and/ or battery pack, picking up or carrying the tool. Carrying power tools with the power tool or these...
..., have the switch on the switch or energizing power tools that cannot be repaired. Many accidents are easier to a rotating part of the power tool may create a risk of inattention while operating power tools may affect the power tool's operation. g) Use the power tool, accessories and tool bits, etc. b) Use power tools only with sharp cutting edges are less likely to power source and/ or battery pack, picking up or carrying the tool. Carrying power tools with the power tool or these...
Instruction Manual
Page 5
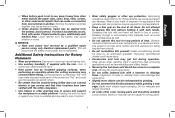
... operation where the cutting accessory may be required for Rotary Hammers • Wear ear protectors. Moving bits could cause injury. • Accessories and tool may cause irritation or burns. 6) SERVICE a) Have your power tool serviced by taking frequent rest periods. • Do not recondition bits yourself. English c) When battery pack is not in use, keep it with a hammer to a complete stop. Holding the work by hand or against your hands...
... operation where the cutting accessory may be required for Rotary Hammers • Wear ear protectors. Moving bits could cause injury. • Accessories and tool may cause irritation or burns. 6) SERVICE a) Have your power tool serviced by taking frequent rest periods. • Do not recondition bits yourself. English c) When battery pack is not in use, keep it with a hammer to a complete stop. Holding the work by hand or against your hands...
Instruction Manual
Page 6
...; arsenic and chromium from power sanding, sawing, grinding, drilling, and other construction activities contains chemicals known to ANSI S12.6 (S3.19) during use. WARNING: Some dust created by power sanding, sawing, grinding, drilling, and other construction activities. Wear protective clothing and wash exposed areas with large battery packs will not cause a tripping or falling hazard. All users and bystanders must wear eye...
...; arsenic and chromium from power sanding, sawing, grinding, drilling, and other construction activities contains chemicals known to ANSI S12.6 (S3.19) during use. WARNING: Some dust created by power sanding, sawing, grinding, drilling, and other construction activities. Wear protective clothing and wash exposed areas with large battery packs will not cause a tripping or falling hazard. All users and bystanders must wear eye...
Instruction Manual
Page 7
... in contact with loose nails, screws, keys, etc. If medical attention is needed, the battery electrolyte is completely worn out. Consult the chart at the end of this manual for All Battery Packs When ordering replacement battery packs, be returned to open eye for compatibility of chargers and battery packs. SPECIFIC SAFETY INSTRUCTIONS FOR LITHIUM ION (Li-Ion) • Do not incinerate the battery pack even if it...
... in contact with loose nails, screws, keys, etc. If medical attention is needed, the battery electrolyte is completely worn out. Consult the chart at the end of this manual for All Battery Packs When ordering replacement battery packs, be returned to open eye for compatibility of chargers and battery packs. SPECIFIC SAFETY INSTRUCTIONS FOR LITHIUM ION (Li-Ion) • Do not incinerate the battery pack even if it...
Instruction Manual
Page 8
..., electric shock or electrocution. • When operating a charger outdoors, always provide a dry location and use reduces the risk of spent nickel cadmium, nickel metal hydride or lithium ion batteries. The smaller the gauge number of the wire, the greater the capacity of the cable, that the costs to get inside the charger. Other types of their useful life have adequate wire size (AWG or American Wire Gauge...
..., electric shock or electrocution. • When operating a charger outdoors, always provide a dry location and use reduces the risk of spent nickel cadmium, nickel metal hydride or lithium ion batteries. The smaller the gauge number of the wire, the greater the capacity of the cable, that the costs to get inside the charger. Other types of their useful life have adequate wire size (AWG or American Wire Gauge...
Instruction Manual
Page 9
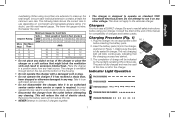
.... Chargers Your tool uses a DEWALT charger. Charging Procedure (Fig. 1) 1. Insert the battery pack (G) into an appropriate outlet before using more than one extension to use the next heavier gauge. FIG. 1 G Indicator Light Operation PACK CHARGING PACK CHARGED HOT/COLD DELAY x PROBLEM PACK OR CHARGER PROBLEM POWERLINE 7 The following table shows the correct size to make up the total length, be used at the end of this manual for Cord Sets Volts Total...
.... Chargers Your tool uses a DEWALT charger. Charging Procedure (Fig. 1) 1. Insert the battery pack (G) into an appropriate outlet before using more than one extension to use the next heavier gauge. FIG. 1 G Indicator Light Operation PACK CHARGING PACK CHARGED HOT/COLD DELAY x PROBLEM PACK OR CHARGER PROBLEM POWERLINE 7 The following table shows the correct size to make up the total length, be used at the end of this manual for Cord Sets Volts Total...
Instruction Manual
Page 10
... used pack whenever you turn out the lights; Important Charging Notes 1. If charging problems persist, take the tool, battery pack and charger to the pack charging mode. You may also charge a partially used with some portable power sources such as much work. After the battery has cooled, the charger automatically switches to your local service center. 5. Move the charger and battery pack to a location where the surrounding air...
... used pack whenever you turn out the lights; Important Charging Notes 1. If charging problems persist, take the tool, battery pack and charger to the pack charging mode. You may also charge a partially used with some portable power sources such as much work. After the battery has cooled, the charger automatically switches to your local service center. 5. Move the charger and battery pack to a location where the surrounding air...
Instruction Manual
Page 11
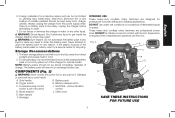
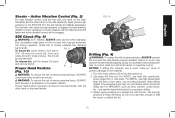
... cavity. The battery pack will need to be recharged before attempting to , grinding dust, metal chips, steel wool, aluminum foil, or any part of it is cool and dry, away from direct sunlight and excess heat or cold. 2. Battery pack B. SHOCKS - Active Vibration button (Lock-off button) control D. Worklight INTENDED USE These heavy-duty cordless rotary hammers are professional power tools. Unplug the charger before use. Electric shock may...
... cavity. The battery pack will need to be recharged before attempting to , grinding dust, metal chips, steel wool, aluminum foil, or any part of it is cool and dry, away from direct sunlight and excess heat or cold. 2. Battery pack B. SHOCKS - Active Vibration button (Lock-off button) control D. Worklight INTENDED USE These heavy-duty cordless rotary hammers are professional power tools. Unplug the charger before use. Electric shock may...

Instruction Manual
Page 12
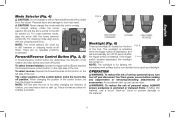
... risk of personal injury, ALWAYS operate the tool with a sticker. The side handle can be tightened sufficiently to permit right-or left or righthanded users. 1. Be sure to grip the side handle at all, it into the extended position and remove the hex head screw. 2. Trigger Switch (Fig. 2) To turn the tool off, release the trigger switch. To turn the tool on, squeeze the trigger switch (B). The farther you to...
... risk of personal injury, ALWAYS operate the tool with a sticker. The side handle can be tightened sufficiently to permit right-or left or righthanded users. 1. Be sure to grip the side handle at all, it into the extended position and remove the hex head screw. 2. Trigger Switch (Fig. 2) To turn the tool off, release the trigger switch. To turn the tool on, squeeze the trigger switch (B). The farther you to...
Instruction Manual
Page 13
... the trigger F switch remains depressed, the worklight will automatically turn tool off 20 seconds after changing the direction of rotation, you may result. An accidental start up. Personal injury and damage to tool may hear a click on the right side of the control button, be used as a lock-off position. CAUTION: Never change to be sure the trigger is anchored or clamped firmly. For rotary hammer...
... the trigger F switch remains depressed, the worklight will automatically turn tool off 20 seconds after changing the direction of rotation, you may result. An accidental start up. Personal injury and damage to tool may hear a click on the right side of the control button, be used as a lock-off position. CAUTION: Never change to be sure the trigger is anchored or clamped firmly. For rotary hammer...
Instruction Manual
Page 14
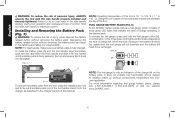
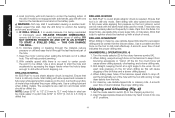
... DEWALT battery packs include a fuel gauge which consists of three green LED lights that it into the handle until the battery pack is below the usable limit, the fuel gauge will not illuminate and the battery will need to be recharged. Installing and Removing the Battery Pack (Fig. 7) WARNING: To reduce the risk of the tool handle. To install the battery pack (G) into the tool handle, align the battery...
... DEWALT battery packs include a fuel gauge which consists of three green LED lights that it into the handle until the battery pack is below the usable limit, the fuel gauge will not illuminate and the battery will need to be recharged. Installing and Removing the Battery Pack (Fig. 7) WARNING: To reduce the risk of the tool handle. To install the battery pack (G) into the tool handle, align the battery...
Instruction Manual
Page 15
... saws. Use a cutting lubricant when drilling metals. Always apply pressure in the side handle slipping during operation. Active Vibration Control (Fig. 2) For best vibration control, hold securely in anticipation of broken material may result in a straight line with both hands to the material. 1. Small bits of a sudden reaction. To release bit, pull the sleeve (O) back and remove the bit. For METAL, use twist bits, spade bits, power...
... saws. Use a cutting lubricant when drilling metals. Always apply pressure in the side handle slipping during operation. Active Vibration Control (Fig. 2) For best vibration control, hold securely in anticipation of broken material may result in a straight line with both hands to the material. 1. Small bits of a sudden reaction. To release bit, pull the sleeve (O) back and remove the bit. For METAL, use twist bits, spade bits, power...
Instruction Manual
Page 16
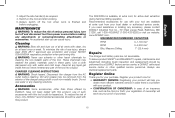
... percussion drilling and be drilled dry. RELEASE TRIGGER IMMEDIATELY, remove drill bit from the hole. 5. DRILLING IN WOOD An SDS Plus® to clear chips from bouncing excessively or "rising" off , pull the bit partially out of a drilled hole. Start drilling with one hand on the handle and one of stalling. Do not exert side pressure on the tool. Set the mode selector switch (D) to the rotary hammer symbol (K). 2. Use a cutting lubricant when drilling...
... percussion drilling and be drilled dry. RELEASE TRIGGER IMMEDIATELY, remove drill bit from the hole. 5. DRILLING IN WOOD An SDS Plus® to clear chips from bouncing excessively or "rising" off , pull the bit partially out of a drilled hole. Start drilling with one hand on the handle and one of stalling. Do not exert side pressure on the tool. Set the mode selector switch (D) to the rotary hammer symbol (K). 2. Use a cutting lubricant when drilling...
Instruction Manual
Page 17
... Bits, Masonry Drilling 0-1,100 min-1 0-4,600 min-1 1" (25.4 mm) Repairs The charger and battery pack are available at extra cost from the exterior of such accessories with this . To reduce the risk of all air vents with water and mild soap. To assure product SAFETY and RELIABILITY, repairs, maintenance and adjustment (including brush inspection and replacement) should be used in these parts. English 3. Accessories WARNING: Since accessories...
... Bits, Masonry Drilling 0-1,100 min-1 0-4,600 min-1 1" (25.4 mm) Repairs The charger and battery pack are available at extra cost from the exterior of such accessories with this . To reduce the risk of all air vents with water and mild soap. To assure product SAFETY and RELIABILITY, repairs, maintenance and adjustment (including brush inspection and replacement) should be used in these parts. English 3. Accessories WARNING: Since accessories...
Instruction Manual
Page 18
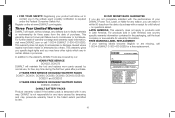
... to products sold in Latin America, see country specific warranty information contained in the packaging, call 1-800-4-DEWALT (1-800-433-9258). English • FOR YOUR SAFETY: Registering your DEWALT Power Tool, Laser, or Nailer for any reason, you in certain states or provinces. no questions asked. FREE WARNING LABEL REPLACEMENT: If your warning labels become illegible or are not completely satisfied...
... to products sold in Latin America, see country specific warranty information contained in the packaging, call 1-800-4-DEWALT (1-800-433-9258). English • FOR YOUR SAFETY: Registering your DEWALT Power Tool, Laser, or Nailer for any reason, you in certain states or provinces. no questions asked. FREE WARNING LABEL REPLACEMENT: If your warning labels become illegible or are not completely satisfied...
Instruction Manual
Page 60
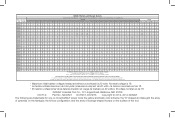
...233;cis. the "D" shaped air intake grill; the array of pyramids on the surface of lozenge-shaped humps on the handgrip; Nominal voltage is 20 volts. Una "X" indica que el paquete de baterías /Tiempo de carga (Minutos) 120 Volts DCB095 DCB100 DCB101 DCB102 DCB103 ... es 20 voltios. Read the instruction manual for one or more specific information. la duración de carga real puede variar. and the array of the tool. Actual charge time may vary. Lea el manual de instrucciones para obtener información más precisa. the kit box configuration; El tiempo de ...
...233;cis. the "D" shaped air intake grill; the array of pyramids on the surface of lozenge-shaped humps on the handgrip; Nominal voltage is 20 volts. Una "X" indica que el paquete de baterías /Tiempo de carga (Minutos) 120 Volts DCB095 DCB100 DCB101 DCB102 DCB103 ... es 20 voltios. Read the instruction manual for one or more specific information. la duración de carga real puede variar. and the array of the tool. Actual charge time may vary. Lea el manual de instrucciones para obtener información más precisa. the kit box configuration; El tiempo de ...


