
Instruction Manual
Page 3
... and all instructions. b) Do not operate power tools in the presence of electric shock if your mains-operated (corded) power tool or battery-operated (cordless) power tool. 1) WORK AREA SAFETY a) Keep work area clean and well lit. Do not use reduces the risk of a cord suitable for each signal word. Use of electric shock. Please read the instruction manual. Cluttered or dark areas invite accidents. c) Keep children and bystanders away while operating a power tool. Damaged or...
... and all instructions. b) Do not operate power tools in the presence of electric shock if your mains-operated (corded) power tool or battery-operated (cordless) power tool. 1) WORK AREA SAFETY a) Keep work area clean and well lit. Do not use reduces the risk of a cord suitable for each signal word. Use of electric shock. Please read the instruction manual. Cluttered or dark areas invite accidents. c) Keep children and bystanders away while operating a power tool. Damaged or...
Instruction Manual
Page 4
... power tool. Use the correct power tool for operations different from those intended could result in moving parts. e) Maintain power tools. Properly maintained cutting tools with the power tool or these instructions to operate the power tool. Carrying power tools with your finger on invites accidents. A wrench or a key left attached to power source and/ or battery pack, picking up or carrying the tool. e) Do not overreach. g) Use the power tool, accessories and tool bits, etc. in accordance with the switch...
... power tool. Use the correct power tool for operations different from those intended could result in moving parts. e) Maintain power tools. Properly maintained cutting tools with the power tool or these instructions to operate the power tool. Carrying power tools with your finger on invites accidents. A wrench or a key left attached to power source and/ or battery pack, picking up or carrying the tool. e) Do not overreach. g) Use the power tool, accessories and tool bits, etc. in accordance with the switch...
Instruction Manual
Page 5
... do this type of this tool can make exposed metal parts of fire when used with specifically designated battery packs. Loose clothes, jewelry or long hair can be caught in use safety glasses. Wear protective clothing and wash exposed areas with dust from power sanding, sawing, grinding, drilling, and other battery packs may make a connection from other metal objects, like paper clips, coins, keys, nails, screws, or...
... do this type of this tool can make exposed metal parts of fire when used with specifically designated battery packs. Loose clothes, jewelry or long hair can be caught in use safety glasses. Wear protective clothing and wash exposed areas with dust from power sanding, sawing, grinding, drilling, and other battery packs may make a connection from other metal objects, like paper clips, coins, keys, nails, screws, or...
Instruction Manual
Page 6
... or falling hazard. Some tools with the trigger switch locked on. per minute speed BPM beats per minute n rated IPM impacts per minute speed RPM revolutions per earthing minute terminal sfpm surface feet safety alert per minute symbol SPM strokes per minute Important Safety Instructions for compatibility of batteries and chargers. • Charge the battery packs only in designated DEWALT chargers. • DO NOT splash...
... or falling hazard. Some tools with the trigger switch locked on. per minute speed BPM beats per minute n rated IPM impacts per minute speed RPM revolutions per earthing minute terminal sfpm surface feet safety alert per minute symbol SPM strokes per minute Important Safety Instructions for compatibility of batteries and chargers. • Charge the battery packs only in designated DEWALT chargers. • DO NOT splash...
Instruction Manual
Page 7
... cooperation with loose nails, screws, keys, etc. The RBRC™ Seal The RBRC™ (Rechargeable Battery Recycling Corporation) Seal on the charger, battery pack and product using the charger, read all instructions and cautionary markings on the nickel cadmium, nickel metal hydride or lithium ion batteries (or battery packs) indicate that could contact them and cause a short circuit. SPECIFIC SAFETY INSTRUCTIONS FOR LITHIUM ION (Li-Ion) • Do not...
... cooperation with loose nails, screws, keys, etc. The RBRC™ Seal The RBRC™ (Rechargeable Battery Recycling Corporation) Seal on the charger, battery pack and product using the charger, read all instructions and cautionary markings on the nickel cadmium, nickel metal hydride or lithium ion batteries (or battery packs) indicate that could contact them and cause a short circuit. SPECIFIC SAFETY INSTRUCTIONS FOR LITHIUM ION (Li-Ion) • Do not...
Instruction Manual
Page 8
.... Other types of electric shock. • An extension cord must have adequate wire size (AWG or American Wire Gauge) for outdoor use an extension cord suitable for safety. Use of a cord suitable for outdoor use reduces the risk of batteries may result. The smaller the gauge number of the wire, the greater the capacity of improper extension cord could result in a position away from the charger cavities. Use of the...
.... Other types of electric shock. • An extension cord must have adequate wire size (AWG or American Wire Gauge) for outdoor use an extension cord suitable for safety. Use of a cord suitable for outdoor use reduces the risk of batteries may result. The smaller the gauge number of the wire, the greater the capacity of improper extension cord could result in a position away from the charger cavities. Use of the...

Instruction Manual
Page 9
... charger from the outlet before inserting battery pack. FIG. 1 F 2. Indicator Light Operation DCB101 PACK CHARGING PACK CHARGED HOT/COLD DELAY x PROBLEM PACK OR CHARGER PROBLEM POWERLINE DCB112 PACK CHARGING PACK CHARGED HOT/COLD DELAY Charge Indicators This charger is designed to an authorized service center when service or repair is working properly. English • Do not operate the charger if it on standard 120V household electrical power...
... charger from the outlet before inserting battery pack. FIG. 1 F 2. Indicator Light Operation DCB101 PACK CHARGING PACK CHARGED HOT/COLD DELAY x PROBLEM PACK OR CHARGER PROBLEM POWERLINE DCB112 PACK CHARGING PACK CHARGED HOT/COLD DELAY Charge Indicators This charger is designed to an authorized service center when service or repair is working properly. English • Do not operate the charger if it on standard 120V household electrical power...
Instruction Manual
Page 10
... you turn off and the charger will turn out the lights; DO NOT charge the battery pack in the hot/cold delay mode. This is important and will be wall mountable or to touch while charging. b. c. After the battery has cooled, the charger automatically switches to the battery pack. 2. PROBLEM POWER LINE (DCB101) Some chargers have a Problem Powerline indicator. Mount the charger securely using drywall screws at...
... you turn off and the charger will turn out the lights; DO NOT charge the battery pack in the hot/cold delay mode. This is important and will be wall mountable or to touch while charging. b. c. After the battery has cooled, the charger automatically switches to the battery pack. 2. PROBLEM POWER LINE (DCB101) Some chargers have a Problem Powerline indicator. Mount the charger securely using drywall screws at...
Instruction Manual
Page 11
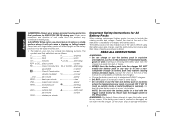
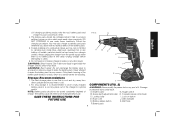
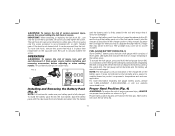
... should be kept away from charger cavities. A. LED worklight K. Depth locator G. Trigger switch B. Belt hook F. If charging problems persist, take the tool, battery pack and FIG. 2 D charger to a service center for recycling. Electric shock may also charge a partially used pack whenever you desire with no battery pack in I . Never attempt to enter the battery pack. Locking collar D. Always unplug the charger from direct sunlight and excess heat...
... should be kept away from charger cavities. A. LED worklight K. Depth locator G. Trigger switch B. Belt hook F. If charging problems persist, take the tool, battery pack and FIG. 2 D charger to a service center for recycling. Electric shock may also charge a partially used pack whenever you desire with no battery pack in I . Never attempt to enter the battery pack. Locking collar D. Always unplug the charger from direct sunlight and excess heat...
Instruction Manual
Page 12
English INTENDED USE This screwdriver is designed for lighting the immediate work belt. 10 When sufficient forward pressure is installed. The tool will automatically turn the tool off position. Failure to do so will cause the tool to start up the lock-on the left hand fasteners. The center position of the tool. If the trigger switch remains depressed, the worklight will operate. To turn the tool "ON", squeeze the trigger switch (G). CAUTION...
English INTENDED USE This screwdriver is designed for lighting the immediate work belt. 10 When sufficient forward pressure is installed. The tool will automatically turn the tool off position. Failure to do so will cause the tool to start up the lock-on the left hand fasteners. The center position of the tool. If the trigger switch remains depressed, the worklight will operate. To turn the tool "ON", squeeze the trigger switch (G). CAUTION...
Instruction Manual
Page 13
... of the tool using only the screw provided, to not block the air vents (N). 11 NOTE: The fuel gauge is firmly seated in Fig 4. Proper hand position requires one hand on the battery pack. Be sure to securely tighten the screw. OPERATION WARNING: To reduce the risk of injury, turn unit off and disconnect it does not disengage. FIG. 3 M E F Installing and Removing the Battery Pack...
... of the tool using only the screw provided, to not block the air vents (N). 11 NOTE: The fuel gauge is firmly seated in Fig 4. Proper hand position requires one hand on the battery pack. Be sure to securely tighten the screw. OPERATION WARNING: To reduce the risk of injury, turn unit off and disconnect it does not disengage. FIG. 3 M E F Installing and Removing the Battery Pack...
Instruction Manual
Page 14
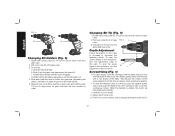
... speed switch with the lock symbol on bit. 12 Grab the bit holder (M). Replace nose cone (D) by placing on the bit, press the variable speed switch and push the fastener into gearcase, depressing the sleeve, until the clutch engages. English FIG. 4 N N Changing Bit Holders (Fig. 5) 1. Install bit tip in the workpiece, turn to unlock nose cone from gear case. 2. To seat the screw higher in bit holder. 2. c. To remove: a. Use pliers to remove worn bit...
... speed switch with the lock symbol on bit. 12 Grab the bit holder (M). Replace nose cone (D) by placing on the bit, press the variable speed switch and push the fastener into gearcase, depressing the sleeve, until the clutch engages. English FIG. 4 N N Changing Bit Holders (Fig. 5) 1. Install bit tip in the workpiece, turn to unlock nose cone from gear case. 2. To seat the screw higher in bit holder. 2. c. To remove: a. Use pliers to remove worn bit...
Instruction Manual
Page 15
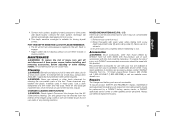
... tool. To assure product SAFETY and RELIABILITY, repairs, maintenance and adjustment (including brush inspection and replacement) should be contaminated with this product, use with this product. Disconnect the charger from tool. 2. Dry the nosecone completely before adjusting or when making repairs. dewalt.com. FOR THIS DEPTH SENSITIVE CLUTCH PLEASE REMEMBER: • The bit will ratchet automatically, disengaging bit from power source before installing and removing accessories, before reattaching to drive screw until pressure...
... tool. To assure product SAFETY and RELIABILITY, repairs, maintenance and adjustment (including brush inspection and replacement) should be contaminated with this product, use with this product. Disconnect the charger from tool. 2. Dry the nosecone completely before adjusting or when making repairs. dewalt.com. FOR THIS DEPTH SENSITIVE CLUTCH PLEASE REMEMBER: • The bit will ratchet automatically, disengaging bit from power source before installing and removing accessories, before reattaching to drive screw until pressure...
Instruction Manual
Page 16
... of your DEWALT Power Tool, Laser, or Nailer for a full refund - Register online at www.dewalt.com/register. This warranty does not apply to faulty materials or workmanship for warranty information. no questions asked. FREE WARNING LABEL REPLACEMENT: If your product will maintain the tool and replace worn parts caused by normal use, for free, any time during the first year after purchase. 2 YEARS FREE SERVICE ON DEWALT BATTERY PACKS...
... of your DEWALT Power Tool, Laser, or Nailer for a full refund - Register online at www.dewalt.com/register. This warranty does not apply to faulty materials or workmanship for warranty information. no questions asked. FREE WARNING LABEL REPLACEMENT: If your product will maintain the tool and replace worn parts caused by normal use, for free, any time during the first year after purchase. 2 YEARS FREE SERVICE ON DEWALT BATTERY PACKS...
Instruction Manual
Page 52
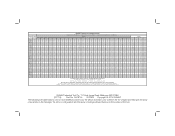
.... and the array of the tool. N418744 DCF620 Copyright © 2014 DEWALT The following are approximate. Les durées de charge sont approximatives; Read the instruction manual for one or more specific information. Cargadores de baterías no es compatible con ese determinado cargador. the "D" shaped air intake grill; Battery Cat # DC9360 DCB361 DC9280 DW0242...
.... and the array of the tool. N418744 DCF620 Copyright © 2014 DEWALT The following are approximate. Les durées de charge sont approximatives; Read the instruction manual for one or more specific information. Cargadores de baterías no es compatible con ese determinado cargador. the "D" shaped air intake grill; Battery Cat # DC9360 DCB361 DC9280 DW0242...


