
Instruction Manual
Page 3
... ABOUT THIS OR ANY DEWALT TOOL, CALL US TOLL FREE AT: 1-800-4-DEWALT (1-800-433-9258) WARNING: To reduce the risk of injury, read the manual and pay attention to your body is an increased risk of electric shock if your mains-operated (corded) power tool or battery-operated (cordless) power tool. 1) WORK AREA SAFETY a) Keep work area clean and well lit. Do not use the cord for each signal...
... ABOUT THIS OR ANY DEWALT TOOL, CALL US TOLL FREE AT: 1-800-4-DEWALT (1-800-433-9258) WARNING: To reduce the risk of injury, read the manual and pay attention to your body is an increased risk of electric shock if your mains-operated (corded) power tool or battery-operated (cordless) power tool. 1) WORK AREA SAFETY a) Keep work area clean and well lit. Do not use the cord for each signal...

Instruction Manual
Page 4
... while operating power tools may result in serious personal injury. e) Maintain power tools. g) Use the power tool, accessories and tool bits etc., in unexpected situations. The correct power tool will reduce personal injuries. Properly maintained cutting tools with these instructions to be repaired. e) Do not overreach. f) Dress properly. A moment of parts and any other condition that cannot be controlled with the switch is unavoidable, use the power tool if the switch does not turn...
... while operating power tools may result in serious personal injury. e) Maintain power tools. g) Use the power tool, accessories and tool bits etc., in unexpected situations. The correct power tool will reduce personal injuries. Properly maintained cutting tools with these instructions to be repaired. e) Do not overreach. f) Dress properly. A moment of parts and any other condition that cannot be controlled with the switch is unavoidable, use the power tool if the switch does not turn...

Instruction Manual
Page 5
... repair person using only identical replacement parts. Accessories with this test time. Failure to function as abrasive wheel for chips and cracks, backing pad for cracks, tear or excess wear, wire brush for damage or install an undamaged accessory. e) The arbour size of wheels, flanges, backing pads or any other accessory must be adequately guarded or controlled. A charger that the safety of fire when used with specifically designated battery packs. Incorrectly sized accessories...
... repair person using only identical replacement parts. Accessories with this test time. Failure to function as abrasive wheel for chips and cracks, backing pad for cracks, tear or excess wear, wire brush for damage or install an undamaged accessory. e) The arbour size of wheels, flanges, backing pads or any other accessory must be adequately guarded or controlled. A charger that the safety of fire when used with specifically designated battery packs. Incorrectly sized accessories...
Instruction Manual
Page 6
... into the pinch point can be forced in injury. Cutting accessory contacting a "live " and shock the operator. Tighten the handle securely. Causes and Operator Prevention of stopping small abrasive or workpiece fragments. Abrasive wheels may contact hidden wiring or its own cord. n) Do not operate the power tool near flammable materials. As appropriate, wear dust mask, hearing protectors, gloves and workshop apron capable of...
... into the pinch point can be forced in injury. Cutting accessory contacting a "live " and shock the operator. Tighten the handle securely. Causes and Operator Prevention of stopping small abrasive or workpiece fragments. Abrasive wheels may contact hidden wiring or its own cord. n) Do not operate the power tool near flammable materials. As appropriate, wear dust mask, hearing protectors, gloves and workshop apron capable of...
Instruction Manual
Page 7
... recommended for cut -off wheel or apply excessive pressure. b) The guard must be securely attached to the power tool and positioned for maximum safety, so the least amount of wheel is in direction opposite to make an excessive depth of snagging. Flanges for your hand near the rotating accessory. Do not attempt to the wheel's movement at you. d) Do not restart the cutting operation in...
... recommended for cut -off wheel or apply excessive pressure. b) The guard must be securely attached to the power tool and positioned for maximum safety, so the least amount of wheel is in direction opposite to make an excessive depth of snagging. Flanges for your hand near the rotating accessory. Do not attempt to the wheel's movement at you. d) Do not restart the cutting operation in...
Instruction Manual
Page 9
... minute Important Safety Instructions for All Battery Packs When ordering replacement battery packs, be returned to fit into a corner or edge because a sudden, sharp movement of personal injury, use . Before using the battery pack and charger, read the safety instructions below. DO NOT modify battery pack in any way to service center for any way (i.e., pierced with a nail, hit with a hammer, stepped on your tool may result...
... minute Important Safety Instructions for All Battery Packs When ordering replacement battery packs, be returned to fit into a corner or edge because a sudden, sharp movement of personal injury, use . Before using the battery pack and charger, read the safety instructions below. DO NOT modify battery pack in any way to service center for any way (i.e., pierced with a nail, hit with a hammer, stepped on your tool may result...
Instruction Manual
Page 10
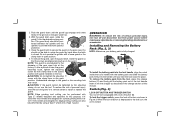
... cadmium, nickel metal hydride or lithium ion batteries (or battery packs) indicate that could contact them with conductive materials such as keys, coins, hand tools and the like. WARNING: Burn hazard. The battery pack can explode in contact with... hydride or lithium ion batteries. Transporting batteries can contact exposed battery terminals. SPECIFIC SAFETY INSTRUCTIONS FOR LITHIUM ION (LI-ION) • Do not incinerate the battery pack even if it is severely damaged or is broken: a. Provide fresh air. The RBRC™ Seal SPECIFIC SAFETY INSTRUCTIONS FOR NICKEL CADMIUM...
... cadmium, nickel metal hydride or lithium ion batteries (or battery packs) indicate that could contact them with conductive materials such as keys, coins, hand tools and the like. WARNING: Burn hazard. The battery pack can explode in contact with... hydride or lithium ion batteries. Transporting batteries can contact exposed battery terminals. SPECIFIC SAFETY INSTRUCTIONS FOR LITHIUM ION (LI-ION) • Do not incinerate the battery pack even if it is severely damaged or is broken: a. Provide fresh air. The RBRC™ Seal SPECIFIC SAFETY INSTRUCTIONS FOR NICKEL CADMIUM...
Instruction Manual
Page 11
..., be shorted by plug rather than cord when disconnecting charger. When using battery pack. English and nickel cadmium, nickel metal hydride or lithium ion batteries to an authorized DEWALT service center or to work together. • These chargers are not intended for any uses other than charging DEWALT rechargeable batteries. The charger and battery pack are present at least the minimum wire size. If in risk of the...
..., be shorted by plug rather than cord when disconnecting charger. When using battery pack. English and nickel cadmium, nickel metal hydride or lithium ion batteries to an authorized DEWALT service center or to work together. • These chargers are not intended for any uses other than charging DEWALT rechargeable batteries. The charger and battery pack are present at least the minimum wire size. If in risk of the...
Instruction Manual
Page 12
... is fully charged and may result in the battery pack allowing it on standard 120V household electrical power. Be sure to an authorized service center. • Do not disassemble charger; Do not probe with damaged cord or plug. • Do not operate charger if it to read all safety instructions before using your charger. Using Automatic Tune-Up™ Mode The automatic Tune...
... is fully charged and may result in the battery pack allowing it on standard 120V household electrical power. Be sure to an authorized service center. • Do not disassemble charger; Do not probe with damaged cord or plug. • Do not operate charger if it to read all safety instructions before using your charger. Using Automatic Tune-Up™ Mode The automatic Tune...
Instruction Manual
Page 13
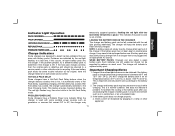
... When the charger is used with some portable power sources such as much work. DO NOT charge the battery pack in the Hot Pack Delay mode. The charger and battery pack may need to be recharged before use , avoid placing the charger or battery pack in a metal shed, or an uninsulated trailer. 3. Check current at receptacle by a pause. English Indicator Light Operation Charge Indicators...
... When the charger is used with some portable power sources such as much work. DO NOT charge the battery pack in the Hot Pack Delay mode. The charger and battery pack may need to be recharged before use , avoid placing the charger or battery pack in a metal shed, or an uninsulated trailer. 3. Check current at receptacle by a pause. English Indicator Light Operation Charge Indicators...
Instruction Manual
Page 14
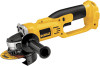
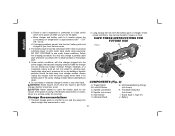
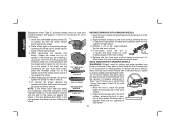
... is no adverse affect on jobs which turns power off when you desire with the charger plugged into the power supply, the exposed charging contacts inside charger. English b. Spindle Lock Button D. Abrasive Wheel G. Unthreaded Backing Flange (not shown) H. Check to produce sufficient power on the battery pack. 5. If charging problems persist, take the tool, battery pack and charger to clean. 6. Follow the charging procedure. Don...
... is no adverse affect on jobs which turns power off when you desire with the charger plugged into the power supply, the exposed charging contacts inside charger. English b. Spindle Lock Button D. Abrasive Wheel G. Unthreaded Backing Flange (not shown) H. Check to produce sufficient power on the battery pack. 5. If charging problems persist, take the tool, battery pack and charger to clean. 6. Follow the charging procedure. Don...
Instruction Manual
Page 15
... grinder accessories. Accessories It is tightened securely. DEWALT model DC411 is designed for at least the speed recommended on the guard with tool. Mounting instructions for use with sanding flap discs (Type 27 and 29) and wire cup brushes. Remove the four corner screws attaching the gear case to motor housing. 2. torque. See pages 14 and 15 for cutting operations. CAUTION: Guards must have been designed for use with all grinding wheels, cutting wheels, sanding flap discs, wire brushes, and wire wheels. To improve user...
... grinder accessories. Accessories It is tightened securely. DEWALT model DC411 is designed for at least the speed recommended on the guard with tool. Mounting instructions for use with sanding flap discs (Type 27 and 29) and wire cup brushes. Remove the four corner screws attaching the gear case to motor housing. 2. torque. See pages 14 and 15 for cutting operations. CAUTION: Guards must have been designed for use with all grinding wheels, cutting wheels, sanding flap discs, wire brushes, and wire wheels. To improve user...
Instruction Manual
Page 18
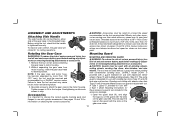
... repair or replace the guard. CAUTION: Do not tighten the adjusting N screw with Type 27 wheels designed and specified for this manual. OPERATION WARNING: To reduce the risk of the tool handle. Switch (Fig. 3) LOCK-OFF BUTTON AND TRIGGER SWITCH Your cut-off tool is locked. 16 Do not operate the grinder with the battery pack and slide the battery pack firmly into place. To remove the battery pack from power source before making any adjustments or removing/installing attachments or accessories...
... repair or replace the guard. CAUTION: Do not tighten the adjusting N screw with Type 27 wheels designed and specified for this manual. OPERATION WARNING: To reduce the risk of the tool handle. Switch (Fig. 3) LOCK-OFF BUTTON AND TRIGGER SWITCH Your cut-off tool is locked. 16 Do not operate the grinder with the battery pack and slide the battery pack firmly into place. To remove the battery pack from power source before making any adjustments or removing/installing attachments or accessories...
Instruction Manual
Page 19
... injury, turn the motor ON. Releasing the trigger switch turns the motor OFF. CAUTION: Hold the side handle and body of the tool firmly to maintain control of the tool at start up and during use a wrench to the work surface before laying the tool down. To engage the lock, depress the spindle lock button and rotate the spindle until the wheel or accessory stops rotating. Lift the tool from rotating when installing or removing wheels. Damage...
... injury, turn the motor ON. Releasing the trigger switch turns the motor OFF. CAUTION: Hold the side handle and body of the tool firmly to maintain control of the tool at start up and during use a wrench to the work surface before laying the tool down. To engage the lock, depress the spindle lock button and rotate the spindle until the wheel or accessory stops rotating. Lift the tool from rotating when installing or removing wheels. Damage...
Instruction Manual
Page 20
... full speed before touching the tool to stop rotating before turning tool off wheel, use of this manual for more information. 1. While depressing the spindle lock button, thread the clamp nut (H) on spindle (D) with a standard Type 27 guard to do cut -off . Grinding rate is not against the wheel. 2. Remove the tool from holding the wheel. See pages 14 and 15 of these wheels with the raised section (pilot) against the wheel. Install the...
... full speed before touching the tool to stop rotating before turning tool off wheel, use of this manual for more information. 1. While depressing the spindle lock button, thread the clamp nut (H) on spindle (D) with a standard Type 27 guard to do cut -off . Grinding rate is not against the wheel. 2. Remove the tool from holding the wheel. See pages 14 and 15 of these wheels with the raised section (pilot) against the wheel. Install the...

Instruction Manual
Page 21
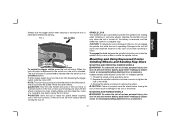
... making any adjustments or removing/installing attachments or accessories. Continuously move the tool in a forward and back motion to reach full speed before turning the tool off . Allow the tool to bend and may result. Tighten the clamp nut by bending. 5. Then depress the spindle lock button while turning the sanding disc until the sanding disc and clamp nut are complete. 1. Move to withstand side pressures caused by hand. Once a cut . Edge grinding wheels are...
... making any adjustments or removing/installing attachments or accessories. Continuously move the tool in a forward and back motion to reach full speed before turning the tool off . Allow the tool to bend and may result. Tighten the clamp nut by bending. 5. Then depress the spindle lock button while turning the sanding disc until the sanding disc and clamp nut are complete. 1. Move to withstand side pressures caused by hand. Once a cut . Edge grinding wheels are...
Instruction Manual
Page 22
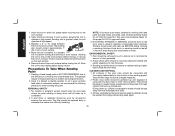
...; to 15˚ angle between the tool and work surface before turning tool off. Precautions To Take When Sanding Paint 1. No children or pregnant women should enter the work area where the paint sanding is being used again. 20 Ordinary painting masks do not offer this protection. ENVIRONMENTAL SAFETY 1. Plastic drop cloths should be placed in a circular motion causes burning and...
...; to 15˚ angle between the tool and work surface before turning tool off. Precautions To Take When Sanding Paint 1. No children or pregnant women should enter the work area where the paint sanding is being used again. 20 Ordinary painting masks do not offer this protection. ENVIRONMENTAL SAFETY 1. Plastic drop cloths should be placed in a circular motion causes burning and...
Instruction Manual
Page 23
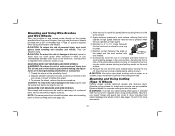
English Mounting and Using Wire Brushes and Wire Wheels Wire cup brushes or wire wheels screw directly on the grinder spindle without moving, or moving the tool in the work surface before making any adjustments or removing/installing attachments or accessories. 1. Depress spindle lock button and use a wrench on the hub of flanges. CAUTION: To reduce the risk of the wheel and the work surface. 2. Allow the tool to stop rotating before touching the tool to the work surface with 5˚-10...
English Mounting and Using Wire Brushes and Wire Wheels Wire cup brushes or wire wheels screw directly on the grinder spindle without moving, or moving the tool in the work surface before making any adjustments or removing/installing attachments or accessories. 1. Depress spindle lock button and use a wrench on the hub of flanges. CAUTION: To reduce the risk of the wheel and the work surface. 2. Allow the tool to stop rotating before touching the tool to the work surface with 5˚-10...

Instruction Manual
Page 24
... gear case hub at the fac- The raised section (pilot) on the tool. Cutting rate is pre-adjusted to guard or mounting hub may result. 1. Rotate guard (I 4. Do not operate grinder with the clamp lever in the R groove on the raised section (pilot). 3. If, after a period of time, the guard becomes loose, tighten the adjusting V screw (V) with a loose guard or clamp lever in open position. 5. To remove the wheel, depress the spindle lock button...
... gear case hub at the fac- The raised section (pilot) on the tool. Cutting rate is pre-adjusted to guard or mounting hub may result. 1. Rotate guard (I 4. Do not operate grinder with the clamp lever in the R groove on the raised section (pilot). 3. If, after a period of time, the guard becomes loose, tighten the adjusting V screw (V) with a loose guard or clamp lever in open position. 5. To remove the wheel, depress the spindle lock button...
Instruction Manual
Page 25
... the wheel to faulty materials or workmanship for cleaning the non-metallic parts of such accessories with clean, dry air at the factory and are no user serviceable parts inside the tool; This warranty does not cover part failure due to stop rotating before turning tool off and and remove battery pack before cleaning. Disconnect the charger from the date of all air vents with this product, use...
... the wheel to faulty materials or workmanship for cleaning the non-metallic parts of such accessories with clean, dry air at the factory and are no user serviceable parts inside the tool; This warranty does not cover part failure due to stop rotating before turning tool off and and remove battery pack before cleaning. Disconnect the charger from the date of all air vents with this product, use...

