Instruction Manual
Page 3
... of electric shock. Do not use the cord for each signal word. d) Do not abuse the cord. F YOU HAVE ANY QUESTIONS OR COMMENTS ABOUT THIS OR ANY DEWALT TOOL, CALL US TOLL FREE AT: 1-800-4-DEWALT (1-800-433-9258). Failure to follow the warnings and instructions may ignite the dust or fumes. Read all safety warnings and all instructions. b) Do not operate power tools in...
... of electric shock. Do not use the cord for each signal word. d) Do not abuse the cord. F YOU HAVE ANY QUESTIONS OR COMMENTS ABOUT THIS OR ANY DEWALT TOOL, CALL US TOLL FREE AT: 1-800-4-DEWALT (1-800-433-9258). Failure to follow the warnings and instructions may ignite the dust or fumes. Read all safety warnings and all instructions. b) Do not operate power tools in...
Instruction Manual
Page 4
... . Use of the power tool for misalignment or binding of moving parts, breakage of parts and any adjustments, changing accessories, or storing power tools. Check for operations different from those intended could result in a hazardous situation. 2 in accordance with sharp cutting edges are less likely to bind and are dangerous in moving parts. Use of dust collection can be caught in the hands of electric shock. 3) PERSONAL SAFETY a) Stay...
... . Use of the power tool for misalignment or binding of moving parts, breakage of parts and any adjustments, changing accessories, or storing power tools. Check for operations different from those intended could result in a hazardous situation. 2 in accordance with sharp cutting edges are less likely to bind and are dangerous in moving parts. Use of dust collection can be caught in the hands of electric shock. 3) PERSONAL SAFETY a) Stay...
Instruction Manual
Page 5
English 5) SERVICE a) Have your power tool serviced by an authorized specialist. This will result in loss of the power tool is maintained. Hammering operations cause chips to a complete stop. Operating this tool with both hands. An electric cord wrapped around any part of metal or material chips could cause injury. • Wear gloves when operating tool or changing bits. Exposure to noise can cause hearing loss. • Use auxiliary handle(s), if supplied...
English 5) SERVICE a) Have your power tool serviced by an authorized specialist. This will result in loss of the power tool is maintained. Hammering operations cause chips to a complete stop. Operating this tool with both hands. An electric cord wrapped around any part of metal or material chips could cause injury. • Wear gloves when operating tool or changing bits. Exposure to noise can cause hearing loss. • Use auxiliary handle(s), if supplied...
Instruction Manual
Page 6
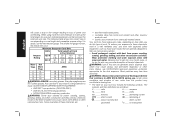
...; arsenic and chromium from bricks and cement and other injury. Direct particles away from power sanding, sawing, grinding, drilling, and other reproductive harm. direct current ........alternating or Class I Construction grounded) direct current no .........no load speed 4 The following symbols. Allowing dust to use NIOSH/OSHA approved respiratory protection appropriate for Cord Sets Volts Total Length of harmful chemicals. To reduce your exposure to these...
...; arsenic and chromium from bricks and cement and other injury. Direct particles away from power sanding, sawing, grinding, drilling, and other reproductive harm. direct current ........alternating or Class I Construction grounded) direct current no .........no load speed 4 The following symbols. Allowing dust to use NIOSH/OSHA approved respiratory protection appropriate for Cord Sets Volts Total Length of harmful chemicals. To reduce your exposure to these...

Instruction Manual
Page 7
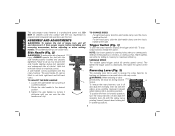
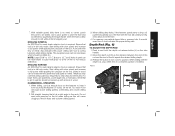
impacts per F minute minute SAVE THESE INSTRUCTIONS E FOR FUTURE USE Motor Be sure your power supply agrees with the nameplate marking. D COMPONENTS (Fig. 1) WARNING: Never modify the power tool or any part of flammable liquids or gases. 5 A B G English Variable speed trigger switch E. Mode selection collar C. Depth rod I overheating. Depth rod release button INTENDED USE This subcompact rotary hammer has been designed for professional C drilling and hammerdrilling at various work sites (i.e., construction sites...
impacts per F minute minute SAVE THESE INSTRUCTIONS E FOR FUTURE USE Motor Be sure your power supply agrees with the nameplate marking. D COMPONENTS (Fig. 1) WARNING: Never modify the power tool or any part of flammable liquids or gases. 5 A B G English Variable speed trigger switch E. Mode selection collar C. Depth rod I overheating. Depth rod release button INTENDED USE This subcompact rotary hammer has been designed for professional C drilling and hammerdrilling at various work sites (i.e., construction sites...
Instruction Manual
Page 8
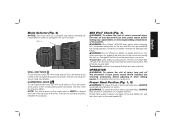
... left-hand users: slide the side handle clamp over the chuck, handle at the right. NOTE: Use lower speeds for starting holes without a centerpunch, drilling in masonry for drilling in metal, plastics or ceramics, or driving screws. An accidental start the rotary hammer, depress the trigger switch (A). Rotate the side handle to clear jammed bits, be fitted to suit both hands to reverse the rotary hammer for strong reactive FIG. 3 G torque. TO ADJUST THE SIDE HANDLE...
... left-hand users: slide the side handle clamp over the chuck, handle at the right. NOTE: Use lower speeds for starting holes without a centerpunch, drilling in masonry for drilling in metal, plastics or ceramics, or driving screws. An accidental start the rotary hammer, depress the trigger switch (A). Rotate the side handle to clear jammed bits, be fitted to suit both hands to reverse the rotary hammer for strong reactive FIG. 3 G torque. TO ADJUST THE SIDE HANDLE...
Instruction Manual
Page 9
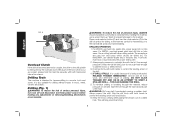
FIG. 4 F DRILL-ONLY MODE To use drill-only mode, turn unit off and disconnect tool from power source before installing and removing accessories, before adjusting or when making any other hand on the tool and bits may damage bare hands. ALWAYS wear gloves when changing bits. Push and rotate bit until it from power source before making repairs. OPERATION WARNING: To reduce the risk of a sudden reaction. Proper Hand Position (Fig. 1, 5) WARNING...
FIG. 4 F DRILL-ONLY MODE To use drill-only mode, turn unit off and disconnect tool from power source before installing and removing accessories, before adjusting or when making any other hand on the tool and bits may damage bare hands. ALWAYS wear gloves when changing bits. Push and rotate bit until it from power source before making repairs. OPERATION WARNING: To reduce the risk of a sudden reaction. Proper Hand Position (Fig. 1, 5) WARNING...
Instruction Manual
Page 10
If drilling thin material, use high-speed steel twist drill bits or hole saws. The exceptions are cast iron and brass which should be drilled dry. Use enough pressure to keep the drill bit biting, but do not push hard enough to the material. RELEASE TRIGGER IMMEDIATELY, remove drill bit from power source before making any adjustments or removing/installing attachments or accessories. Press mode selector button (F) and turn tool off and disconnect tool from work, and...
If drilling thin material, use high-speed steel twist drill bits or hole saws. The exceptions are cast iron and brass which should be drilled dry. Use enough pressure to keep the drill bit biting, but do not push hard enough to the material. RELEASE TRIGGER IMMEDIATELY, remove drill bit from power source before making any adjustments or removing/installing attachments or accessories. Press mode selector button (F) and turn tool off and disconnect tool from work, and...
Instruction Manual
Page 11
... speed to start the hole and accelerate by squeezing the trigger harder when the hole is no need to center punch the point to the work. Do not exert side pressure on the side handle. 2. Use a cutting lubricant when drilling metals. Depth Rod (Fig. 6) TO ADJUST THE DEPTH ROD 1. Holes in and hold the depth rod release button (J) on the bit when drilling as this will cause slower drilling speeds...
... speed to start the hole and accelerate by squeezing the trigger harder when the hole is no need to center punch the point to the work. Do not exert side pressure on the side handle. 2. Use a cutting lubricant when drilling metals. Depth Rod (Fig. 6) TO ADJUST THE DEPTH ROD 1. Holes in and hold the depth rod release button (J) on the bit when drilling as this will cause slower drilling speeds...
Instruction Manual
Page 12
... Online Thank you need relubrication more efficient warranty service in case there is a problem with your tool are available at least once a week. WARNING: Never use identical replacement parts. Register your product now for a complete cleaning, inspection and lubrication. Use a cloth dampened only with this . To reduce the risk of injury, only DEWALT recommended accessories should be used in locating any accessory, please contact DEWALT Industrial Tool...
... Online Thank you need relubrication more efficient warranty service in case there is a problem with your tool are available at least once a week. WARNING: Never use identical replacement parts. Register your product now for a complete cleaning, inspection and lubrication. Use a cloth dampened only with this . To reduce the risk of injury, only DEWALT recommended accessories should be used in locating any accessory, please contact DEWALT Industrial Tool...
Instruction Manual
Page 13
... the warranty, DEWALT tools are covered by our: 1 YEAR FREE SERVICE DEWALT will allow us to accessories or damage caused where repairs have other rights which vary in the unlikely event a safety notification is required under the Federal Consumer Safety Act. no questions asked. English • FOR YOUR SAFETY: Registering your product will maintain the tool and replace worn parts caused by normal use, for free...
... the warranty, DEWALT tools are covered by our: 1 YEAR FREE SERVICE DEWALT will allow us to accessories or damage caused where repairs have other rights which vary in the unlikely event a safety notification is required under the Federal Consumer Safety Act. no questions asked. English • FOR YOUR SAFETY: Registering your product will maintain the tool and replace worn parts caused by normal use, for free...

Instruction Manual
Page 42
and the array of lozenge-shaped humps on the surface of pyramids on the handgrip; the kit box configuration; the array of the tool. N312980 D25052 Copyright © 2013 DEWALT The following are trademarks for one or more DEWALT power tools: the yellow and black color scheme; the "D" shaped air intake grill; DEWALT Industrial Tool Co., 701 East Joppa Road, Baltimore, MD 21286 (OCT13) Part No.
and the array of lozenge-shaped humps on the surface of pyramids on the handgrip; the kit box configuration; the array of the tool. N312980 D25052 Copyright © 2013 DEWALT The following are trademarks for one or more DEWALT power tools: the yellow and black color scheme; the "D" shaped air intake grill; DEWALT Industrial Tool Co., 701 East Joppa Road, Baltimore, MD 21286 (OCT13) Part No.


