

Literature/Product Sheet
Page 1
..., light weight S-shaped tonearm Effective length: 230 mm, 9.06 inch Overhang: 15 mm, 0.6 inch Tracking error: Within 3° Stylus pressure range: 0 - 4.0 g (0.25 g increments) Acceptable weight of accessorius headshell is 9.0 g.) ■ General Power Supply: AC120V, 60 Hz Power Consumption: 10W Dimensions: 450 (W) x 170 (H) x 370 (D) mm (incl. feet), 17.7 (W) x 6.7 (H) x 14.6 (D) inch Weight: 10.1 kg, 22.2 lbs. NEW MODEL I N F O R M AT I O N Analog Turntable DP-500M...
..., light weight S-shaped tonearm Effective length: 230 mm, 9.06 inch Overhang: 15 mm, 0.6 inch Tracking error: Within 3° Stylus pressure range: 0 - 4.0 g (0.25 g increments) Acceptable weight of accessorius headshell is 9.0 g.) ■ General Power Supply: AC120V, 60 Hz Power Consumption: 10W Dimensions: 450 (W) x 170 (H) x 370 (D) mm (incl. feet), 17.7 (W) x 6.7 (H) x 14.6 (D) inch Weight: 10.1 kg, 22.2 lbs. NEW MODEL I N F O R M AT I O N Analog Turntable DP-500M...

Owners Manual - English
Page 1
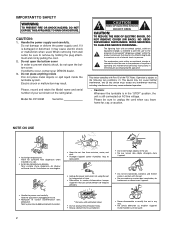
DIRECT DRIVE MANUAL TURNTABLE SYSTEM DP-500M OPERATING INSTRUCTIONS SERIAL NO. PLEASE RECORD UNIT SERIAL NUMBER ATTACHED TO THE REAR OF THE CABINET FOR FUTURE REFERENCE
DIRECT DRIVE MANUAL TURNTABLE SYSTEM DP-500M OPERATING INSTRUCTIONS SERIAL NO. PLEASE RECORD UNIT SERIAL NUMBER ATTACHED TO THE REAR OF THE CABINET FOR FUTURE REFERENCE
Owners Manual - English
Page 2
...;branchement du cordon. * (For sets with the set shown on AC line voltage. If problems occur, contact your set . • Ne pas mettre en contact des insecticides, du benzène et un diluant avec l'appareil. • Handle the power cord carefully. Please, record and retain the Model name and serial number of important operating and maintenance (servicing) instructions in the "STOP" position...
...;branchement du cordon. * (For sets with the set shown on AC line voltage. If problems occur, contact your set . • Ne pas mettre en contact des insecticides, du benzène et un diluant avec l'appareil. • Handle the power cord carefully. Please, record and retain the Model name and serial number of important operating and maintenance (servicing) instructions in the "STOP" position...
Owners Manual - English
Page 3
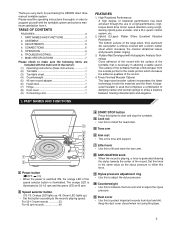
... acquaint yourself with the main unit in the carton: (1) Operating instructions (these instructions 1 (2) Turntable 1 (3) Turntable sheet 1 (4) Counterweight 1 (5) 45 rpm record adapter 1 (6) Head shell 1 (7) Hinge 2 (8) Dust cover 1 (9) Connecting cord 1 1. Please read the operating instructions thoroughly in order to lift and lower the tone arm. , ANTI-SKATING knob • When the record is playing, a force is the tone arm support. PART NAMES AND FUNCTIONS FEATURES 1. Hybrid (2-Layer...
... acquaint yourself with the main unit in the carton: (1) Operating instructions (these instructions 1 (2) Turntable 1 (3) Turntable sheet 1 (4) Counterweight 1 (5) 45 rpm record adapter 1 (6) Head shell 1 (7) Hinge 2 (8) Dust cover 1 (9) Connecting cord 1 1. Please read the operating instructions thoroughly in order to lift and lower the tone arm. , ANTI-SKATING knob • When the record is playing, a force is the tone arm support. PART NAMES AND FUNCTIONS FEATURES 1. Hybrid (2-Layer...

Owners Manual - English
Page 4
...main unit and all the parts. • Set the parts on the turntable, lining it up with the hole of dust cover with the hinges and insert it securely in the direction of the arrows. • To remove the dust cover, open it fully and pull it . 4 head shell 1 Remove all the parts in place using the lock...been mounted into the holder in the rear of the hinges in the following figure. Hinge Holder (2) Mounting the counterweight. 1 Mount the counterweight on the cartridge or the cartridge's instructions. RL OUTPUT GND 1 Securely insert the two included hinges into the ...
...main unit and all the parts. • Set the parts on the turntable, lining it up with the hole of dust cover with the hinges and insert it securely in the direction of the arrows. • To remove the dust cover, open it fully and pull it . 4 head shell 1 Remove all the parts in place using the lock...been mounted into the holder in the rear of the hinges in the following figure. Hinge Holder (2) Mounting the counterweight. 1 Mount the counterweight on the cartridge or the cartridge's instructions. RL OUTPUT GND 1 Securely insert the two included hinges into the ...
Owners Manual - English
Page 5
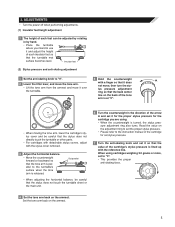
... the turntable mat surface becomes level. Insulator feet (2) Stylus pressure and anti-skating adjustment 1 Set the anti-skating knob to the instruction manual of the cartridge for set stylus pressure. 7 Turn the anti-skating knob and set it so that the value of each foot can be careful that the tone arm is lined up with the stylus cover...
... the turntable mat surface becomes level. Insulator feet (2) Stylus pressure and anti-skating adjustment 1 Set the anti-skating knob to the instruction manual of the cartridge for set stylus pressure. 7 Turn the anti-skating knob and set it so that the value of each foot can be careful that the tone arm is lined up with the stylus cover...
Owners Manual - English
Page 6
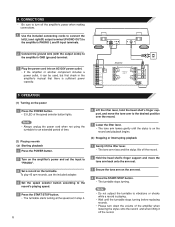
...;er's power when making connections. 1 Use the included connecting cords to connect the left(L) and right(R) output terminal (PHONO OUT) to the amplifier's GND (ground) terminal. Note • Always unplug the power cord when not using the turntable for an extended period of time. (2) Playing records (a) Starting playback 1 Press the POWER button. 2 Turn on the amplifier's power and set in the amplifier's manual that...
...;er's power when making connections. 1 Use the included connecting cords to connect the left(L) and right(R) output terminal (PHONO OUT) to the amplifier's GND (ground) terminal. Note • Always unplug the power cord when not using the turntable for an extended period of time. (2) Playing records (a) Starting playback 1 Press the POWER button. 2 Turn on the amplifier's power and set in the amplifier's manual that...

Owners Manual - English
Page 7
... the output cord's plugs securely connected? • Is the head shell's lock nut securely tightened? • Is the stylus pressure properly adjusted? • Is the record warped or scratched? • Is there dust on the type of the record . Is the set to the check list, please contact your DENON dealer. If the turntable system still does not function properly, check it plays...
... the output cord's plugs securely connected? • Is the head shell's lock nut securely tightened? • Is the stylus pressure properly adjusted? • Is the record warped or scratched? • Is there dust on the type of the record . Is the set to the check list, please contact your DENON dealer. If the turntable system still does not function properly, check it plays...

Owners Manual - English
Page 8
Printed in China 00D 511 4121 304 www.denon.com Denon Brand Company, D&M Holdings Inc.
Printed in China 00D 511 4121 304 www.denon.com Denon Brand Company, D&M Holdings Inc.


