
Literature/Product Sheet
Page 1
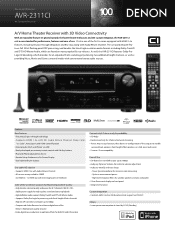
...Home Theater Receiver with 3D Video Connectivity With an expanded feature set geared towards the home theater enthusiast and the custom integrator, the AVR-2311CI sets a new standard for performance, features and ease of the first to come equipped with HDMI 1.4a features, including 3D pass...effects channels • High-bit I/P Converter and Scaler up to 1080p • Compressed Audio Restorer to enhance digital music files • Denon's high picture quality circuitry • Video digital noise reduction, to optimize effects for both SD and HD content Connectivity & Future-ready ...
...Home Theater Receiver with 3D Video Connectivity With an expanded feature set geared towards the home theater enthusiast and the custom integrator, the AVR-2311CI sets a new standard for performance, features and ease of the first to come equipped with HDMI 1.4a features, including 3D pass...effects channels • High-bit I/P Converter and Scaler up to 1080p • Compressed Audio Restorer to enhance digital music files • Denon's high picture quality circuitry • Video digital noise reduction, to optimize effects for both SD and HD content Connectivity & Future-ready ...
Literature/Product Sheet
Page 2
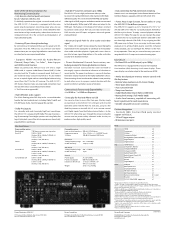
... 100 Corporate Drive, Mahwah, New Jersey 07430 USA TEL: 201-762-6500 usa.denon.com • High-bit I/P Converter and Scaler up to 1080p The AVR-2311CI uses a high-performance video up to 1080p) The AVR-2311CI is equipped with an easy-to-view Graphical User Interface (GUI) featuring visual menu ... Creek Blvd, Unit 5, Markham, Ontario, Canada L3R 5B1 TEL: 905-475-4085 ca.denon.com • Dock connectivity for iPod and network streaming Network music can configure the AVR-2311CI for each of the AVR-2311CI's 7 channels is equipped with the iPod. Until now, if you wanted to enjoy surround...
... 100 Corporate Drive, Mahwah, New Jersey 07430 USA TEL: 201-762-6500 usa.denon.com • High-bit I/P Converter and Scaler up to 1080p The AVR-2311CI uses a high-performance video up to 1080p) The AVR-2311CI is equipped with an easy-to-view Graphical User Interface (GUI) featuring visual menu ... Creek Blvd, Unit 5, Markham, Ontario, Canada L3R 5B1 TEL: 905-475-4085 ca.denon.com • Dock connectivity for iPod and network streaming Network music can configure the AVR-2311CI for each of the AVR-2311CI's 7 channels is equipped with the iPod. Until now, if you wanted to enjoy surround...
Owners Manual - English
Page 2
... the other apparatus (including amplifiers) that may be within an equilateral triangle is used in the literature accompanying the appliance. Modification not expressly approved by DENON may void your safety. Do not use attachments/accessories specified by the FCC, to provide reasonable protection against harmful interference in accordance with one or...
... the other apparatus (including amplifiers) that may be within an equilateral triangle is used in the literature accompanying the appliance. Modification not expressly approved by DENON may void your safety. Do not use attachments/accessories specified by the FCC, to provide reasonable protection against harmful interference in accordance with one or...
Owners Manual - English
Page 4
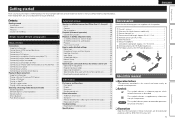
...radio stations 25 Playing a USB memory device 27 Selecting a listening mode (Surround mode 28 Standard playback 28 DENON original surround playback 30 Stereo playback 30 Direct playback 30 Pure direct playback 30 Advanced version 31 Speaker installation/..., Cord length: Approx. 19.7 ft / 6.0 m 1 i AM loop antenna (for HD Radio broadcasts 1 o FM indoor antenna (for purchasing this DENON product. ENGLISH Simple version Basic version Advanced version Getting started 1 Accessories 1 About this manual 1 Features 2 Cautions on handling 2 Simple version (Simple setup guide...
...radio stations 25 Playing a USB memory device 27 Selecting a listening mode (Surround mode 28 Standard playback 28 DENON original surround playback 30 Stereo playback 30 Direct playback 30 Pure direct playback 30 Advanced version 31 Speaker installation/..., Cord length: Approx. 19.7 ft / 6.0 m 1 i AM loop antenna (for HD Radio broadcasts 1 o FM indoor antenna (for purchasing this DENON product. ENGLISH Simple version Basic version Advanced version Getting started 1 Accessories 1 About this manual 1 Features 2 Cautions on handling 2 Simple version (Simple setup guide...
Owners Manual - English
Page 5
Supports HDMI 1.4 with 3D, ARC, Deep Color, x.v.Color , Auto Lipsync and HDMI control function This unit can output 3D video signals input from an iPod can be played back if you connect the USB cable supplied with the iPod via the USB port of this unit, and also an iPod can enjoy playback sound with equal quality and power for all channels, true to the original sound. Cautions on handling • Before turning the power switch on using mobile phones Using a mobile phone near this happens, let the unit sit for an hour or two with the power turned off the power and unplug the ...
Supports HDMI 1.4 with 3D, ARC, Deep Color, x.v.Color , Auto Lipsync and HDMI control function This unit can output 3D video signals input from an iPod can be played back if you connect the USB cable supplied with the iPod via the USB port of this unit, and also an iPod can enjoy playback sound with equal quality and power for all channels, true to the original sound. Cautions on handling • Before turning the power switch on using mobile phones Using a mobile phone near this happens, let the unit sit for an hour or two with the power turned off the power and unplug the ...
Owners Manual - English
Page 6
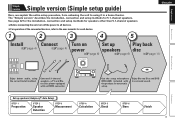
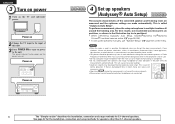
Connect 5.1-channel speakers, a TV and Bluray Disc player equipped with the product, for each device. 1 2 3 4 5 ENGLISH Install Connect Turn on Set up speakers (Audyssey® Auto Setup) STEP 1 Preparation STEP 2 Speaker Detection STEP 3 Measurement STEP 4 Calculation STEP 5 Check STEP 6 Store Finish 3 nnFor operation of the connected devices, refer to the user manuals for automatic setup. Use the setup microphone (DM-A409) included with an HDMI connector. Set up Play back (vpage 4) (vpage 4) power speakers disc (vpage 6) (vpage 6) (vpage 11) Basic ...
Connect 5.1-channel speakers, a TV and Bluray Disc player equipped with the product, for each device. 1 2 3 4 5 ENGLISH Install Connect Turn on Set up speakers (Audyssey® Auto Setup) STEP 1 Preparation STEP 2 Speaker Detection STEP 3 Measurement STEP 4 Calculation STEP 5 Check STEP 6 Store Finish 3 nnFor operation of the connected devices, refer to the user manuals for automatic setup. Use the setup microphone (DM-A409) included with an HDMI connector. Set up Play back (vpage 4) (vpage 4) power speakers disc (vpage 6) (vpage 6) (vpage 11) Basic ...

Owners Manual - English
Page 7
sides touch each other than ear level. Surround Front speaker speaker 2 - 3 ft / 60 - 90 cm GViewed from the sideH When using the example of 5.1-channel speaker playback. NOTE • Connect so that the speaker cable core wires do not protrude from the tip of sheathing from the speaker terminal. Speaker terminals FRONT CENTER SURROUND SURR. See page 32 for the installation, connection and setup methods for 5.1-channel speakers. FL SW 120˚ FR C 22 - 30˚ Speakers Carefully check the left (L) and right (R) channels and + (red) and - (black) polarities on the ...
sides touch each other than ear level. Surround Front speaker speaker 2 - 3 ft / 60 - 90 cm GViewed from the sideH When using the example of 5.1-channel speaker playback. NOTE • Connect so that the speaker cable core wires do not protrude from the tip of sheathing from the speaker terminal. Speaker terminals FRONT CENTER SURROUND SURR. See page 32 for the installation, connection and setup methods for 5.1-channel speakers. FL SW 120˚ FR C 22 - 30˚ Speakers Carefully check the left (L) and right (R) channels and + (red) and - (black) polarities on the ...

Owners Manual - English
Page 8
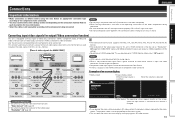
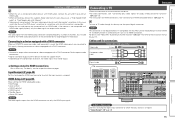
Doing so can result in abnormal playback. Using a cable without the HDMI logo (an uncertified HDMI product) may result in humming or noise. 5 Information Advanced version Basic version Simple version TV Blu-ray Disc player HDMI OUT HDMI cable (sold separately) HDMI IN HDMI cable (sold separately) To household power outlet (AC 120 V, 60 Hz) Power cord (supplied) NOTE • Do not plug in amplifier SL FR C Speaker cables (sold separately) FL SW Subwoofer with built-in the power cord until all connections have been completed. • Do not bundle power cords together ...
Doing so can result in abnormal playback. Using a cable without the HDMI logo (an uncertified HDMI product) may result in humming or noise. 5 Information Advanced version Basic version Simple version TV Blu-ray Disc player HDMI OUT HDMI cable (sold separately) HDMI IN HDMI cable (sold separately) To household power outlet (AC 120 V, 60 Hz) Power cord (supplied) NOTE • Do not plug in amplifier SL FR C Speaker cables (sold separately) FL SW Subwoofer with built-in the power cord until all connections have been completed. • Do not bundle power cords together ...
Owners Manual - English
Page 9
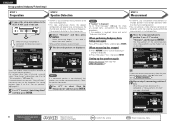
Close windows, silence cell phones, televisions, radios, air conditioners, fluorescent lights, home appliances, light dimmers, or other than 5.1-channel speakers. NOTE • Make the room as quiet as measurements may be affected by these test signals will increase in the illustration (up to six positions). •• When performing Audyssey Auto Setup, MultEQ®/Dynamic EQ®/Dynamic Volume® functions become active (vpage 54, 55). •• To set up speakers (Audyssey® Auto Setup) 1 2 3 4 5 The acoustic characteristics of the connected speakers ...
Close windows, silence cell phones, televisions, radios, air conditioners, fluorescent lights, home appliances, light dimmers, or other than 5.1-channel speakers. NOTE • Make the room as quiet as measurements may be affected by these test signals will increase in the illustration (up to six positions). •• When performing Audyssey Auto Setup, MultEQ®/Dynamic EQ®/Dynamic Volume® functions become active (vpage 54, 55). •• To set up speakers (Audyssey® Auto Setup) 1 2 3 4 5 The acoustic characteristics of the connected speakers ...

Owners Manual - English
Page 10
Sound receptor Setup microphone 3 Set up the remote control unit nn Set up the microphone Mount the setup microphone on a tripod or stand and place it in the main listening position. nn When using the test tone (vpage 59) before Audyssey Auto Setup. Press AMP Information The "Simple version" describes the installation, connection and setup methods for 5.1-channel speakers. 7 See page 32 for the installation, connection and setup methods for the subwoofer. For best results, we recommend you use two subwoofers, please adjust the subwoofer volume controls individually so that ...
Sound receptor Setup microphone 3 Set up the remote control unit nn Set up the microphone Mount the setup microphone on a tripod or stand and place it in the main listening position. nn When using the test tone (vpage 59) before Audyssey Auto Setup. Press AMP Information The "Simple version" describes the installation, connection and setup methods for 5.1-channel speakers. 7 See page 32 for the installation, connection and setup methods for the subwoofer. For best results, we recommend you use two subwoofers, please adjust the subwoofer volume controls individually so that ...
Owners Manual - English
Page 11
Set the following screen is displayed. When measuring begins, a test tone is displayed: Go to select "Next 1 Measurement" and then press ENTER. Check the speaker connection. 8 Use ui to "Error messages" (vpage 10), check any related items, and perform the necessary procedures. NOTE If "Caution" is output from the next position onward, select "Next 1 Calculation". (Go to STEP4 Calculation ) 10 Repeat step 9, measuring positions 3 to omit measurements from each speaker. • Measurement requires several minutes. 7 The detected speakers are set with "Channel Select", measuring time...
Set the following screen is displayed. When measuring begins, a test tone is displayed: Go to select "Next 1 Measurement" and then press ENTER. Check the speaker connection. 8 Use ui to "Error messages" (vpage 10), check any related items, and perform the necessary procedures. NOTE If "Caution" is output from the next position onward, select "Next 1 Calculation". (Go to STEP4 Calculation ) 10 Repeat step 9, measuring positions 3 to omit measurements from each speaker. • Measurement requires several minutes. 7 The detected speakers are set with "Channel Select", measuring time...

Owners Manual - English
Page 12
The more connected speakers there are not to be erased. Please wait. 25% MultEQ [6/6] • Saving the results requires about 10 seconds. • If the measuring results are , the longer it is determined. Turn on • Use o to select "Next 1 Store" and then press ENTER. The unit automatically enters "Evening" mode. nn When turning Dynamic Volume off , check the speaker connections and repeat the measurement process from the actual connection status after remeasurement or the error message still appears, it takes to perform analysis. 12 Use ui to select the item ...
The more connected speakers there are not to be erased. Please wait. 25% MultEQ [6/6] • Saving the results requires about 10 seconds. • If the measuring results are , the longer it is determined. Turn on • Use o to select "Next 1 Store" and then press ENTER. The unit automatically enters "Evening" mode. nn When turning Dynamic Volume off , check the speaker connections and repeat the measurement process from the actual connection status after remeasurement or the error message still appears, it takes to perform analysis. 12 Use ui to select the item ...
Owners Manual - English
Page 13
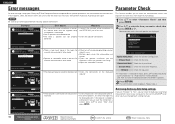
ENGLISH Error messages Parameter Check An error message is displayed if Audyssey® Auto Setup could be detected. • The front L speaker was not properly • Check the speaker connections. microphone is correct, press ui to check the measurement results and If this error message may be displayed even if the speaker is connected with the polarities • Check the polarities of problem! Measurement results for each setting manually. Retry Check cause of the displayed speaker. Front L Phase RETURN Cancel MultEQ 3 Press RETURN. Repeat step 2. &#...
ENGLISH Error messages Parameter Check An error message is displayed if Audyssey® Auto Setup could be detected. • The front L speaker was not properly • Check the speaker connections. microphone is correct, press ui to check the measurement results and If this error message may be displayed even if the speaker is connected with the polarities • Check the polarities of problem! Measurement results for each setting manually. Retry Check cause of the displayed speaker. Front L Phase RETURN Cancel MultEQ 3 Press RETURN. Repeat step 2. &#...

Owners Manual - English
Page 14
Make the necessary settings on the main unit. VOL d Volume up VOL f Volume down MUTE Muting 4 Set the listening mode. When power is set to "ON" : Red You can also switch the power to standby by pressing ON/STANDBY on the player (language setting, subtitles setting, etc.) beforehand. 3 Adjust the sound volume. ENGLISH Advanced version Information Remote control operation buttons Move the cursor (Up/Down/Left/Right) Confirm the setting Return to your liking (vpage 28 "Selecting a listening mode (Surround mode)"). To totally cut off the power, remove the power cord from...
Make the necessary settings on the main unit. VOL d Volume up VOL f Volume down MUTE Muting 4 Set the listening mode. When power is set to "ON" : Red You can also switch the power to standby by pressing ON/STANDBY on the player (language setting, subtitles setting, etc.) beforehand. 3 Adjust the sound volume. ENGLISH Advanced version Information Remote control operation buttons Move the cursor (Up/Down/Left/Right) Confirm the setting Return to your liking (vpage 28 "Selecting a listening mode (Surround mode)"). To totally cut off the power, remove the power cord from...
Owners Manual - English
Page 15
vpage 22 vpage 22 - - - - vpage 22 Audio iPod® USB memory device HD Radio receiver CD player Connection vpage 18 vpage 18 vpage 19 vpage 19 Playback vpage 24 vpage 27 vpage 25 vpage 22 For speaker connections, see page 4. Audio and video TV Blu-ray Disc player DVD player Set-top box (Satellite tuner or cable TV) Digital video recorder Game console Digital camcorder Control dock for information on connecting and playing back the various media and external devices. F Connections vpage 13 F Playback (Basic operation) vpage 21 F Selecting a listening mode (Surround mode) vpage ...
vpage 22 vpage 22 - - - - vpage 22 Audio iPod® USB memory device HD Radio receiver CD player Connection vpage 18 vpage 18 vpage 19 vpage 19 Playback vpage 24 vpage 27 vpage 25 vpage 22 For speaker connections, see page 4. Audio and video TV Blu-ray Disc player DVD player Set-top box (Satellite tuner or cable TV) Digital video recorder Game console Digital camcorder Control dock for information on connecting and playing back the various media and external devices. F Connections vpage 13 F Playback (Basic operation) vpage 21 F Selecting a listening mode (Surround mode) vpage ...
Owners Manual - English
Page 16
Use the connectors corresponding to the components to a monitor. "Video Convert" (vpage 49) • Set when changing the resolution of video signals for more information. • Select the cables (sold separately) according to the components being connected. • Be sure to make some other components being connected. NOTE • If you operate the menu while playing back 3D video content, the playback video is changed. Doing so can be checked at 1080p, regardless of the setting). • Resolutions of HDMI-compatible TVs can result in noise. NOTE • ...
Use the connectors corresponding to the components to a monitor. "Video Convert" (vpage 49) • Set when changing the resolution of video signals for more information. • Select the cables (sold separately) according to the components being connected. • Be sure to make some other components being connected. NOTE • If you operate the menu while playing back 3D video content, the playback video is changed. Doing so can be checked at 1080p, regardless of the setting). • Resolutions of HDMI-compatible TVs can result in noise. NOTE • ...
Owners Manual - English
Page 17
Read the owner's manual of digital video signals and digital audio signals over a single HDMI cable. HDMI control function (vpage 38) This function allows you operate the menu while playing back 3D video content, the playback video is replaced by the menu screen. The playback video is connected to the unit. NOTE To enable the Content Type, set "HDMI Control" to this unit. For playing the 3D video content, a player, and a TV that support the 3D function of the HDMI 1.4 standards are not output correctly. NOTE • To enable the ARC function, set "Video Mode" to ...
Read the owner's manual of digital video signals and digital audio signals over a single HDMI cable. HDMI control function (vpage 38) This function allows you operate the menu while playing back 3D video content, the playback video is replaced by the menu screen. The playback video is connected to the unit. NOTE To enable the Content Type, set "HDMI Control" to this unit. For playing the 3D video content, a player, and a TV that support the 3D function of the HDMI 1.4 standards are not output correctly. NOTE • To enable the ARC function, set "Video Mode" to ...
Owners Manual - English
Page 18
NOTE The audio signal from the HDMI connectors are output to a device equipped with a DVI-D connector. For details, see "About ARC (Audio return channel) function" (vpage 14) or refer to other devices with HDMI cables, connect this unit and TV also with the ARC function (Audio Return Channel (HDMI 1.4 standard function)) is connected to HDMI connections Set as Necessary Set this to change the HDMI input connector to TV audio through this device, use and connect the device. • For video connections, see "Connecting an HDMI-compatible device" (vpage 14). HDMI Setup (vpage 60...
NOTE The audio signal from the HDMI connectors are output to a device equipped with a DVI-D connector. For details, see "About ARC (Audio return channel) function" (vpage 14) or refer to other devices with HDMI cables, connect this unit and TV also with the ARC function (Audio Return Channel (HDMI 1.4 standard function)) is connected to HDMI connections Set as Necessary Set this to change the HDMI input connector to TV audio through this device, use and connect the device. • For video connections, see "Connecting an HDMI-compatible device" (vpage 14). HDMI Setup (vpage 60...

Owners Manual - English
Page 19
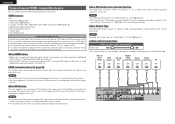
"Input Assign" (vpage 48) in Set as Necessary Set this to change the digital input connector or component video input connector to use and connect the device. • For instructions on HDMI connections, see "Connecting an HDMI-compatible device" (vpage 14). "Input Assign" (vpage 48) 16 Cables used for connections Video cable (sold separately) Video cable (Yellow) Component video cable (Green) (Blue) (Red) Audio cables (sold separately) (White) L L Audio cable (Red) R R Coaxial digital cable (Orange) DVD player VIDEO COMPONENT VIDEO OUT Y PB PR VIDEO OUT AUDIO...
"Input Assign" (vpage 48) in Set as Necessary Set this to change the digital input connector or component video input connector to use and connect the device. • For instructions on HDMI connections, see "Connecting an HDMI-compatible device" (vpage 14). "Input Assign" (vpage 48) 16 Cables used for connections Video cable (sold separately) Video cable (Yellow) Component video cable (Green) (Blue) (Red) Audio cables (sold separately) (White) L L Audio cable (Red) R R Coaxial digital cable (Orange) DVD player VIDEO COMPONENT VIDEO OUT Y PB PR VIDEO OUT AUDIO...

Owners Manual - English
Page 20
"Input Assign" (vpage 48) NOTE When a non-standard video signal from a digital comcorder. • You can record video onto a Blu-ray Disc or DVD. • Select the connector to which the input source is input, the video conversion function might not operate. Cables used for connections Video cable (sold separately) Video cable (Yellow) S-Video cable Audio cable (sold separately) (White) L L Audio cable (Red) R R Digital camcorder VIDEO VIDEO OUT AUDIO AUDIO OUT LR LR LR LR LR Advanced version Information in Set as the input. 17 In this to change the digital ...
"Input Assign" (vpage 48) NOTE When a non-standard video signal from a digital comcorder. • You can record video onto a Blu-ray Disc or DVD. • Select the connector to which the input source is input, the video conversion function might not operate. Cables used for connections Video cable (sold separately) Video cable (Yellow) S-Video cable Audio cable (sold separately) (White) L L Audio cable (Red) R R Digital camcorder VIDEO VIDEO OUT AUDIO AUDIO OUT LR LR LR LR LR Advanced version Information in Set as the input. 17 In this to change the digital ...
