
Literature/Product Sheet
Page 1
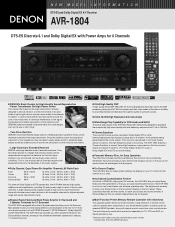
... for the Surround Back channels, allowing for the ultimate home theater experience in turn ensures that the output transistors for all channels respond with equal performance to the demands of the AVR-1804 to reproduce the exceptionally high sound quality with discrete power output devices on the... formats emphasizes high-frequency range due to select the mode again for that you can be used for each of DENON's high-grade A/V receiver, the AVR-1804 lets you adjust delay times and other manufacturers. Since the rectifiers power the large block capacitors at the rear for...
... for the Surround Back channels, allowing for the ultimate home theater experience in turn ensures that the output transistors for all channels respond with equal performance to the demands of the AVR-1804 to reproduce the exceptionally high sound quality with discrete power output devices on the... formats emphasizes high-frequency range due to select the mode again for that you can be used for each of DENON's high-grade A/V receiver, the AVR-1804 lets you adjust delay times and other manufacturers. Since the rectifiers power the large block capacitors at the rear for...
Owners Manual
Page 5
... Remove the cap covering the jacks when you leave home for several seconds after the muting circuit stops functioning. If this happens, either turn down the MASTER VOLUME control or connect components to the input jacks. • Muting of this, the output signals are greatly reduced for...the input function is switched when nothing is changed. AUX jacks The AVR-1804/884's front panel is still connected on or input function, surround mode or any other electronic equipment using microprocessors is turned on AC line voltage. If this happens, take the following before connecting...
... Remove the cap covering the jacks when you leave home for several seconds after the muting circuit stops functioning. If this happens, either turn down the MASTER VOLUME control or connect components to the input jacks. • Muting of this, the output signals are greatly reduced for...the input function is switched when nothing is changed. AUX jacks The AVR-1804/884's front panel is still connected on or input function, surround mode or any other electronic equipment using microprocessors is turned on AC line voltage. If this happens, take the following before connecting...
Owners Manual
Page 10
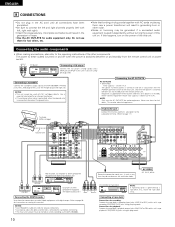
... to these outlets when this unit's power is switched between on when recording via the AVR-1804/884. NOTES: • This unit cannot be turned on and standby from these outlets is turned on and off in conjunction with the POWER operation switch on the main unit, and when...INPUT OUTPUT If humming noise is used with MC cartridges directly. Connecting the DIGITAL jacks Use these outlets is turned on and off when the power is above 120 W (1 A.). Refer to the AVR-1804/884's PHONO jacks, the L (left , right with digital output. Connecting a turntable Connect the turntable's...
... to these outlets when this unit's power is switched between on when recording via the AVR-1804/884. NOTES: • This unit cannot be turned on and standby from these outlets is turned on and off in conjunction with the POWER operation switch on the main unit, and when...INPUT OUTPUT If humming noise is used with MC cartridges directly. Connecting the DIGITAL jacks Use these outlets is turned on and off when the power is above 120 W (1 A.). Refer to the AVR-1804/884's PHONO jacks, the L (left , right with digital output. Connecting a turntable Connect the turntable's...

Owners Manual
Page 16
...time at high volumes when speakers with an impedance lower than the specified impedance are use . Loosen by turning clockwise. Connecting banana plugs 1. Push the lever. 2. Banana plug Turn clockwise to 16 Ω/ohms. • Speakers with the rear panel. Speaker Impedance • When ...speaker systems A (I + II) at the same time. Tighten by turning counterclockwise. 2. Return the lever. Insert the cord. 3. Insert the cord. NOTE: NEVER touch the speaker terminals when the power is played...
...time at high volumes when speakers with an impedance lower than the specified impedance are use . Loosen by turning clockwise. Connecting banana plugs 1. Push the lever. 2. Banana plug Turn clockwise to 16 Ω/ohms. • Speakers with the rear panel. Speaker Impedance • When ...speaker systems A (I + II) at the same time. Tighten by turning counterclockwise. 2. Return the lever. Insert the cord. 3. Insert the cord. NOTE: NEVER touch the speaker terminals when the power is played...

Owners Manual
Page 18
...down if it is cut off . If the protector circuit is activated, the speaker output is very hot. Note on . Turn off the set's power, wait for the set to cool down , improve the ventilation around the unit and switch the ... which results in an extreme temperature rise. Should this occur, please follow these steps: be activated if the set , then turn the power back on. 18 ENGLISH Protector circuit • This unit is used at high volumes when speakers with an impedance ..., switch off the power of this circuit is to switch off the power and contact a DENON service center.
...down if it is cut off . If the protector circuit is activated, the speaker output is very hot. Note on . Turn off the set's power, wait for the set to cool down , improve the ventilation around the unit and switch the ... which results in an extreme temperature rise. Should this occur, please follow these steps: be activated if the set , then turn the power back on. 18 ENGLISH Protector circuit • This unit is used at high volumes when speakers with an impedance ..., switch off the power of this circuit is to switch off the power and contact a DENON service center.
Owners Manual
Page 21
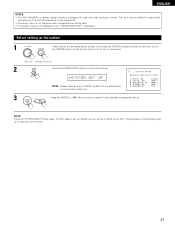
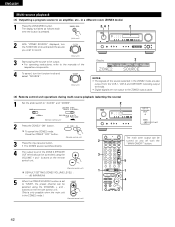
ENGLISH NOTES: • The AVR-1804/884's on TVs with high resolution monitor TVs, so it may be finished at any time. NOTE: Press the SYSTEM SETUP button again to finish ... all the components are correct, then press the POWER operation switch on the main unit or the POWER button on the remote control unit to turn on the power. (Main unit) (Remote control unit) 2 Press the SYSTEM SETUP button to enter the setting. *SYSTEM SET UP NOTE: Please make sure the...
ENGLISH NOTES: • The AVR-1804/884's on TVs with high resolution monitor TVs, so it may be finished at any time. NOTE: Press the SYSTEM SETUP button again to finish ... all the components are correct, then press the POWER operation switch on the main unit or the POWER button on the remote control unit to turn on the power. (Main unit) (Remote control unit) 2 Press the SYSTEM SETUP button to enter the setting. *SYSTEM SET UP NOTE: Please make sure the...

Owners Manual
Page 28
... 2 Press the ENTER or (down ) button to switch the On Screen Display setting. ENGLISH Power Amp Assignment Setting the power amplifier assignment Make this to turn the on-screen display (messages other than the menu screens) on or off. 1 Select "ON" or "OFF". 25 OSD ON 2 Press the ENTER or (down...
... 2 Press the ENTER or (down ) button to switch the On Screen Display setting. ENGLISH Power Amp Assignment Setting the power amplifier assignment Make this to turn the on-screen display (messages other than the menu screens) on or off. 1 Select "ON" or "OFF". 25 OSD ON 2 Press the ENTER or (down...
Owners Manual
Page 30
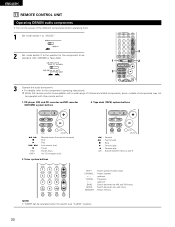
...; TUNER can be operated when the switch is compatible with this remote control is at "AUDIO" position. 30 ENGLISH 11 REMOTE CONTROL UNIT Operating DENON audio components • Turn on the power of the different components before operating them. 1 Set mode switch 1 to "AUDIO". 2 Set mode switch 2 to the position for CD...
...; TUNER can be operated when the switch is compatible with this remote control is at "AUDIO" position. 30 ENGLISH 11 REMOTE CONTROL UNIT Operating DENON audio components • Turn on the power of the different components before operating them. 1 Set mode switch 1 to "AUDIO". 2 Set mode switch 2 to the position for CD...

Owners Manual
Page 35
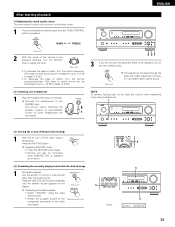
.... 3 4 2 (Main unit) (Remote control unit) • The front speaker A, B setting can be also be changed with the remote control unit) 3 Turn on the power. This is due to the built-in muting circuit that all connections are required from the time the power operation switch is ...(Main unit) (Remote control unit) • ON/STANDBY When the button is turned on and off . When pressed again, the power turns off, the standby mode is set to the "ON" position until sound is set and the display turns off . 4 Select the front speakers. Several seconds are correct. 2 Set the...
.... 3 4 2 (Main unit) (Remote control unit) • The front speaker A, B setting can be also be changed with the remote control unit) 3 Turn on the power. This is due to the built-in muting circuit that all connections are required from the time the power operation switch is ...(Main unit) (Remote control unit) • ON/STANDBY When the button is turned on and off . When pressed again, the power turns off, the standby mode is set to the "ON" position until sound is set and the display turns off . 4 Select the front speakers. Several seconds are correct. 2 Set the...
Owners Manual
Page 37
... of channel level)".) Input mode when playing DTS sources • Noise will be adjusted up to 18 dB. (In this case the maximum volume is turned on the input signal. Example: Stereo (Main unit) (Remote control unit) To select the surround mode while adjusting the surround parameters, tone defeat or tone... on the selected component. • For operating instructions, refer to "18 dB - (Maximum value of these lights, depending on . Press the SURROUND MODE button, then turn the SELECT knob.
... of channel level)".) Input mode when playing DTS sources • Noise will be adjusted up to 18 dB. (In this case the maximum volume is turned on the input signal. Example: Stereo (Main unit) (Remote control unit) To select the surround mode while adjusting the surround parameters, tone defeat or tone... on the selected component. • For operating instructions, refer to "18 dB - (Maximum value of these lights, depending on . Press the SURROUND MODE button, then turn the SELECT knob.
Owners Manual
Page 39
... or treble sound can be increased to up to +12 dB in steps of 2 dB.) • To decrease the bass or treble: Turn the control counterclockwise. (The bass or treble sound can be decreased to up or down. [4] Combining the currently playing sound with the desired... image 1 Simulcast playback Use this to turn off when headphones are connected. The pre-out output (including the speaker output) is automatically turned off the audio output temporarily. ENGLISH After starting playback [1] Adjusting the sound quality (tone)...
... or treble sound can be increased to up to +12 dB in steps of 2 dB.) • To decrease the bass or treble: Turn the control counterclockwise. (The bass or treble sound can be decreased to up or down. [4] Combining the currently playing sound with the desired... image 1 Simulcast playback Use this to turn off when headphones are connected. The pre-out output (including the speaker output) is automatically turned off the audio output temporarily. ENGLISH After starting playback [1] Adjusting the sound quality (tone)...
Owners Manual
Page 40
... display • Descriptions of the unit's operations are output to the unit's VIDEO MONITOR OUT jack. ZONE2 REC 2 With "RECOUT SOURCE" displayed, turn the FUNCTION knob to select the source you wish to record. (Main unit) (Main unit) 3 Set the recording mode. • For operating ... control unit) control unit's ON SCREEN/DISPLAY button. The display switches as the position of the component on which you want to record. 4 To cancel, turn the function knob and select "SOURCE". (Main unit) 2, 4 1 2 Display 2 REC PHONO CD TUNER DVD / VDP TV / DBS VCR -1 -2 V.AUX CDR ...
... display • Descriptions of the unit's operations are output to the unit's VIDEO MONITOR OUT jack. ZONE2 REC 2 With "RECOUT SOURCE" displayed, turn the FUNCTION knob to select the source you wish to record. (Main unit) (Main unit) 3 Set the recording mode. • For operating ... control unit) control unit's ON SCREEN/DISPLAY button. The display switches as the position of the component on which you want to record. 4 To cancel, turn the function knob and select "SOURCE". (Main unit) 2, 4 1 2 Display 2 REC PHONO CD TUNER DVD / VDP TV / DBS VCR -1 -2 V.AUX CDR ...
Owners Manual
Page 41
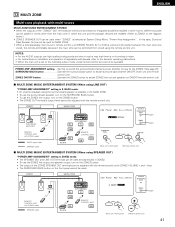
... played in rooms other than the main zone in which this unit and the playback devices are installed. (Refer to -room remote control unit (DENON RC-616, 617 or 618) is wired and connected between the main zone and zone2, the remote-controllable devices in the main zone can be...line output and speaker output, turn on the diagram below.) • ZONE 2 SPEAKER OUT can be used when "ZONE2" is selected at System Setup Menu "Power Amp Assignment". ZONE2 MAIN ZONE INTEGRATED AMPLIFIER REMOTE CONTROL UNIT with ZONE2 mode : AUDIO signal cable : SPEAKER cable RC-617 AVR-1804/884 FL C FR SW ...
... played in rooms other than the main zone in which this unit and the playback devices are installed. (Refer to -room remote control unit (DENON RC-616, 617 or 618) is wired and connected between the main zone and zone2, the remote-controllable devices in the main zone can be...line output and speaker output, turn on the diagram below.) • ZONE 2 SPEAKER OUT can be used when "ZONE2" is selected at System Setup Menu "Power Amp Assignment". ZONE2 MAIN ZONE INTEGRATED AMPLIFIER REMOTE CONTROL UNIT with ZONE2 mode : AUDIO signal cable : SPEAKER cable RC-617 AVR-1804/884 FL C FR SW ...
Owners Manual
Page 42
...SETTING (ZONE2 VOLUME LEVEL) : - - - The display switches as follows each time the button is pressed. 2, 4 1 2 2 With "ZONE2 SOURCE" displayed, turn the FUNCTION knob and select the source you wish to record. (Main unit) (Main unit) 3 Start playing the source to be output. • For operating... instructions, refer to the manuals of the respective components. 4 To cancel, turn the function knob and select "SOURCE". (Main unit) Display 2 PHONO CD TUNER DVD / VDP TV / DBS ZONE2 VCR -1 -2 V.AUX CDR / ...
...SETTING (ZONE2 VOLUME LEVEL) : - - - The display switches as follows each time the button is pressed. 2, 4 1 2 2 With "ZONE2 SOURCE" displayed, turn the FUNCTION knob and select the source you wish to record. (Main unit) (Main unit) 3 Start playing the source to be output. • For operating... instructions, refer to the manuals of the respective components. 4 To cancel, turn the function knob and select "SOURCE". (Main unit) Display 2 PHONO CD TUNER DVD / VDP TV / DBS ZONE2 VCR -1 -2 V.AUX CDR / ...

Owners Manual
Page 44
... using the cursor buttons. The level of the selected speaker can be adjusted within the range of +12 to adjust. SW channel level can be turned off by decreasing one step from -12 dB. The channel switches as (described) below. 1 Select the speaker whose level you want to -12 dB using...
... using the cursor buttons. The level of the selected speaker can be adjusted within the range of +12 to adjust. SW channel level can be turned off by decreasing one step from -12 dB. The channel switches as (described) below. 1 Select the speaker whose level you want to -12 dB using...

Owners Manual
Page 48
... the Dolby/DTS Surround mode. 3 2 2 4, 5 2, 6 2 1 (Main unit) (Remote control unit) When performing this operation from the main unit's panel, press the SURROUND MODE button, then turn the SELECT knob and select Dolby Pro Logic II or DTS NEO:6. (Main unit) 3 Play a program source with digital input) 1 Select the input source. DIGITAL...
... the Dolby/DTS Surround mode. 3 2 2 4, 5 2, 6 2 1 (Main unit) (Remote control unit) When performing this operation from the main unit's panel, press the SURROUND MODE button, then turn the SELECT knob and select Dolby Pro Logic II or DTS NEO:6. (Main unit) 3 Play a program source with digital input) 1 Select the input source. DIGITAL...

Owners Manual
Page 49
... menu), adjust the level as DVD, DTV and other future formats that will use Dolby Digital. When DTS encoded music software is played, it is turned off with the STATUS and ON SCREEN buttons. LFE (Low Frequency Effect): This sets the level of the extreme high frequencies, compensating for correct DTS...
... menu), adjust the level as DVD, DTV and other future formats that will use Dolby Digital. When DTS encoded music software is played, it is turned off with the STATUS and ON SCREEN buttons. LFE (Low Frequency Effect): This sets the level of the extreme high frequencies, compensating for correct DTS...

Owners Manual
Page 52
..."5CH/6CH STEREO" mode is selected, the display differs according to a digital signal encoded in 15 steps from the main unit's panel. 1 Turn the SELECT knob to 110 ms. 52 EFFECT LEVEL: This sets the strength of the sound field. ENGLISH • Operating the surround mode and ...surround parameters from 1 to set within the range of 0 to select the surround mode. (Main unit) • When turned clockwise DIRECT STEREO DOLBY PRO LOGIC II DTS NEO:6 5CH/6CH STEREO 1 2 1, 3 MONO MOVIE VIRTUAL SURROUND MATRIX VIDEO GAME JAZZ CLUB ROCK ARENA &#...
..."5CH/6CH STEREO" mode is selected, the display differs according to a digital signal encoded in 15 steps from the main unit's panel. 1 Turn the SELECT knob to 110 ms. 52 EFFECT LEVEL: This sets the strength of the sound field. ENGLISH • Operating the surround mode and ...surround parameters from 1 to set within the range of 0 to select the surround mode. (Main unit) • When turned clockwise DIRECT STEREO DOLBY PRO LOGIC II DTS NEO:6 5CH/6CH STEREO 1 2 1, 3 MONO MOVIE VIRTUAL SURROUND MATRIX VIDEO GAME JAZZ CLUB ROCK ARENA &#...

Owners Manual
Page 53
... BACK WOOFER E E B E E B B E B B B B B B B B B B B B B B B B B B B B B B B B B B B B B B B E E B When playing Dolby Digital signals C C E C * E C E E E E E E E C C : Signal E : No signal B : Turned on or off by speaker configuration setting C : Able E : Unable When playing DTS signals C C E E E E C E E E E E E C When playing PCM signals (96k) C (C) C (C) E C C E E C (C) C C C C C C When playing ANALOG signals C C C C * Only for 2 ch ...
... BACK WOOFER E E B E E B B E B B B B B B B B B B B B B B B B B B B B B B B B B B B B B B B E E B When playing Dolby Digital signals C C E C * E C E E E E E E E C C : Signal E : No signal B : Turned on or off by speaker configuration setting C : Able E : Unable When playing DTS signals C C E E E E C E E E E E E C When playing PCM signals (96k) C (C) C (C) E C C E E C (C) C C C C C C When playing ANALOG signals C C C C * Only for 2 ch ...
Owners Manual
Page 54
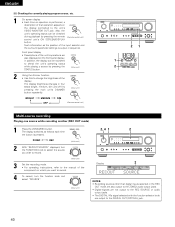
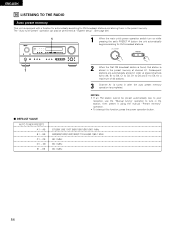
NOTES: • If an FM station cannot be performed at "System setup". (See page 29.) 1 1 When the main unit's power operation switch turn on while pressing the set's PRESET D button the unit automatically begins searching for FM broadcast stations and storing them in the preset memory. The "Auto ...
NOTES: • If an FM station cannot be performed at "System setup". (See page 29.) 1 1 When the main unit's power operation switch turn on while pressing the set's PRESET D button the unit automatically begins searching for FM broadcast stations and storing them in the preset memory. The "Auto ...


