

Owners Manual
Page 2
... in the instructions contained in the literature accompanying the appliance. These limits are designed to radio communications. Modification not expressly approved by DENON may not cause harmful interference, and (2) this manual, meets FCC requirements. Hold the plug when unplugging the cord. • Manipuler le cordon d'alimentation avec précaution. NOTE This...
... in the instructions contained in the literature accompanying the appliance. These limits are designed to radio communications. Modification not expressly approved by DENON may not cause harmful interference, and (2) this manual, meets FCC requirements. Hold the plug when unplugging the cord. • Manipuler le cordon d'alimentation avec précaution. NOTE This...
Owners Manual
Page 4
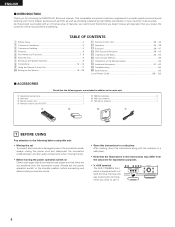
... Check that there are included in a safe place. • Note that you review the contents of your favorite music sources. As this manual before using this first 9 m Setting up the Speaker Systems 9 , Connections 10 ~ 16 . Remove the cap covering the terminal when you... Check once again that all other audio components when moving the set for choosing the DENON A/V Surround receiver. After reading, store this instructions along with the connection cords. AUX terminal The AVR-1705/685's front panel is provided with a V. AUX terminal. ENGLISH 2 INTRODUCTION Thank ...
... Check that there are included in a safe place. • Note that you review the contents of your favorite music sources. As this manual before using this first 9 m Setting up the Speaker Systems 9 , Connections 10 ~ 16 . Remove the cap covering the terminal when you... Check once again that all other audio components when moving the set for choosing the DENON A/V Surround receiver. After reading, store this instructions along with the connection cords. AUX terminal The AVR-1705/685's front panel is provided with a V. AUX terminal. ENGLISH 2 INTRODUCTION Thank ...
Owners Manual
Page 11
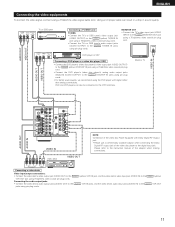
Using an improper cable can also be connected to the instruction manual of the adapter when making connections. DVD and VDP players can result in a drop in sound quality. Please refer to the VCR terminals. VIDEO IN ...
Using an improper cable can also be connected to the instruction manual of the adapter when making connections. DVD and VDP players can result in a drop in sound quality. Please refer to the VCR terminals. VIDEO IN ...
Owners Manual
Page 12
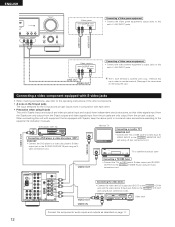
... jack inputs work in mind and make connections according to the S-VIDEO MONITOR OUT jack using a S jack connection cord. VIDEO INPUT) to the equipment's instruction manuals. LINE OUT VIDEO OUT Video camera OUTPUT RL VIDEO OUT RL LINE OUT VIDEO OUT Connecting a Video camera equipment • Connect the video camera equipment...
... jack inputs work in mind and make connections according to the S-VIDEO MONITOR OUT jack using a S jack connection cord. VIDEO INPUT) to the equipment's instruction manuals. LINE OUT VIDEO OUT Video camera OUTPUT RL VIDEO OUT RL LINE OUT VIDEO OUT Connecting a Video camera equipment • Connect the video camera equipment...
Owners Manual
Page 24
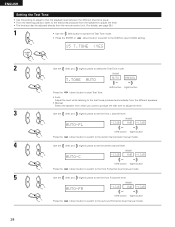
ENGLISH Setting the Test Tone • Use this setting to adjust to that the playback level between the different channel is equal. • From the listening position, listen to the test tones produced from the speakers to adjust the level. • The level can also be adjusted directly from the remote control unit. (For details, see page 39.) 1 • Use the (left) button to switch the Test Tone mode. • Press the ENTER or (down) button to switch to the DIGITAL input (COAX) setting. 15 T.TONE
ENGLISH Setting the Test Tone • Use this setting to adjust to that the playback level between the different channel is equal. • From the listening position, listen to the test tones produced from the speakers to adjust the level. • The level can also be adjusted directly from the remote control unit. (For details, see page 39.) 1 • Use the (left) button to switch the Test Tone mode. • Press the ENTER or (down) button to switch to the DIGITAL input (COAX) setting. 15 T.TONE
Owners Manual
Page 25
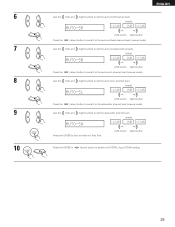
... the ENTER button to finish the Test Tone. (left) button (right) button Press the ENTER or (down) button to the surround L channel level (manual mode). Use the (left) and (right) buttons to set the surround back channel level. (Initial) AUTO-SB -12dB 0dB +12dB Press the (left... L channel level. (Initial) AUTO-SL -12dB 0dB +12dB Press the (left) button (right) button (down) button to switch to the surround back channel level (manual mode). 6 7 8 9 10 ENGLISH Use the (left) and (right) buttons to set the surround R channel level. (Initial) AUTO-SR -12dB 0dB +12dB ...
... the ENTER button to finish the Test Tone. (left) button (right) button Press the ENTER or (down) button to the surround L channel level (manual mode). Use the (left) and (right) buttons to set the surround back channel level. (Initial) AUTO-SB -12dB 0dB +12dB Press the (left... L channel level. (Initial) AUTO-SL -12dB 0dB +12dB Press the (left) button (right) button (down) button to switch to the surround back channel level (manual mode). 6 7 8 9 10 ENGLISH Use the (left) and (right) buttons to set the surround R channel level. (Initial) AUTO-SR -12dB 0dB +12dB ...
Owners Manual
Page 29
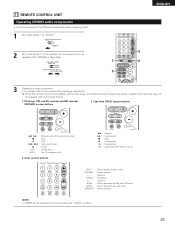
...Switch between decks A and B SHIFT : Switch preset channel range CHANNEL : Preset channel +, - Tape deck (TAPE) system buttons 6, 7 2 1 8, 9 3 DISC SKIP+ : Manual search (forward and reverse) : Stop : Play : Auto search (cue) : Pause : Switch discs (for the component to be operated. (CD, CDR/MD or Tape deck) 1... for CD changers only) 3. up /down TUNING : Frequency +, - While this remote control. 1. 11 REMOTE CONTROL UNIT Operating DENON audio components • Turn on the power of components may not be operated when the switch is at "AUDIO" position. 29
...Switch between decks A and B SHIFT : Switch preset channel range CHANNEL : Preset channel +, - Tape deck (TAPE) system buttons 6, 7 2 1 8, 9 3 DISC SKIP+ : Manual search (forward and reverse) : Stop : Play : Auto search (cue) : Pause : Switch discs (for the component to be operated. (CD, CDR/MD or Tape deck) 1... for CD changers only) 3. up /down TUNING : Frequency +, - While this remote control. 1. 11 REMOTE CONTROL UNIT Operating DENON audio components • Turn on the power of components may not be operated when the switch is at "AUDIO" position. 29
Owners Manual
Page 31
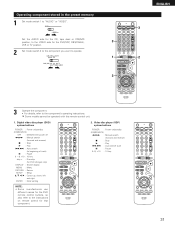
... or CDR/MD position, to the VIDEO side for the DVD remote control buttons, so also refer to the instructions on /standby (ON/SOURCE) 6,7 : Manual search (forward and reverse) 2 : Stop 1 : Play 8,9 : Auto search (cue) 3 : Pause 0~9, +10 : 10 key 31 Digital video ...disc player (DVD) system buttons POWER : Power on/standby (ON/SOURCE) OFF : DENON DVD power off 6,7 : Manual search (forward and reverse) 2 : Stop 1 : Play 8,9 : Auto search (to beginning of track) 3 : Pause 0 ~ 9, +10 : 10 key skip + : Disc...
... or CDR/MD position, to the VIDEO side for the DVD remote control buttons, so also refer to the instructions on /standby (ON/SOURCE) 6,7 : Manual search (forward and reverse) 2 : Stop 1 : Play 8,9 : Auto search (cue) 3 : Pause 0~9, +10 : 10 key 31 Digital video ...disc player (DVD) system buttons POWER : Power on/standby (ON/SOURCE) OFF : DENON DVD power off 6,7 : Manual search (forward and reverse) 2 : Stop 1 : Play 8,9 : Auto search (to beginning of track) 3 : Pause 0 ~ 9, +10 : 10 key skip + : Disc...
Owners Manual
Page 32
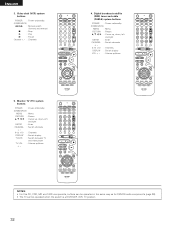
... display TV/VCR : Switch between TV and video player TV VOL : Volume up /down +, - Monitor TV (TV) system buttons POWER : Power on /standby (ON/SOURCE) 6,7 : Manual search (forward and reverse) 2 : Stop 1 : Play 3 : Pause Channel +, - : Channels 4. NOTES: • For this CD, CDR, MD and TAPE components, buttons can be operated in the...
... display TV/VCR : Switch between TV and video player TV VOL : Volume up /down +, - Monitor TV (TV) system buttons POWER : Power on /standby (ON/SOURCE) 6,7 : Manual search (forward and reverse) 2 : Stop 1 : Play 3 : Pause Channel +, - : Channels 4. NOTES: • For this CD, CDR, MD and TAPE components, buttons can be operated in the...
Owners Manual
Page 33
By default, nothing is a function allowing you want to operate the PLAY, STOP, MANUAL SEARCH and AUTO SEARCH buttons on the CD, TAPE, CDR/MD, DVD/VDP or VCR components when in the DBS/CABLE or TV mode. CD 1 ...
By default, nothing is a function allowing you want to operate the PLAY, STOP, MANUAL SEARCH and AUTO SEARCH buttons on the CD, TAPE, CDR/MD, DVD/VDP or VCR components when in the DBS/CABLE or TV mode. CD 1 ...

Owners Manual
Page 36
However, when the channel level is set as follows each time the TONE CONTROL button is adjusted to the component's manual. 5 Adjust the volume. After starting playback [1] Adjusting the sound quality (tone) 1 The tone switches as described on . DIGITAL ANALOG DIGITAL DIGITAL ANALOG The DIGITAL indicator ...
However, when the channel level is set as follows each time the TONE CONTROL button is adjusted to the component's manual. 5 Adjust the volume. After starting playback [1] Adjusting the sound quality (tone) 1 The tone switches as described on . DIGITAL ANALOG DIGITAL DIGITAL ANALOG The DIGITAL indicator ...
Owners Manual
Page 41
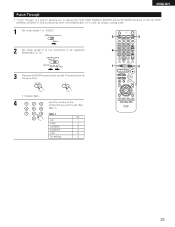
... is set to play in the Dolby Surround Pro Logic IIx mode. 3 Play a program source with the mark. • For operating instructions, refer to the manuals of the respective components. 4 Select the surround parameter mode.
... is set to play in the Dolby Surround Pro Logic IIx mode. 3 Play a program source with the mark. • For operating instructions, refer to the manuals of the respective components. 4 Select the surround parameter mode.
Owners Manual
Page 53
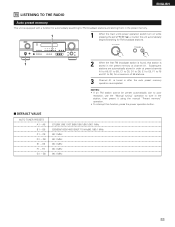
Subsequent stations are automatically stored in the station, then preset it using the manual "Preset memory" operation. • To interrupt this function, press the power operation button. 2 DEFAULT VALUE AUTO TUNER PRESETS A1 ~ A8 B1 ~ B8 C1 ~ C8 D1 ~ ... and G1 to tune in order at channel A1. NOTES: • If an FM station cannot be preset automatically due to poor reception, use the "Manual tuning" operation to G8, for FM broadcast stations. 1 2 When the first FM broadcast station is found, that station is completed.
Subsequent stations are automatically stored in the station, then preset it using the manual "Preset memory" operation. • To interrupt this function, press the power operation button. 2 DEFAULT VALUE AUTO TUNER PRESETS A1 ~ A8 B1 ~ B8 C1 ~ C8 D1 ~ ... and G1 to tune in order at channel A1. NOTES: • If an FM station cannot be preset automatically due to poor reception, use the "Manual tuning" operation to G8, for FM broadcast stations. 1 2 When the first FM broadcast station is found, that station is completed.
Owners Manual
Page 54
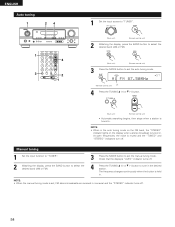
Manual tuning 1 Set the input function to "TUNER". 3 Press the MODE button to set , FM stereo broadcasts are received in . The frequency changes continuously when the ...; Automatic searching begins, then stops when a station is tuned in monaural and the "STEREO" indicator turns off. 54 NOTE: • When the manual tuning mode is set the manual tuning mode. NOTE: • When in the auto tuning mode on the FM band, the "STEREO" indicator lights on the display when a stereo...
Manual tuning 1 Set the input function to "TUNER". 3 Press the MODE button to set , FM stereo broadcasts are received in . The frequency changes continuously when the ...; Automatic searching begins, then stops when a station is tuned in monaural and the "STEREO" indicator turns off. 54 NOTE: • When the manual tuning mode is set the manual tuning mode. NOTE: • When in the auto tuning mode on the FM band, the "STEREO" indicator lights on the display when a stereo...
Owners Manual
Page 55
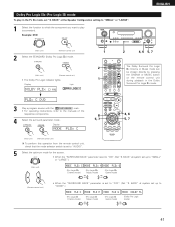
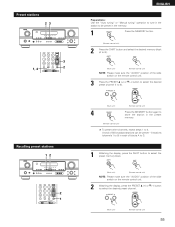
... select the desired preset channel. (Main unit) (Remote control unit) 55 Preset stations 23 3 1, 4 2 Recalling preset stations 12 2 1 ENGLISH Preparations: Use the "Auto tuning" or "Manual tuning" operation to tune in the station to be preset - 8 stations (channels 1 to 8) in each of blocks A to G. 1 Watching the display, press the SHIFT button...
... select the desired preset channel. (Main unit) (Remote control unit) 55 Preset stations 23 3 1, 4 2 Recalling preset stations 12 2 1 ENGLISH Preparations: Use the "Auto tuning" or "Manual tuning" operation to tune in the station to be preset - 8 stations (channels 1 to 8) in each of blocks A to G. 1 Watching the display, press the SHIFT button...
Owners Manual
Page 59
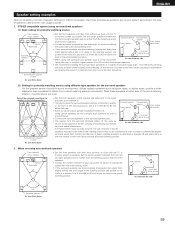
...speaker between the front left and right speakers and no further from the listening position than the front speakers. • Consult the owner's manual for your subwoofer for advice on placing Surround speaker Surround back speaker Front speaker Point slightly downwards the subwoofer within the listening room. •... one surround back speaker, place it at the rear center As seen from the listening position than the front speakers. • Consult the owner's manual for your system according to the type of the viewing position, and 2 to 3 feet (60 to 90 cm) above • Set the ...
...speaker between the front left and right speakers and no further from the listening position than the front speakers. • Consult the owner's manual for your subwoofer for advice on placing Surround speaker Surround back speaker Front speaker Point slightly downwards the subwoofer within the listening room. •... one surround back speaker, place it at the rear center As seen from the listening position than the front speakers. • Consult the owner's manual for your system according to the type of the viewing position, and 2 to 3 feet (60 to 90 cm) above • Set the ...
Owners Manual
Page 60
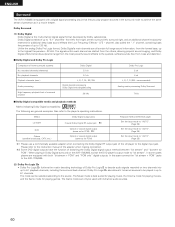
...processing High frequency playback limit of presence as for additional deep bass sound effects (the Low Frequency Effects - ENGLISH Surround The AVR-1705/685 is equipped with a digital signal processing circuit that lets you play program sources in the surround mode to achieve the..., SW Digital discrete processing Dolby Digital encoding/decoding 20 kHz Dolby Pro Logic 2 ch 4 ch L, R, C, S (SW - Please refer to the instruction manual of the adapter when making connection. 2 Some DVD digital outputs have the function of up to the source. Dolby Digital consists of switching the Dolby...
...processing High frequency playback limit of presence as for additional deep bass sound effects (the Low Frequency Effects - ENGLISH Surround The AVR-1705/685 is equipped with a digital signal processing circuit that lets you play program sources in the surround mode to achieve the..., SW Digital discrete processing Dolby Digital encoding/decoding 20 kHz Dolby Pro Logic 2 ch 4 ch L, R, C, S (SW - Please refer to the instruction manual of the adapter when making connection. 2 Some DVD digital outputs have the function of up to the source. Dolby Digital consists of switching the Dolby...
Owners Manual
Page 62
... when playing CDs or LDs on the front panel of internal signal processing (output level adjustment, sampling frequency conversion, etc.). Recent DENON DVD player models feature DTS-compatible digital output - PAT. AND WORLD-WIDE PATENTS ISSUED AND PENDING. With it is also possible ... outputs of DTS-encoded DVDs. Before playing DTS signals for surround playback with 6.1-channel sources. consult the player's owner's manual for information on the AVR-1705/685 (see page 45.) The DTS-ES decoder includes another function, the DTS Neo:6 surround mode for 6.1-channel playback ...
... when playing CDs or LDs on the front panel of internal signal processing (output level adjustment, sampling frequency conversion, etc.). Recent DENON DVD player models feature DTS-compatible digital output - PAT. AND WORLD-WIDE PATENTS ISSUED AND PENDING. With it is also possible ... outputs of DTS-encoded DVDs. Before playing DTS signals for surround playback with 6.1-channel sources. consult the player's owner's manual for information on the AVR-1705/685 (see page 45.) The DTS-ES decoder includes another function, the DTS Neo:6 surround mode for 6.1-channel playback ...


