
Getting Started
Page 8
...Next SLEEP POWER CBL /SAT DVD Blu-ray GAME AUX CHANNEL iPod/USB TV AUDIO FM NETWORK INTERNET RADIO PAGE SOUND MODE MOVIE MUSIC GAME PURE INFO OPTION ENTER VOLUME BACK SETUP FAVORITE STATION MUTE 1 2 3 TUNE RC-1169 ...7 ENTER SLEEP POWER CBL /SAT DVD Blu-ray GAME AUX CHANNEL iPod/USB TV AUDIO FM NETWORK INTERNET RADIO PAGE SOUND MODE MOVIE MUSIC GAME PURE INFO OPTION ENTER VOLUME BACK SETUP FAVORITE STATION 1 2 3 MUTE TUNE RC-1169 ENTER Select... will walk you through connecting your speakers and components to your DENON receiver.
...Next SLEEP POWER CBL /SAT DVD Blu-ray GAME AUX CHANNEL iPod/USB TV AUDIO FM NETWORK INTERNET RADIO PAGE SOUND MODE MOVIE MUSIC GAME PURE INFO OPTION ENTER VOLUME BACK SETUP FAVORITE STATION MUTE 1 2 3 TUNE RC-1169 ...7 ENTER SLEEP POWER CBL /SAT DVD Blu-ray GAME AUX CHANNEL iPod/USB TV AUDIO FM NETWORK INTERNET RADIO PAGE SOUND MODE MOVIE MUSIC GAME PURE INFO OPTION ENTER VOLUME BACK SETUP FAVORITE STATION 1 2 3 MUTE TUNE RC-1169 ENTER Select... will walk you through connecting your speakers and components to your DENON receiver.
Owners Manual
Page 4
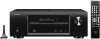
To ensure proper operation, please read this DENON product. Basic version Advanced version Getting started 1 Accessories 2 Features 2 Cautions on handling 3 Basic version 4 Connections 5 Important information 5 Connecting an HDMI-compatible ...43 Playing back files stored on a PC and NAS 46 Using online services 50 Convenient functions 58 AirPlay function 62 Selecting a listening mode (Sound Mode 64 Selecting a listening mode 64 Advanced version 68 Installation/connection of terms 117 Troubleshooting 119 Resetting the microprocessor 123 Specifications 124 Information 1...
To ensure proper operation, please read this DENON product. Basic version Advanced version Getting started 1 Accessories 2 Features 2 Cautions on handling 3 Basic version 4 Connections 5 Important information 5 Connecting an HDMI-compatible ...43 Playing back files stored on a PC and NAS 46 Using online services 50 Convenient functions 58 AirPlay function 62 Selecting a listening mode (Sound Mode 64 Selecting a listening mode 64 Advanced version 68 Installation/connection of terms 117 Troubleshooting 119 Resetting the microprocessor 123 Specifications 124 Information 1...
Owners Manual
Page 5
... supports the ARC (Audio Return Channel) function, which reproduces TV sound with 5 HDMI input connectors for connecting the unit and a TVz2. Then simply follow setup instructions First select the language when prompted. z1 Download "Denon Remote App" from an iPod can enjoy a wide variety of the..., Deep Color, "x.v.Color", Auto Lip Sync) and HDMI control function (vpage 7) This unit can be connected to perform basic operations with "Denon Remote App" for iPod® and iPhone® via an HDMI cable used for connecting devices with the product. z2 The TV should support...
... supports the ARC (Audio Return Channel) function, which reproduces TV sound with 5 HDMI input connectors for connecting the unit and a TVz2. Then simply follow setup instructions First select the language when prompted. z1 Download "Denon Remote App" from an iPod can enjoy a wide variety of the..., Deep Color, "x.v.Color", Auto Lip Sync) and HDMI control function (vpage 7) This unit can be connected to perform basic operations with "Denon Remote App" for iPod® and iPhone® via an HDMI cable used for connecting devices with the product. z2 The TV should support...

Owners Manual
Page 7
F Connections vpage 5 F Settings vpage 20 F Playback (Basic operation) vpage 27 F Selecting a listening mode (Sound Mode) vpage 64 4 Basic version Advanced version Information Basic version Basic version Here, we explain the connections and basic operation methods for this unit.
F Connections vpage 5 F Settings vpage 20 F Playback (Basic operation) vpage 27 F Selecting a listening mode (Sound Mode) vpage 64 4 Basic version Advanced version Information Basic version Basic version Here, we explain the connections and basic operation methods for this unit.

Owners Manual
Page 12
..., etc.) may be limited by the HDMI audio specifications of devices, the video signals may hinder normal operations for the connection method. NOTE • No sound is also used for video transmission via HDMI connections Cables used for computers, and some device combinations. The DVI-D connector can transmit high quality digital...
..., etc.) may be limited by the HDMI audio specifications of devices, the video signals may hinder normal operations for the connection method. NOTE • No sound is also used for video transmission via HDMI connections Cables used for computers, and some device combinations. The DVI-D connector can transmit high quality digital...

Owners Manual
Page 16
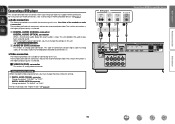
... quality is achieved. a DIGITAL AUDIO COAXIAL connector Change the default "CBL/SAT" to connect when your TV's manual. • To listen to play back surround sound. a VIDEO OUT (MONITOR) connector This makes an analog video connection. Information 13 For instructions on HDMI connections, see "Digital Assign" (vpage 90). The numbers prefixed...
... quality is achieved. a DIGITAL AUDIO COAXIAL connector Change the default "CBL/SAT" to connect when your TV's manual. • To listen to play back surround sound. a VIDEO OUT (MONITOR) connector This makes an analog video connection. Information 13 For instructions on HDMI connections, see "Digital Assign" (vpage 90). The numbers prefixed...

Owners Manual
Page 17
..." (vpage 7). The smaller the number is, the higher playback quality is achieved. Input connector setting When making this unit. For how to play back surround sound. Basic version Advanced version Connecting a set-top box (Satellite tuner/cable TV) This section describes how to make a connection. zzWhen making the following methods are...
..." (vpage 7). The smaller the number is, the higher playback quality is achieved. Input connector setting When making this unit. For how to play back surround sound. Basic version Advanced version Connecting a set-top box (Satellite tuner/cable TV) This section describes how to make a connection. zzWhen making the following methods are...
Owners Manual
Page 18
... to "DVD". The smaller the number is, the higher playback quality is achieved. For instructions on this unit decodes the audio to play back surround sound. a DIGITAL AUDIO COAXIAL connector DIGITAL AUDIO OPTICAL connector When a multichannel audio (digital bit stream audio) is input, this unit. (v Input connector setting ) s AUDIO IN (DVD...
... to "DVD". The smaller the number is, the higher playback quality is achieved. For instructions on this unit decodes the audio to play back surround sound. a DIGITAL AUDIO COAXIAL connector DIGITAL AUDIO OPTICAL connector When a multichannel audio (digital bit stream audio) is input, this unit. (v Input connector setting ) s AUDIO IN (DVD...

Owners Manual
Page 19
USB memory device iPod or Supported iPod models • iPod / iPod classic • iPod nano • iPod touch DENON does not guarantee that is longer than 1 m (3.3 ft). • iPhone 16 Connecting an HDMI-incompatible device (as of the kind to this unit by the ... this unit and a telephone call is received by connecting the unit's iPod/USB port to a PC via a USB hub. • It is shorter than 2 m (6.6 ft), sound may not be connected to this unit, keep the iPhone at least 20 cm away from this unit.
USB memory device iPod or Supported iPod models • iPod / iPod classic • iPod nano • iPod touch DENON does not guarantee that is longer than 1 m (3.3 ft). • iPhone 16 Connecting an HDMI-incompatible device (as of the kind to this unit by the ... this unit and a telephone call is received by connecting the unit's iPod/USB port to a PC via a USB hub. • It is shorter than 2 m (6.6 ft), sound may not be connected to this unit, keep the iPhone at least 20 cm away from this unit.

Owners Manual
Page 23
...174; Setup) (vpage 20) nn Making the network settings (Network) (vpage 26) Playback (Basic operation) (vpage 27) Selecting a listening mode (Sound Mode) (vpage 64) Playback (Advanced operation) (vpage 73) Set up to six positions). • Even if the listening environment is part of ... noise in room, these test signals will cause inaccurate readings. • During the measurement process, loud test sounds may be affected by the sounds emitted by placing the setup microphone successively at multiple points throughout the listening environment results in the illustration (up speakers...
...174; Setup) (vpage 20) nn Making the network settings (Network) (vpage 26) Playback (Basic operation) (vpage 27) Selecting a listening mode (Sound Mode) (vpage 64) Playback (Advanced operation) (vpage 73) Set up to six positions). • Even if the listening environment is part of ... noise in room, these test signals will cause inaccurate readings. • During the measurement process, loud test sounds may be affected by the sounds emitted by placing the setup microphone successively at multiple points throughout the listening environment results in the illustration (up speakers...
Owners Manual
Page 24
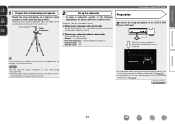
... to a seat back or wall as shown below. When the setup microphone is connected, the following screen is displayed. Audyssey Setup Your AVR can automatically measure the acoustics of your room and the optimize your subwoofer's manual. For details, see "Connecting this unit. NOTE •...; Do not hold the setup microphone in the main listening position. v See overleaf Information 21 Sound receptor Setup microphone 2 Set up the subwoofer If using a subwoofer with a direct mode Set the direct mode to "On" and disable the ...
... to a seat back or wall as shown below. When the setup microphone is connected, the following screen is displayed. Audyssey Setup Your AVR can automatically measure the acoustics of your room and the optimize your subwoofer's manual. For details, see "Connecting this unit. NOTE •...; Do not hold the setup microphone in the main listening position. v See overleaf Information 21 Sound receptor Setup microphone 2 Set up the subwoofer If using a subwoofer with a direct mode Set the direct mode to "On" and disable the ...

Owners Manual
Page 27
... loss in subwoofers. • If you want to check, and then press ENTER. 13 Select "Store" and then press ENTER. NOTE During saving of the sound when, for example, the volume suddenly increases for all content. Audyssey Setup MultEQ You can set Dynamic Volume function, which automatically adjusts volume level for...
... loss in subwoofers. • If you want to check, and then press ENTER. 13 Select "Store" and then press ENTER. NOTE During saving of the sound when, for example, the volume suddenly increases for all content. Audyssey Setup MultEQ You can set Dynamic Volume function, which automatically adjusts volume level for...

Owners Manual
Page 28
... cable connection and retry. Front R Please check the cable connection and retry. Microphone or Speaker is correct, use o p to be made . • Speaker or subwoofer sound is connected with the polarity reversed. (The screen on the left ) was not properly detected. Retry Audyssey Setup Caution! MultEQ Retry Phase Info. Skip •...
... cable connection and retry. Front R Please check the cable connection and retry. Microphone or Speaker is correct, use o p to be made . • Speaker or subwoofer sound is connected with the polarity reversed. (The screen on the left ) was not properly detected. Retry Audyssey Setup Caution! MultEQ Retry Phase Info. Skip •...

Owners Manual
Page 30
...and NAS (vpage 46) nn Using online services (vpage 50) nn Convenient functions (vpage 58) nn AirPlay function (vpage 62) Selecting a listening mode (Sound Mode) (vpage 64) Playback (Advanced operation) (vpage 73) Important information Before starting playback, make the connections between the different devices and the settings on ... Turning the power on (vpage 27) nn Selecting the input source (vpage 27) nn Adjusting the master volume (vpage 28) nn Turning off the sound temporarily (vpage 28) nn Playing a Blu-ray Disc player/DVD player (vpage 28) nn Playing an iPod (vpage 29) nn Playing a USB ...
...and NAS (vpage 46) nn Using online services (vpage 50) nn Convenient functions (vpage 58) nn AirPlay function (vpage 62) Selecting a listening mode (Sound Mode) (vpage 64) Playback (Advanced operation) (vpage 73) Important information Before starting playback, make the connections between the different devices and the settings on ... Turning the power on (vpage 27) nn Selecting the input source (vpage 27) nn Adjusting the master volume (vpage 28) nn Turning off the sound temporarily (vpage 28) nn Playing a Blu-ray Disc player/DVD player (vpage 28) nn Playing an iPod (vpage 29) nn Playing a USB ...

Owners Manual
Page 31
... necessary settings on power to the unit. 3 Press Blu-ray or DVD to switch an input source for a player used for playback. Turning off the sound temporarily Press MUTE :. • "MUTE" indicator on the display flashes. • : appears on the "Scale" setting (vpage 83). w Change the TV input ...nn When the "Scale" setting (vpage 83) is reduced to adjust the volume. • The volume display method varies depending on a TV screen. • The sound is "-79.5dB - 18.0dB" GAdjustable rangeH - - -.- -79.5dB - 18.0dB • The variable range differs according to the input of the TV, ...
... necessary settings on power to the unit. 3 Press Blu-ray or DVD to switch an input source for a player used for playback. Turning off the sound temporarily Press MUTE :. • "MUTE" indicator on the display flashes. • : appears on the "Scale" setting (vpage 83). w Change the TV input ...nn When the "Scale" setting (vpage 83) is reduced to adjust the volume. • The volume display method varies depending on a TV screen. • The sound is "-79.5dB - 18.0dB" GAdjustable rangeH - - -.- -79.5dB - 18.0dB • The variable range differs according to the input of the TV, ...

Owners Manual
Page 33
... Press OPTION. NOTE • Depending on the type of iPod and the software version, some functions may not operate. • Note that DENON will accept no responsibility whatsoever for "Browse Mode" and "Remote Mode" are displayed. This section describes the steps up to playing back tracks on... Remote Mode Browse Mode Playable Music file P P files Video file z Active buttons Remote control unit P P (This unit) iPod P zzOnly the sound is displayed. The display switches between track title, artist name, and album title each time the button is off to return to be played. 6 ...
... Press OPTION. NOTE • Depending on the type of iPod and the software version, some functions may not operate. • Note that DENON will accept no responsibility whatsoever for "Browse Mode" and "Remote Mode" are displayed. This section describes the steps up to playing back tracks on... Remote Mode Browse Mode Playable Music file P P files Video file z Active buttons Remote control unit P P (This unit) iPod P zzOnly the sound is displayed. The display switches between track title, artist name, and album title each time the button is off to return to be played. 6 ...

Owners Manual
Page 34
... OPTION uio p ENTER (Press and release) ENTER (Press and hold) BACK SETUP 8 9 1 3 Function Page search Display of information such as the source name, volume, and sound mode name Browse / Remote Mode switching / Repeat playback / Random playback Cursor operation / Auto search (cue, ui) / Manual search (Press and hold, ui) Enter Stop Return...
... OPTION uio p ENTER (Press and release) ENTER (Press and hold) BACK SETUP 8 9 1 3 Function Page search Display of information such as the source name, volume, and sound mode name Browse / Remote Mode switching / Repeat playback / Random playback Cursor operation / Auto search (cue, ui) / Manual search (Press and hold, ui) Enter Stop Return...

Owners Manual
Page 36
...back music and a favorite picture at the same time (Picture View) (vpage 61) nn Playing back still images in the menu. nnAdjusting the sound quality (Restorer) Make this setting at "Audio Display" (vpage 88) in the menu. nnChanging the screen display duration Make this menu. nn Searching...restore to a state close to the audio before compression while correcting the bass feel to connect and use a computer via a USB hub. • DENON does not guarantee that can draw power from this setting at "Restorer" (vpage 83) in sequential order (Slideshow) (vpage 61) Information DVD 33 ...
...back music and a favorite picture at the same time (Picture View) (vpage 61) nn Playing back still images in the menu. nnAdjusting the sound quality (Restorer) Make this setting at "Audio Display" (vpage 88) in the menu. nnChanging the screen display duration Make this menu. nn Searching...restore to a state close to the audio before compression while correcting the bass feel to connect and use a computer via a USB hub. • DENON does not guarantee that can draw power from this setting at "Restorer" (vpage 83) in sequential order (Slideshow) (vpage 61) Information DVD 33 ...

Owners Manual
Page 37
Basic version Advanced version Playing a USB memory device nnUSB memory device operation buttons Operation buttons PAGE df INFO OPTION uio p ENTER (Press and release) ENTER (Press and hold) BACK SETUP 8 9 1 3 Function Page search Display of information such as the source name, volume, and sound mode name Text Search / Repeat playback / Random playback / Picture View / Slideshow Cursor operation / Auto search (cue, ui) Enter Stop Return Setup menu Auto search (cue) Playback Pause Information DVD 34
Basic version Advanced version Playing a USB memory device nnUSB memory device operation buttons Operation buttons PAGE df INFO OPTION uio p ENTER (Press and release) ENTER (Press and hold) BACK SETUP 8 9 1 3 Function Page search Display of information such as the source name, volume, and sound mode name Text Search / Repeat playback / Random playback / Picture View / Slideshow Cursor operation / Auto search (cue, ui) Enter Stop Return Setup menu Auto search (cue) Playback Pause Information DVD 34

Owners Manual
Page 45
....10 MHz On CH 7 FM 90.10 MHz On CH 8 FM 90.10 MHz On GDisplay of information such as the source name, volume, and sound mode name Switch tuning modes / Direct frequency tuning / Preset Memory / Auto Preset / Preset Name / Preset Skip Cursor operation Enter Return Setup menu Add/call up...
....10 MHz On CH 7 FM 90.10 MHz On CH 8 FM 90.10 MHz On GDisplay of information such as the source name, volume, and sound mode name Switch tuning modes / Direct frequency tuning / Preset Memory / Auto Preset / Preset Name / Preset Skip Cursor operation Enter Return Setup menu Add/call up...

