Setup and Specifications
Page 3
... up your XPS 13 7390...4 2 Views of XPS 13 7390...6 Front...6 Right...6 Left...7 Base...7 Display...8 Bottom...9 3 Specifications of XPS 13 7390...10 Dimensions and weight...10 Processors...10 Chipset...10 Operating system...11 Memory...11 Ports and connectors...11 Communications...12 Audio...12 Storage...13 Media-card reader...13 Keyboard...13 Camera...14 Touchpad...14 Touchpad gestures...15 Power adapter...15 Battery...15...
... up your XPS 13 7390...4 2 Views of XPS 13 7390...6 Front...6 Right...6 Left...7 Base...7 Display...8 Bottom...9 3 Specifications of XPS 13 7390...10 Dimensions and weight...10 Processors...10 Chipset...10 Operating system...11 Memory...11 Ports and connectors...11 Communications...12 Audio...12 Storage...13 Media-card reader...13 Keyboard...13 Camera...14 Touchpad...14 Touchpad gestures...15 Power adapter...15 Battery...15...
Setup and Specifications
Page 4
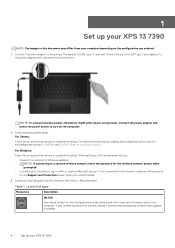
...battery power, the battery might enter power saving mode. Connect the power adapter and press the power button to turn on the configuration you ordered. 1. Locate Dell apps Resources Description My Dell Centralized location for key Dell applications, help articles, and other important information about your XPS 13 7390... base articles SLN151664 and SLN151748 at www.dell.com/support. For more information about the warranty status, recommended accessories, and software updates if available. 4 Set up your computer. 1 Set up your XPS 13 7390 NOTE: The images in with Power Delivery...
...battery power, the battery might enter power saving mode. Connect the power adapter and press the power button to turn on the configuration you ordered. 1. Locate Dell apps Resources Description My Dell Centralized location for key Dell applications, help articles, and other important information about your XPS 13 7390... base articles SLN151664 and SLN151748 at www.dell.com/support. For more information about the warranty status, recommended accessories, and software updates if available. 4 Set up your computer. 1 Set up your XPS 13 7390 NOTE: The images in with Power Delivery...
Setup and Specifications
Page 6
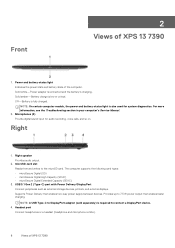
... light Indicates the power state and battery state of XPS 13 7390 Solid white-Power adapter is connected and the battery is low or critical. USB 3.1 Gen 2 (Type-C) port with Power Delivery/DisplayPort Connect peripherals such as external storage ... supply between devices. Headset port Connect headphones or a headset (headphone and microphone combo). 6 Views of the computer. Front 2 Views of XPS 13 7390 1. For more information, see the Troubleshooting section in your computer's Service Manual. 2. Supports Power Delivery that enables faster charging. Right 1....
... light Indicates the power state and battery state of XPS 13 7390 Solid white-Power adapter is connected and the battery is low or critical. USB 3.1 Gen 2 (Type-C) port with Power Delivery/DisplayPort Connect peripherals such as external storage ... supply between devices. Headset port Connect headphones or a headset (headphone and microphone combo). 6 Views of the computer. Front 2 Views of XPS 13 7390 1. For more information, see the Troubleshooting section in your computer's Service Manual. 2. Supports Power Delivery that enables faster charging. Right 1....

Setup and Specifications
Page 7
...XPS 13 7390 7 NOTE: This is required to an external display using a display adapter. Provides data transfer rates up to 10 Gbps for USB 3.1 Gen 2 and up to a DisplayPort device. Base 1. Security-cable slot (wedge-shaped) Connect a security cable to prevent unauthorized movement of your finger on when the battery...Right-click area Press to 40 Gbps for power supply. Views of up to 5 V/3 A power output that enables faster charging. Battery-charge status button Press to DisplayPort adapter (sold separately) is the primary port for Thunderbolt 3. Provides up to 40 Gbps for USB ...
...XPS 13 7390 7 NOTE: This is required to an external display using a display adapter. Provides data transfer rates up to 10 Gbps for USB 3.1 Gen 2 and up to a DisplayPort device. Base 1. Security-cable slot (wedge-shaped) Connect a security cable to prevent unauthorized movement of your finger on when the battery...Right-click area Press to 40 Gbps for power supply. Views of up to 5 V/3 A power output that enables faster charging. Battery-charge status button Press to DisplayPort adapter (sold separately) is the primary port for Thunderbolt 3. Provides up to 40 Gbps for USB ...
Setup and Specifications
Page 8
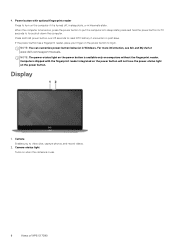
Computers shipped with optional fingerprint reader Press to turn on the power button to reset RTC battery if encounter no post issue. Camera Enables you to put the computer into sleep state; Press ...NOTE: The power-status light on the power button is turned off, in sleep state, or in use. 8 Views of XPS 13 7390 4. Power button with the fingerprint reader integrated on the power button will not have the power-status light on when the camera ... power button to video chat, capture photos, and record videos. 2. For more information, see Me and My Dell at www.dell.com/support/manuals.
Computers shipped with optional fingerprint reader Press to turn on the power button to reset RTC battery if encounter no post issue. Camera Enables you to put the computer into sleep state; Press ...NOTE: The power-status light on the power button is turned off, in sleep state, or in use. 8 Views of XPS 13 7390 4. Power button with the fingerprint reader integrated on the power button will not have the power-status light on when the camera ... power button to video chat, capture photos, and record videos. 2. For more information, see Me and My Dell at www.dell.com/support/manuals.
Setup and Specifications
Page 15
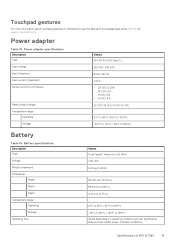
Specifications of XPS 13 7390 15 Power adapter Table 15. Battery specifications Description Type Voltage Weight (maximum) Dimensions: Height Width Depth Temperature range: Operating Storage Operating time Values 4-cell "smart" lithium-ion (52 WHr) 7.60 VDC 0.... (3.88 in.) 4.30 mm (0.17 in.) 0°C to 35°C (32°F to 95°F) -40°C to 65°C (-40°F to 158°F) Battery Table 16. Touchpad gestures For more information about touchpad gestures for Windows 10, see the Microsoft knowledge base article 4027871 at support.microsoft.com. Power...
Specifications of XPS 13 7390 15 Power adapter Table 15. Battery specifications Description Type Voltage Weight (maximum) Dimensions: Height Width Depth Temperature range: Operating Storage Operating time Values 4-cell "smart" lithium-ion (52 WHr) 7.60 VDC 0.... (3.88 in.) 4.30 mm (0.17 in.) 0°C to 35°C (32°F to 95°F) -40°C to 65°C (-40°F to 158°F) Battery Table 16. Touchpad gestures For more information about touchpad gestures for Windows 10, see the Microsoft knowledge base article 4027871 at support.microsoft.com. Power...
Setup and Specifications
Page 16
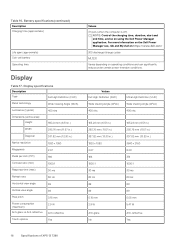
...) Description Charging time (approximate) Life span (approximate) Coin-cell battery Operating time Display Table 17. Display specifications Decsription Type Full High Definition ...29 331 1000:1 30 ms 60 Hz 89 89 0.08 mm 5.41 W Anti-reflective Yes 16 Specifications of XPS 13 7390 Values Full High Definition (FHD) Wide Viewing Angle (WVA) 400 nits Ultra High Definition (UHD) Wide Viewing... power-intensive conditions. Table 16. For more information on the Dell Power Manager see, Me and My Dell on https://www.dell.com/ 300 discharge/charge cycles ML1220 Varies depending on using the...
...) Description Charging time (approximate) Life span (approximate) Coin-cell battery Operating time Display Table 17. Display specifications Decsription Type Full High Definition ...29 331 1000:1 30 ms 60 Hz 89 89 0.08 mm 5.41 W Anti-reflective Yes 16 Specifications of XPS 13 7390 Values Full High Definition (FHD) Wide Viewing Angle (WVA) 400 nits Ultra High Definition (UHD) Wide Viewing... power-intensive conditions. Table 16. For more information on the Dell Power Manager see, Me and My Dell on https://www.dell.com/ 300 discharge/charge cycles ML1220 Varies depending on using the...
Re-imaging guide for Windows 10
Page 13
... changing power alert system events, power management, thermal management, battery extender, and battery settings. • Product Feedback: Provide feedback on Dell computers. Connecting the computer to the docking station enables you ...saved the Wi-Fi driver file. 8. Connecting the computer to the docking station enables you do not have the Service Tag, use the auto-detect feature or manually browse for drivers and applications 13 8. Dell...
... changing power alert system events, power management, thermal management, battery extender, and battery settings. • Product Feedback: Provide feedback on Dell computers. Connecting the computer to the docking station enables you ...saved the Wi-Fi driver file. 8. Connecting the computer to the docking station enables you do not have the Service Tag, use the auto-detect feature or manually browse for drivers and applications 13 8. Dell...
Service Manual
Page 3
... ...10 Transporting sensitive components...11 4 Recommended tools...12 5 Screw list...13 6 Removing the base cover...15 Procedure...15 7 Replacing the base cover...17 Procedure...17 8 Removing the battery...19 Lithium-ion battery precautions...19 Prerequisites...19 Procedure...19 9 Replacing the battery...21 Lithium-ion battery precautions...21 Procedure...21 Post-requisites...22 10 Removing the...
... ...10 Transporting sensitive components...11 4 Recommended tools...12 5 Screw list...13 6 Removing the base cover...15 Procedure...15 7 Replacing the base cover...17 Procedure...17 8 Removing the battery...19 Lithium-ion battery precautions...19 Prerequisites...19 Procedure...19 9 Replacing the battery...21 Lithium-ion battery precautions...21 Procedure...21 Post-requisites...22 10 Removing the...
Service Manual
Page 4
13 Replacing the speakers...28 Procedure...28 Post-requisites...28 14 Removing the coin-cell battery 29 Prerequisites...29 Procedure...29 15 Replacing the coin-cell battery 30 Procedure...30 Post-requisites...30 16 Removing the heat sink...31 Prerequisites...31 Procedure...31 17 Replacing the heat sink...32 Procedure...32 Post-...
13 Replacing the speakers...28 Procedure...28 Post-requisites...28 14 Removing the coin-cell battery 29 Prerequisites...29 Procedure...29 15 Replacing the coin-cell battery 30 Procedure...30 Post-requisites...30 16 Removing the heat sink...31 Prerequisites...31 Procedure...31 17 Replacing the heat sink...32 Procedure...32 Post-...
Service Manual
Page 13
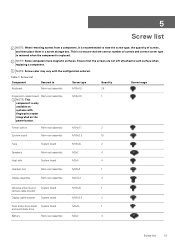
....6x3L 1 camera cable bracket Display cable bracket System board M1.6x2.5 2 Solid-state drive shield System board M2x3L 1 and solid-state drive Battery Palm-rest assembly M2x2 4 Screw list 13 Table 1. This is to ensure that the screws are not left attached to Screw type Quantity Screw image Keyboard Palm-rest assembly...
....6x3L 1 camera cable bracket Display cable bracket System board M1.6x2.5 2 Solid-state drive shield System board M2x3L 1 and solid-state drive Battery Palm-rest assembly M2x2 4 Screw list 13 Table 1. This is to ensure that the screws are not left attached to Screw type Quantity Screw image Keyboard Palm-rest assembly...

Service Manual
Page 14
Component Battery Base cover Secured to Palm-rest assembly Palm-rest assembly Screw type M1.6x4 M2x3, Torx Quantity 1 8 Screw image 14 Screw list
Component Battery Base cover Secured to Palm-rest assembly Palm-rest assembly Screw type M1.6x4 M2x3, Torx Quantity 1 8 Screw image 14 Screw list
Service Manual
Page 19
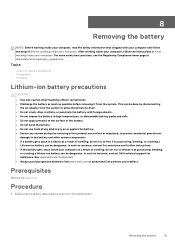
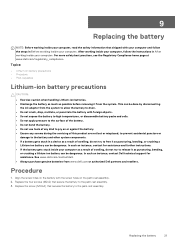
... your computer. See www.dell.com/contactdell. • Always purchase genuine batteries from www.dell.com or authorized Dell partners and resellers. Procedure 1. Removing the battery 19 Topics: • Lithium-ion battery precautions • Prerequisites • Procedure Lithium-ion battery precautions CAUTION: • Exercise...swelling, do not try to free it from the system. In such an instance, contact Dell technical support for assistance and further instructions. • If the battery gets stuck inside your computer as a result of this product are not lost or misplaced...
... your computer. See www.dell.com/contactdell. • Always purchase genuine batteries from www.dell.com or authorized Dell partners and resellers. Procedure 1. Removing the battery 19 Topics: • Lithium-ion battery precautions • Prerequisites • Procedure Lithium-ion battery precautions CAUTION: • Exercise...swelling, do not try to free it from the system. In such an instance, contact Dell technical support for assistance and further instructions. • If the battery gets stuck inside your computer as a result of this product are not lost or misplaced...
Service Manual
Page 20
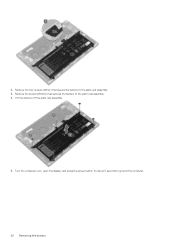
Lift the battery off the palm-rest assembly. 5. Remove the screw (M1.6x4) that secure the battery to the palm-rest assembly. 3. Turn the computer over, open the display, and press the power button for about 5 seconds to the palm-rest assembly. 4. Remove the four screws (M2x2) that secures the battery to ground the computer. 20 Removing the battery 2.
Lift the battery off the palm-rest assembly. 5. Remove the screw (M1.6x4) that secure the battery to the palm-rest assembly. 3. Turn the computer over, open the display, and press the power button for about 5 seconds to the palm-rest assembly. 4. Remove the four screws (M2x2) that secures the battery to ground the computer. 20 Removing the battery 2.
Service Manual
Page 21
... disconnecting the AC adapter from the system. See www.dell.com/contactdell. • Always purchase genuine batteries from www.dell.com or authorized Dell partners and resellers. Replacing the battery 21 In such an instance, contact Dell technical support for assistance and further instructions. • If the battery gets stuck inside your computer as a result of swelling...
... disconnecting the AC adapter from the system. See www.dell.com/contactdell. • Always purchase genuine batteries from www.dell.com or authorized Dell partners and resellers. Replacing the battery 21 In such an instance, contact Dell technical support for assistance and further instructions. • If the battery gets stuck inside your computer as a result of swelling...
Service Manual
Page 22
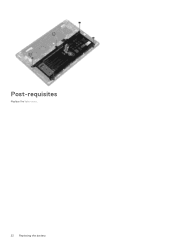
Post-requisites Replace the base cover. 22 Replacing the battery
Post-requisites Replace the base cover. 22 Replacing the battery
Service Manual
Page 23
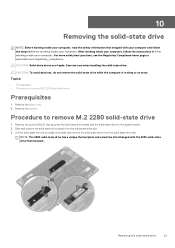
Procedure to remove M.2 2280 solid-state drive Prerequisites 1. Remove the battery. Lift the solid-state drive at www.dell.com/regulatory_compliance. For more safety best practices, see the Regulatory Compliance home page at an angle, then slide and remove the solid-state drive from ...
Procedure to remove M.2 2280 solid-state drive Prerequisites 1. Remove the battery. Lift the solid-state drive at www.dell.com/regulatory_compliance. For more safety best practices, see the Regulatory Compliance home page at an angle, then slide and remove the solid-state drive from ...
Service Manual
Page 26
Replace the battery. 2. Replace the screw (M2x3) that secures the solid-state drive to the system board. NOTE: The 2230 solid-state drive has a unique thermal plate and cannot be interchanged with the 2280 solid-state drive thermal plate. 3. Replace the base cover. 26 Replacing the solid-state drive Post-requisites 1.
Replace the battery. 2. Replace the screw (M2x3) that secures the solid-state drive to the system board. NOTE: The 2230 solid-state drive has a unique thermal plate and cannot be interchanged with the 2280 solid-state drive thermal plate. 3. Replace the base cover. 26 Replacing the solid-state drive Post-requisites 1.
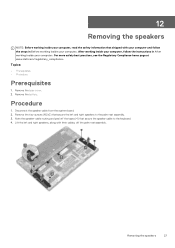
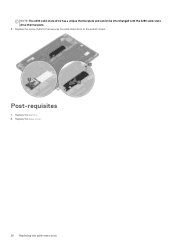
Service Manual
Page 27
... your computer. Note the speaker-cable routing and peel off the palm-rest assembly. Disconnect the speaker cable from the system board. 2. Procedure 1. Remove the battery. Removing the speakers 27 Remove the base cover. 2. For more safety best practices, see the Regulatory Compliance home page at www...
... your computer. Note the speaker-cable routing and peel off the palm-rest assembly. Disconnect the speaker cable from the system board. 2. Procedure 1. Remove the battery. Removing the speakers 27 Remove the base cover. 2. For more safety best practices, see the Regulatory Compliance home page at www...
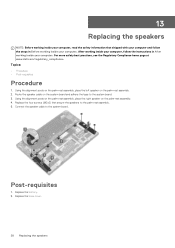
Service Manual
Page 28
... the speakers Route the speaker cable on the palm-rest assembly. 2. Connect the speaker cable to the system board. 3. Replace the battery. 2. 13 Replacing the speakers NOTE: Before working inside your computer, read the safety information that secure the speakers to the palm-rest assembly. 5....board and adhere the tape to the system board. For more safety best practices, see the Regulatory Compliance home page at www.dell.com/regulatory_compliance. Replace the four screws (M2x2) that shipped with your computer and follow the instructions in Before working inside your ...
... the speakers Route the speaker cable on the palm-rest assembly. 2. Connect the speaker cable to the system board. 3. Replace the battery. 2. 13 Replacing the speakers NOTE: Before working inside your computer, read the safety information that secure the speakers to the palm-rest assembly. 5....board and adhere the tape to the system board. For more safety best practices, see the Regulatory Compliance home page at www.dell.com/regulatory_compliance. Replace the four screws (M2x2) that shipped with your computer and follow the instructions in Before working inside your ...


