Dell -5050 Quick Start Guide
Page 1
...;glementaire Muster-Typnummer | Tipo normativo Computer model Computermodel | Modèle de l'ordinateur Computermodell | Modelo de equipo dell.com/support dell.com/support/manuals dell.com/contactdell dell.com/regulatory_compliance T14G T14G001 Venue 10 5050 Venue 10 5050 WWAN © 2014 Dell Inc. © 2014 Google Inc. Meld u aan bij uw Google-account of maak een nieuwe account aan...
...;glementaire Muster-Typnummer | Tipo normativo Computer model Computermodel | Modèle de l'ordinateur Computermodell | Modelo de equipo dell.com/support dell.com/support/manuals dell.com/contactdell dell.com/regulatory_compliance T14G T14G001 Venue 10 5050 Venue 10 5050 WWAN © 2014 Dell Inc. © 2014 Google Inc. Meld u aan bij uw Google-account of maak een nieuwe account aan...
Dell 5050 Users Guide
Page 2
... potential damage to avoid the problem. All rights reserved. in the United States and/or other marks and names mentioned herein may be trademarks of Dell Inc. Notes, Cautions, and Warnings NOTE: A NOTE indicates important information that helps you how to hardware or loss of data and tells you ... computer. WARNING: A WARNING indicates a potential for property damage, personal injury, or death. and international copyright and intellectual property laws. A00 All other jurisdictions. Dell™ and the Dell logo are trademarks of their respective companies. 2015 -03 Rev.
... potential damage to avoid the problem. All rights reserved. in the United States and/or other marks and names mentioned herein may be trademarks of Dell Inc. Notes, Cautions, and Warnings NOTE: A NOTE indicates important information that helps you how to hardware or loss of data and tells you ... computer. WARNING: A WARNING indicates a potential for property damage, personal injury, or death. and international copyright and intellectual property laws. A00 All other jurisdictions. Dell™ and the Dell logo are trademarks of their respective companies. 2015 -03 Rev.
Dell 5050 Users Guide
Page 3
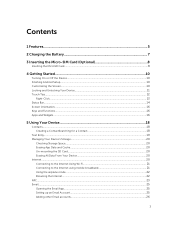
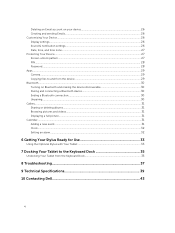
Contents 1 Features...5 2 Charging the Battery 7 3 Inserting the Micro-SIM Card (Optional 8 Inserting the MicroSD Card...8 4 Getting Started...10 Turning On or Off the Device...10 Finishing Android Setup...10 Customizing the Screen...10 Locking and Unlocking Your Device 11 Touch Tips...12 Right-Click...13 Status Bar...14 Screen Orientation...16 Keys and Functions...16...
Contents 1 Features...5 2 Charging the Battery 7 3 Inserting the Micro-SIM Card (Optional 8 Inserting the MicroSD Card...8 4 Getting Started...10 Turning On or Off the Device...10 Finishing Android Setup...10 Customizing the Screen...10 Locking and Unlocking Your Device 11 Touch Tips...12 Right-Click...13 Status Bar...14 Screen Orientation...16 Keys and Functions...16...
Dell 5050 Users Guide
Page 4
... with Your Tablet 33 7 Docking Your Tablet to the Keyboard Dock 35 Undocking Your Tablet from the Keyboard Dock 35 8 Troubleshooting 37 9 Technical Specifications 39 10 Contacting Dell 43 4
... with Your Tablet 33 7 Docking Your Tablet to the Keyboard Dock 35 Undocking Your Tablet from the Keyboard Dock 35 8 Troubleshooting 37 9 Technical Specifications 39 10 Contacting Dell 43 4
Dell 5050 Users Guide
Page 5
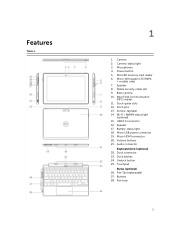
... (NFC) reader 11. Service-tag label 14. USB 2.0 connector 16. Touchpad Stylus (optional) 26. Buttons 28. Camera-status light 3. MicroSD memory card reader 6. Back camera 10. Micro USB power connector 19. Audio connector Keyboard dock (optional) 22. Dock latches 24. Pen loop 5 Microphones 4. Noble security-cable slot 9. Dock pins 13. Speaker...
... (NFC) reader 11. Service-tag label 14. USB 2.0 connector 16. Touchpad Stylus (optional) 26. Buttons 28. Camera-status light 3. MicroSD memory card reader 6. Back camera 10. Micro USB power connector 19. Audio connector Keyboard dock (optional) 22. Dock latches 24. Pen loop 5 Microphones 4. Noble security-cable slot 9. Dock pins 13. Speaker...

Dell 5050 Users Guide
Page 7
NOTE: Battery LED will be fully charged when you receive it. Connect the other end of the USB cable to the USB port of the USB cable to the adapter. 3. Connect the micro-USB end of the device. 2. Connect the power adapter to charge the device for 4 hours for the first time. When the battery is fully charged, the icon is being charged. An animated icon appears on the screen while the battery is static. CAUTION: Use only the power adapter and/or cable that shipped with the device. It is recommended to an electrical outlet. Using unauthorized power adapters or power ...
NOTE: Battery LED will be fully charged when you receive it. Connect the other end of the USB cable to the USB port of the USB cable to the adapter. 3. Connect the micro-USB end of the device. 2. Connect the power adapter to charge the device for 4 hours for the first time. When the battery is fully charged, the icon is being charged. An animated icon appears on the screen while the battery is static. CAUTION: Use only the power adapter and/or cable that shipped with the device. It is recommended to an electrical outlet. Using unauthorized power adapters or power ...

Dell 5050 Users Guide
Page 8
Close the card-slot door. 5. NOTE: The type of screw may damage the door. Insert the microSD card into the respective slot and push the card in until it click in place. 8 CAUTION: Opening the card-slot door without loosening the screw may vary depending on the tablet configuration. NOTE: Turn off your device before inserting the micro‑SIM card. Inserting the MicroSD Card 1. 3 Inserting the Micro-SIM Card (Optional) 1. Tighten the screw to secure the card-slot door. NOTE: Make sure the card is correctly aligned and is inserted all the way. Insert the card into the ...
Close the card-slot door. 5. NOTE: The type of screw may damage the door. Insert the microSD card into the respective slot and push the card in until it click in place. 8 CAUTION: Opening the card-slot door without loosening the screw may vary depending on the tablet configuration. NOTE: Turn off your device before inserting the micro‑SIM card. Inserting the MicroSD Card 1. 3 Inserting the Micro-SIM Card (Optional) 1. Tighten the screw to secure the card-slot door. NOTE: Make sure the card is correctly aligned and is inserted all the way. Insert the card into the ...

Dell 5050 Users Guide
Page 9
NOTE: Turn off your device before inserting the microSD card. 9 NOTE: Make sure the card is correctly aligned and is inserted all the way.
NOTE: Turn off your device before inserting the microSD card. 9 NOTE: Make sure the card is correctly aligned and is inserted all the way.
Dell 5050 Users Guide
Page 10
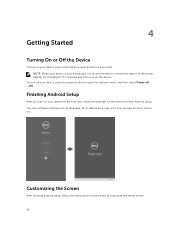
... to connect the device to the power adapter for charging for the first time, follow the instructions on the screen to customize the home screen. 10
... to connect the device to the power adapter for charging for the first time, follow the instructions on the screen to customize the home screen. 10

Dell 5050 Users Guide
Page 11
You can also configure your device to enter sleep state and lock itself. Tap →Settings → Display→ Sleep to set the time after which you choose. 11 To unlock the screen, press the power button and then slide the lock icon in any direction. Locking and Unlocking Your Device Press the power button to unlock your device varies depending on the security method you want the device to automatically lock after a certain period of inactivity. NOTE: The procedure to turn off the screen and lock your device.
You can also configure your device to enter sleep state and lock itself. Tap →Settings → Display→ Sleep to set the time after which you choose. 11 To unlock the screen, press the power button and then slide the lock icon in any direction. Locking and Unlocking Your Device Press the power button to unlock your device varies depending on the security method you want the device to automatically lock after a certain period of inactivity. NOTE: The procedure to turn off the screen and lock your device.

Dell 5050 Users Guide
Page 12
Touch and hold your finger on the display with the display, move your fingertip to the desired location 3. Take your finger in a vertical or horizontal direction on the display • Scroll through the Start screen, web pages, lists, entries, photos, contacts, and so on the screen 2. You can use the touch screen as images and icons on the screen Swipe or Slide Move your finger off the display to drop the item in contact with your finger on an item on • Close an application. (Swipe the application to perform further actions Drag and Drop 1. Touch Tips Your device ...
Touch and hold your finger on the display with the display, move your fingertip to the desired location 3. Take your finger in a vertical or horizontal direction on the display • Scroll through the Start screen, web pages, lists, entries, photos, contacts, and so on the screen 2. You can use the touch screen as images and icons on the screen Swipe or Slide Move your finger off the display to drop the item in contact with your finger on an item on • Close an application. (Swipe the application to perform further actions Drag and Drop 1. Touch Tips Your device ...

Dell 5050 Users Guide
Page 13
The options menu appears on any section of the screen or an icon and then release your finger. Gesture Actions Functions Zoom in Touch the display with two fingers and then move the fingers apart Enlarge the view of an image or web page Zoom out Touch the display with two fingers and then move the fingers closer Reduce the view of an image or web page Rotate Touch the display with two or more fingers and then move the fingers in a clockwise or counterclockwise arc Rotate an object by 90 degrees Right-Click To perform a right-click on your tablet, touch and hold your finger for 2 ...
The options menu appears on any section of the screen or an icon and then release your finger. Gesture Actions Functions Zoom in Touch the display with two fingers and then move the fingers apart Enlarge the view of an image or web page Zoom out Touch the display with two fingers and then move the fingers closer Reduce the view of an image or web page Rotate Touch the display with two or more fingers and then move the fingers in a clockwise or counterclockwise arc Rotate an object by 90 degrees Right-Click To perform a right-click on your tablet, touch and hold your finger for 2 ...

Dell 5050 Users Guide
Page 14
Status Bar The status bar at the top of the screen displays notifications from apps, time, status of various devices such as battery, SIM card, Bluetooth, and so on. 14
Status Bar The status bar at the top of the screen displays notifications from apps, time, status of various devices such as battery, SIM card, Bluetooth, and so on. 14

Dell 5050 Users Guide
Page 15
Slide the panel down to view the notifications and then tap a notification icon to access more details. Slide the panel down to view more settings and configuration options. 15 Tap to inform you of new emails, missed calls, unread messages, and so on . Table 2. 1 Notification panel displays notification icons to clear all the notifications. 2 Status panel displays the status icons for battery status, alarms, Bluetooth, network connection, and so on .
Slide the panel down to view the notifications and then tap a notification icon to access more details. Slide the panel down to view more settings and configuration options. 15 Tap to inform you of new emails, missed calls, unread messages, and so on . Table 2. 1 Notification panel displays notification icons to clear all the notifications. 2 Status panel displays the status icons for battery status, alarms, Bluetooth, network connection, and so on .

Dell 5050 Users Guide
Page 16
Gesture Actions 1 Back 2 Home 3 Menu Functions • Tap to return to the previous screen or to exit the current app. • In text input mode, tap to close the on-screen keyboard. • Tap to return to the main screen. • Tap and hold the device. Screen Orientation For optimal viewing experience, the screen orientation changes automatically depending on how you to open Search. You can be downloaded from the Play Store. • Widgets: A small app that allows you hold to open a list of apps, and additional apps can touch the screen to information. 16 Your device...
Gesture Actions 1 Back 2 Home 3 Menu Functions • Tap to return to the previous screen or to exit the current app. • In text input mode, tap to close the on-screen keyboard. • Tap to return to the main screen. • Tap and hold the device. Screen Orientation For optimal viewing experience, the screen orientation changes automatically depending on how you to open Search. You can be downloaded from the Play Store. • Widgets: A small app that allows you hold to open a list of apps, and additional apps can touch the screen to information. 16 Your device...

Dell 5050 Users Guide
Page 18
Creating a Contact 1. Sign in to an existing Google account or create a new Google account to keep local. 18 Tap → People→ Create a new contact. 2. 5 Using Your Device Contacts To view and manage your contacts online or choose the option to save the contacts on the device to back up your contacts, tap → Contacts.
Creating a Contact 1. Sign in to an existing Google account or create a new Google account to keep local. 18 Tap → People→ Create a new contact. 2. 5 Using Your Device Contacts To view and manage your contacts online or choose the option to save the contacts on the device to back up your contacts, tap → Contacts.

Dell 5050 Users Guide
Page 19
Tap to keep it as local, enter the contact information using the on -screen keyboard and then tap Add new contact . To open the search bar, and then type either the contact's full or partial name in the Find contacts box. Text Entry You can type text using the on -screen keyboard. After you find the desired contact. 2. Table 3. 1 • Tap to view the details. To save the contacts on the device and to open the on-screen keyboard, tap a text box. Scroll through the contact list until you locate the desired contact, tap the contact's entry to type letters. 19 A list of ...
Tap to keep it as local, enter the contact information using the on -screen keyboard and then tap Add new contact . To open the search bar, and then type either the contact's full or partial name in the Find contacts box. Text Entry You can type text using the on -screen keyboard. After you find the desired contact. 2. Table 3. 1 • Tap to view the details. To save the contacts on the device and to open the on-screen keyboard, tap a text box. Scroll through the contact list until you locate the desired contact, tap the contact's entry to type letters. 19 A list of ...
Dell 5050 Users Guide
Page 20
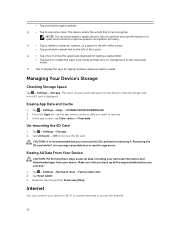
Managing Your Device's Storage Checking Storage Space Tap → Settings→ Storage. Tap → Settings→ Apps → DOWNLOADED/RUNNING/All. 2. Removing the SD card while it is displayed. Erasing All Data From Your Device CAUTION: Performing these steps erases all the required data before removing it can connect your device. Make sure that it . Erasing App Data and Cache 1. Un-mounting the SD Card 1. Tap → Settings→ Backup & reset→ Factory data reset. 2. Tap → Settings→ Storage. 2. Read the warning and tap Erase everything. The ...
Managing Your Device's Storage Checking Storage Space Tap → Settings→ Storage. Tap → Settings→ Apps → DOWNLOADED/RUNNING/All. 2. Removing the SD card while it is displayed. Erasing All Data From Your Device CAUTION: Performing these steps erases all the required data before removing it can connect your device. Make sure that it . Erasing App Data and Cache 1. Un-mounting the SD Card 1. Tap → Settings→ Backup & reset→ Factory data reset. 2. Tap → Settings→ Storage. 2. Read the warning and tap Erase everything. The ...

Dell 5050 Users Guide
Page 21
The device automatically searches for Wi-Fi networks in the status bar. 21 The device scans for the signal and connects to the network. 3. Type a password (if connecting to a mobile-broadband network, the network type appears in range. 3. When the device is transmitted. 1. Tap → Settings→ Wi-Fi. 2. Connecting to disable it. 2. Tap → Settings→ Wi-Fi, and then touch Wi-Fi to the Internet using mobile broadband 1. Connecting to On position. Enable Wi-Fi by moving the slider to the Internet Using Wi-Fi NOTE: The range and quality of the Wi-Fi signal is ...
The device automatically searches for Wi-Fi networks in the status bar. 21 The device scans for the signal and connects to the network. 3. Type a password (if connecting to a mobile-broadband network, the network type appears in range. 3. When the device is transmitted. 1. Tap → Settings→ Wi-Fi. 2. Connecting to disable it. 2. Tap → Settings→ Wi-Fi, and then touch Wi-Fi to the Internet using mobile broadband 1. Connecting to On position. Enable Wi-Fi by moving the slider to the Internet Using Wi-Fi NOTE: The range and quality of the Wi-Fi signal is ...

Dell 5050 Users Guide
Page 22
Using the Chrome controls bar 1. To enable airplane mode, tap → Settings→ More...→ Airplane mode. Add to open the chrome app. Enter the web page address. 22 2. This feature is useful when wireless connectivity is strictly prohibited, such as on an airplane. Browsing the Internet Opening Chrome Tap → Chrome to the bookmark. Using the airplane mode Putting the device in airplane mode disables all mobile and Wi-Fi connections.
Using the Chrome controls bar 1. To enable airplane mode, tap → Settings→ More...→ Airplane mode. Add to open the chrome app. Enter the web page address. 22 2. This feature is useful when wireless connectivity is strictly prohibited, such as on an airplane. Browsing the Internet Opening Chrome Tap → Chrome to the bookmark. Using the airplane mode Putting the device in airplane mode disables all mobile and Wi-Fi connections.
