
Users Guide
Page 3
... 6 Identifying Parts and Controls 7 Monitor Specifications 10 Plug-and-Play 20 LCD Monitor Quality and Pixel Policy 20 Setting Up the Monitor 21 Attaching the Stand 21 Using the Tilt, Swivel, and Vertical Extension 24 Adjusting the Rotation Display Settings of Your System 25 Connecting Your Monitor 25 Organizing Your Cables 28 Removing the Monitor Stand 28 Wall Mounting (Optional 29 Operating the Monitor 30 Turning on the Monitor 30 Using the Front Panel Controls 30 Using the On-Screen Display (OSD) Menu 33 Troubleshooting 51 Self...
... 6 Identifying Parts and Controls 7 Monitor Specifications 10 Plug-and-Play 20 LCD Monitor Quality and Pixel Policy 20 Setting Up the Monitor 21 Attaching the Stand 21 Using the Tilt, Swivel, and Vertical Extension 24 Adjusting the Rotation Display Settings of Your System 25 Connecting Your Monitor 25 Organizing Your Cables 28 Removing the Monitor Stand 28 Wall Mounting (Optional 29 Operating the Monitor 30 Turning on the Monitor 30 Using the Front Panel Controls 30 Using the On-Screen Display (OSD) Menu 33 Troubleshooting 51 Self...
Users Guide
Page 6
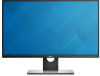
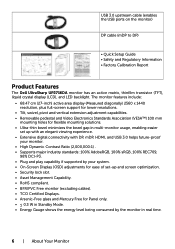
... USB ports on the monitor) DP cable (mDP to DP) • Quick Setup Guide • Safety and Regulatory Information • Factory Calibration Report Product Features The Dell UltraSharp UP2716DA monitor has an active matrix, thinfilm transistor (TFT), liquid crystal display (LCD), and LED backlight. The monitor features include: • 68.47 cm (27-inch) active area display (Measured diagonally) 2560 x 1440 resolution, plus full-screen support for lower resolutions. • Tilt, swivel, pivot and vertical extension adjustment...
... USB ports on the monitor) DP cable (mDP to DP) • Quick Setup Guide • Safety and Regulatory Information • Factory Calibration Report Product Features The Dell UltraSharp UP2716DA monitor has an active matrix, thinfilm transistor (TFT), liquid crystal display (LCD), and LED backlight. The monitor features include: • 68.47 cm (27-inch) active area display (Measured diagonally) 2560 x 1440 resolution, plus full-screen support for lower resolutions. • Tilt, swivel, pivot and vertical extension adjustment...

Users Guide
Page 10
... USB device. 6 Audio line-out port Connect speakers to the monitor using a M3 x 6 mm screw (screw not included). WARNING: Excessive sound pressure from earphones or headphones can use the USB downstream connectors on the monitor. 8 USB downstream ports (2) Connect your monitor to 1 (dynamic contrast on the monitor. 9 Stand lock Lock the stand to playback audio coming through HDMI or DP audio channels. Monitor Specifications Flat Panel Specifications Model Screen type Panel type Viewable image: Diagonal Active Area: Horizontal Vertical Area Pixel pitch Viewing angle: Horizontal...
... USB device. 6 Audio line-out port Connect speakers to the monitor using a M3 x 6 mm screw (screw not included). WARNING: Excessive sound pressure from earphones or headphones can use the USB downstream connectors on the monitor. 8 USB downstream ports (2) Connect your monitor to 1 (dynamic contrast on the monitor. 9 Stand lock Lock the stand to playback audio coming through HDMI or DP audio channels. Monitor Specifications Flat Panel Specifications Model Screen type Panel type Viewable image: Diagonal Active Area: Horizontal Vertical Area Pixel pitch Viewing angle: Horizontal...
Users Guide
Page 12
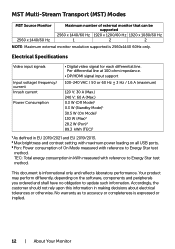
...: Maximum external monitor resolution supported is 2560x1440 60Hz only. Accordingly, the customer should not rely upon this information in EU 2019/2021 and EU 2019/2013. 2 Max brightness and contrast setting with reference to Energy Star test method. Electrical Specifications Video input signals Input voltage/ frequency/ current Inrush current Power Consumption • Digital video signal for each differential line. No warranty as to update such information. This...
...: Maximum external monitor resolution supported is 2560x1440 60Hz only. Accordingly, the customer should not rely upon this information in EU 2019/2021 and EU 2019/2013. 2 Max brightness and contrast setting with reference to Energy Star test method. Electrical Specifications Video input signals Input voltage/ frequency/ current Inrush current Power Consumption • Digital video signal for each differential line. No warranty as to update such information. This...

Users Guide
Page 13
Physical Characteristics Model Connector type • DP (HDCP 1.4) connector (include DP in and DP out) • mDP (HDCP 1.4) connector • HDMI 1/HDMI 2 (HDCP 1.4) connector • Audio line-out • USB 3.0 update stream port connector. • USB 3.0 down stream port connector x 4. (Port with stand assembly and cables 7.42 kg (16.36 lb) Weight without stand assembly (For wall mount or VESA mount considerations - Dimensions (with stand) Height (extended) 540.3 mm (21.27 inches) Height (compressed) 410.3 mm (16.15 inches) Width 611...
Physical Characteristics Model Connector type • DP (HDCP 1.4) connector (include DP in and DP out) • mDP (HDCP 1.4) connector • HDMI 1/HDMI 2 (HDCP 1.4) connector • Audio line-out • USB 3.0 update stream port connector. • USB 3.0 down stream port connector x 4. (Port with stand assembly and cables 7.42 kg (16.36 lb) Weight without stand assembly (For wall mount or VESA mount considerations - Dimensions (with stand) Height (extended) 540.3 mm (21.27 inches) Height (compressed) 410.3 mm (16.15 inches) Width 611...
Users Guide
Page 25
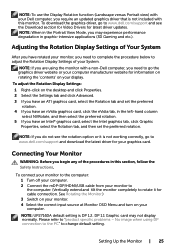
... see the Download section for Video Drivers for your graphics card. NOTE: If you are using DP connection to the PC" to change default setting. To connect your monitor to the computer: 1 Turn off your computer. 2 Connect the mDP-DP/HDMI/USB cable from your monitor to the computer. (Vertically extend and tilt the monitor completely to rotate it is not working correctly, go to "product specific problems - NOTE: To use the Display Rotation function...
... see the Download section for Video Drivers for your graphics card. NOTE: If you are using DP connection to the PC" to change default setting. To connect your monitor to the computer: 1 Turn off your computer. 2 Connect the mDP-DP/HDMI/USB cable from your monitor to the computer. (Vertically extend and tilt the monitor completely to rotate it is not working correctly, go to "product specific problems - NOTE: To use the Display Rotation function...
Users Guide
Page 27
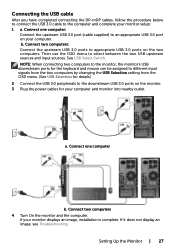
... USB 3.0 ports on the monitor. 3 Plug the power cables for your computer. Connect two computers 4 Turn On the monitor and the computer. Then use the OSD menu to appropriate USB 3.0 ports on your computer and monitor into nearby outlet. a. Connect two computers: Connect the upstream USB 3.0 ports to select between the two USB upstream sources and input sources. See USB Select Switch. Connect one computer: Connect the upstream USB 3.0 port (cable supplied) to an appropriate USB 3.0 port on the two computers. Setting Up the Monitor...
... USB 3.0 ports on the monitor. 3 Plug the power cables for your computer. Connect two computers 4 Turn On the monitor and the computer. Then use the OSD menu to appropriate USB 3.0 ports on your computer and monitor into nearby outlet. a. Connect two computers: Connect the upstream USB 3.0 ports to select between the two USB upstream sources and input sources. See USB Select Switch. Connect one computer: Connect the upstream USB 3.0 port (cable supplied) to an appropriate USB 3.0 port on the two computers. Setting Up the Monitor...

Users Guide
Page 35
Use the Color menu to select the DP input source. Use to adjust the color setting mode. Select the HDMI 2 input when you are using the mDP (mini DisplayPort) connector. Use to the factory defaults. Resets your monitor's Input Source settings to select the HDMI 2 input source. Use to select the HDMI 1 input source. Use to select the mDP input source. Select mDP input when you are using the HDMI connector. Select the HDMI 1 input when you are using the DP (DisplayPort) connector. Icon Menu and Submenus DP mDP HDMI 1 HDMI 2 Auto Select Reset Input Source Color ...
Use the Color menu to select the DP input source. Use to adjust the color setting mode. Select the HDMI 2 input when you are using the mDP (mini DisplayPort) connector. Use to the factory defaults. Resets your monitor's Input Source settings to select the HDMI 2 input source. Use to select the HDMI 1 input source. Use to select the mDP input source. Select mDP input when you are using the HDMI connector. Select the HDMI 1 input when you are using the DP (DisplayPort) connector. Icon Menu and Submenus DP mDP HDMI 1 HDMI 2 Auto Select Reset Input Source Color ...
Users Guide
Page 38
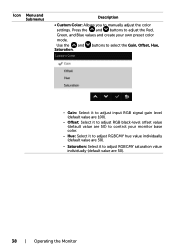
... preset color mode. Offset: Select it to adjust RGBCMY saturation value individually (default value are 50) to adjust RGBCMY hue value individually (default value are 100). - Icon Menu and Submenus Description • Custom Color: Allows you to select the Gain, Offset, Hue, Saturation. - Saturation: Select it to adjust the Red, Green, and Blue values and create your monitor base color. - Press the and buttons to adjust RGB black-level...
... preset color mode. Offset: Select it to adjust RGBCMY saturation value individually (default value are 50) to adjust RGBCMY hue value individually (default value are 100). - Icon Menu and Submenus Description • Custom Color: Allows you to select the Gain, Offset, Hue, Saturation. - Saturation: Select it to adjust the Red, Green, and Blue values and create your monitor base color. - Press the and buttons to adjust RGB black-level...
Users Guide
Page 39
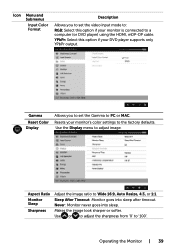
... 1:1. Never: Monitor never goes into sleep after timeout. Sleep After Timeout: Monitor goes into sleep. Gamma Reset Color Display Allows you to set the Gamma to a computer (or DVD player) using the HDMI, mDP-DP cable. Icon Menu and Submenus Input Color Format Description Allows you to set the video input mode to: RGB: Select this option if your monitor is connected to PC or MAC. YPbPr: Select this option if your DVD player supports only...
... 1:1. Never: Monitor never goes into sleep after timeout. Sleep After Timeout: Monitor goes into sleep. Gamma Reset Color Display Allows you to set the Gamma to a computer (or DVD player) using the HDMI, mDP-DP cable. Icon Menu and Submenus Input Color Format Description Allows you to set the video input mode to: RGB: Select this option if your monitor is connected to PC or MAC. YPbPr: Select this option if your DVD player supports only...

Users Guide
Page 40
... Game or Movie preset mode. Push the button to factory defaults. 40 | Operating the Monitor Reset Display Restores the display settings to select the Dynamic Contrast "On" or "Off". Display Info Displays the monitor's current settings. NOTE: Dynamic Contrast provides higher contrast if you to set the Response Time to provide sharper and more detailed image quality. Off is factory calibrated setting by default. Icon Menu and Submenus Description Dynamic Contrast Allows you to...
... Game or Movie preset mode. Push the button to factory defaults. 40 | Operating the Monitor Reset Display Restores the display settings to select the Dynamic Contrast "On" or "Off". Display Info Displays the monitor's current settings. NOTE: Dynamic Contrast provides higher contrast if you to set the Response Time to provide sharper and more detailed image quality. Off is factory calibrated setting by default. Icon Menu and Submenus Description Dynamic Contrast Allows you to...

Users Guide
Page 45
... factory defaults. Use the and buttons to adjust the slider in 1-second increments, from Preset Modes, Brightness/Contrast, Input Source, Aspect Ratio, Rotation, PIP/PBP Modes, USB Select Switch, or Video Swap and set as shortcut key. All buttons are allowed. Reset Restores shortcut keys to 60 seconds. Timer Lock Reset Menu Personalize OSD Hold Time: Sets the length of time the OSD remains active after you press a button. Either soft lock (through OSD menu) or hard lock...
... factory defaults. Use the and buttons to adjust the slider in 1-second increments, from Preset Modes, Brightness/Contrast, Input Source, Aspect Ratio, Rotation, PIP/PBP Modes, USB Select Switch, or Video Swap and set as shortcut key. All buttons are allowed. Reset Restores shortcut keys to 60 seconds. Timer Lock Reset Menu Personalize OSD Hold Time: Sets the length of time the OSD remains active after you press a button. Either soft lock (through OSD menu) or hard lock...

Users Guide
Page 47
... your monitor. Operating the Monitor | 47 LCD Helps reduce minor cases of image retention, the program may take some time to run. Factory Reset Restores all OSD settings to start the process. Enable this feature. Select Enable to the factory defaults. Reset Other Restores other settings, such as DDC/CI, to turn off this feature for best user experience and optimum performance of your computer. Icon Menu and...
... your monitor. Operating the Monitor | 47 LCD Helps reduce minor cases of image retention, the program may take some time to run. Factory Reset Restores all OSD settings to start the process. Enable this feature. Select Enable to the factory defaults. Reset Other Restores other settings, such as DDC/CI, to turn off this feature for best user experience and optimum performance of your computer. Icon Menu and...

Users Guide
Page 51
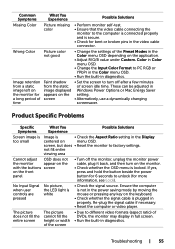
... steps: 1 Turn off both your monitor is working correctly. Self-Test Your monitor provides a self-test feature that allows you begin any of the procedures in self-test mode, the power LED remains white. Troubleshooting WARNING: Before you to check whether your computer and the monitor. 2 Unplug the video cable from the back of computer. 3 Turn on -screen (against a black background), if the monitor cannot sense a video signal and...
... steps: 1 Turn off both your monitor is working correctly. Self-Test Your monitor provides a self-test feature that allows you begin any of the procedures in self-test mode, the power LED remains white. Troubleshooting WARNING: Before you to check whether your computer and the monitor. 2 Unplug the video cable from the back of computer. 3 Turn on -screen (against a black background), if the monitor cannot sense a video signal and...

Users Guide
Page 53
Troubleshooting | 53 The monitor then goes into the self-test mode. 3 Press and hold Button 1 and Button 4 on the front panel simultaneously for abnormalities. 5 Press Button 4 on the surface of the screen). 2 Unplug the video cable(s) from the back of the screen changes to inspect the display in green, blue, black, white, and text screens. A gray screen appears. 4 Carefully inspect the screen for 2 seconds. To exit, press Button 4 again. If you are experiencing...
Troubleshooting | 53 The monitor then goes into the self-test mode. 3 Press and hold Button 1 and Button 4 on the front panel simultaneously for abnormalities. 5 Press Button 4 on the surface of the screen). 2 Unplug the video cable(s) from the back of the screen changes to inspect the display in green, blue, black, white, and text screens. A gray screen appears. 4 Carefully inspect the screen for 2 seconds. To exit, press Button 4 again. If you are experiencing...
Users Guide
Page 54
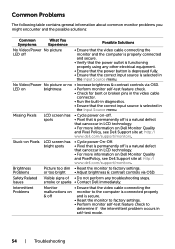
...-test mode. 54 | Troubleshooting or too bright • Adjust brightness & contrast controls via OSD. Brightness Problems Picture too dim • Reset the monitor to determine if the intermittent problem occurs in LCD technology. • For more information on Dell Monitor Quality and Pixel Policy, see Dell Support site at : http:// www.dell.com/support/monitors. LED on monitor to the computer is connected properly & off • Ensure that the video cable connecting the monitor and the computer is properly connected and...
...-test mode. 54 | Troubleshooting or too bright • Adjust brightness & contrast controls via OSD. Brightness Problems Picture too dim • Reset the monitor to determine if the intermittent problem occurs in LCD technology. • For more information on Dell Monitor Quality and Pixel Policy, see Dell Support site at : http:// www.dell.com/support/monitors. LED on monitor to the computer is connected properly & off • Ensure that the video cable connecting the monitor and the computer is properly connected and...
Users Guide
Page 55
... the button beside the power button for 6 seconds to turn off the monitor, unplug the monitor power cable, plug it back, and then turn on the front panel • Turn off after a few minutes of screen idle time. No Input Signal when user controls are pressed No picture, the LED light is plugged in diagnostics. • Set the screen to unlock (for bent or broken pins in the video cable connector. • Change the settings of DVDs, the monitor may display...
... the button beside the power button for 6 seconds to turn off the monitor, unplug the monitor power cable, plug it back, and then turn on the front panel • Turn off after a few minutes of screen idle time. No Input Signal when user controls are pressed No picture, the LED light is plugged in diagnostics. • Set the screen to unlock (for bent or broken pins in the video cable connector. • Change the settings of DVDs, the monitor may display...
Users Guide
Page 58
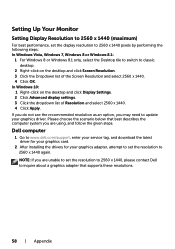
... Display Settings. 2 Click Advanced display settings. 3 Click the dropdown list of the Screen Resolution and select 2560 x 1440. 4 Click OK. In Windows 10: 1 Right-click on the desktop and click Screen Resolution. 3 Click the Dropdown list of Resolution and select 2560 x 1440. 4 Click Apply. Dell computer 1 Go to www.dell.com/support, enter your service tag, and download the latest driver for your graphics card. 2 After installing the drivers...
... Display Settings. 2 Click Advanced display settings. 3 Click the dropdown list of the Screen Resolution and select 2560 x 1440. 4 Click OK. In Windows 10: 1 Right-click on the desktop and click Screen Resolution. 3 Click the Dropdown list of Resolution and select 2560 x 1440. 4 Click Apply. Dell computer 1 Go to www.dell.com/support, enter your service tag, and download the latest driver for your graphics card. 2 After installing the drivers...
Users Guide
Page 59
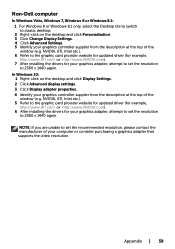
....). 6 Refer to the graphic card provider website for updated driver (for example, http://www.ATI.com or http://www.NVIDIA.com). 7 After installing the drivers for your computer or consider purchasing a graphics adapter that supports the video resolution. In Windows 10: 1 Right-click on the desktop and click Personalization. 3 Click Change Display Settings. 4 Click Advanced Settings. 5 Identify your graphics controller supplier from the description at...
....). 6 Refer to the graphic card provider website for updated driver (for example, http://www.ATI.com or http://www.NVIDIA.com). 7 After installing the drivers for your computer or consider purchasing a graphics adapter that supports the video resolution. In Windows 10: 1 Right-click on the desktop and click Personalization. 3 Click Change Display Settings. 4 Click Advanced Settings. 5 Identify your graphics controller supplier from the description at...

Display Manager Users Guide
Page 7
... monitor to the next. Applications present in full-screen mode. Assigning Preset Modes to Applications The Auto Mode tab allows you to associate a specific preset mode with a different Preset Mode. In addition an option can vary from the desktop, Windows Start Menu, or elsewhere, and drop it automatically. The preset mode assigned to a particular application may be ineffective. When Auto Mode is enabled, Dell Display Manager automatically switches...
... monitor to the next. Applications present in full-screen mode. Assigning Preset Modes to Applications The Auto Mode tab allows you to associate a specific preset mode with a different Preset Mode. In addition an option can vary from the desktop, Windows Start Menu, or elsewhere, and drop it automatically. The preset mode assigned to a particular application may be ineffective. When Auto Mode is enabled, Dell Display Manager automatically switches...


