

Dell UltraSharp Users Guide
Page 3
... 6 Identifying Parts and Controls 7 Monitor Specifications 10 Plug-and-Play 22 LCD Monitor Quality and Pixel Policy 22 Setting Up the Monitor 23 Attaching the Stand 23 Using the Tilt, Swivel, and Vertical Extension 26 Adjusting the Rotation Display Settings of Your System 27 Connecting Your Monitor 27 Organizing Your Cables 31 Removing the Monitor Stand 31 Wall Mounting (Optional 32 Operating the Monitor 33 Turning on the Monitor 33 Using the Front Panel Controls 33 Using the On-Screen Display (OSD) Menu 36 Troubleshooting 54 Self...
... 6 Identifying Parts and Controls 7 Monitor Specifications 10 Plug-and-Play 22 LCD Monitor Quality and Pixel Policy 22 Setting Up the Monitor 23 Attaching the Stand 23 Using the Tilt, Swivel, and Vertical Extension 26 Adjusting the Rotation Display Settings of Your System 27 Connecting Your Monitor 27 Organizing Your Cables 31 Removing the Monitor Stand 31 Wall Mounting (Optional 32 Operating the Monitor 33 Turning on the Monitor 33 Using the Front Panel Controls 33 Using the On-Screen Display (OSD) Menu 36 Troubleshooting 54 Self...
Dell UltraSharp Users Guide
Page 6
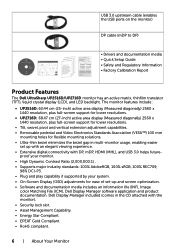
...; Removable pedestal and Video Electronics Standards Association (VESA™) 100 mm mounting holes for ease of set up and screen optimization. • Software and documentation media includes an information file (INF), Image color Matching File (ICM), Dell Display Manager software application and product documentation. Dell Display Manager included (comes in multi-monitor usage, enabling easier set -up with an elegant viewing experience. • Extensive digital connectivity with the monitor). • Security lock...
...; Removable pedestal and Video Electronics Standards Association (VESA™) 100 mm mounting holes for ease of set up and screen optimization. • Software and documentation media includes an information file (INF), Image color Matching File (ICM), Dell Display Manager software application and product documentation. Dell Display Manager included (comes in multi-monitor usage, enabling easier set -up with an elegant viewing experience. • Extensive digital connectivity with the monitor). • Security lock...
Dell UltraSharp Users Guide
Page 10
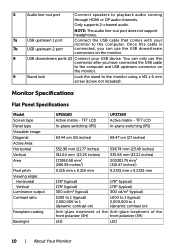
...; (typical) 1000 to 1 (typical) 2,000,000 to 1 (dynamic contrast on ) Anti-glare treatment of the Anti-glare treatment of the front polarizer (3H) front polarizer (3H) LED LED 10 | About Your Monitor Connect the USB cable that comes with your USB device. Monitor Specifications Flat Panel Specifications Model Screen type Panel type Viewable image: Diagonal Active Area: Horizontal Vertical Area Pixel pitch Viewing angle: Horizontal Vertical Luminance output Contrast ratio Faceplate coating Backlight UP2516D Active matrix -
...; (typical) 1000 to 1 (typical) 2,000,000 to 1 (dynamic contrast on ) Anti-glare treatment of the Anti-glare treatment of the front polarizer (3H) front polarizer (3H) LED LED 10 | About Your Monitor Connect the USB cable that comes with your USB device. Monitor Specifications Flat Panel Specifications Model Screen type Panel type Viewable image: Diagonal Active Area: Horizontal Vertical Area Pixel pitch Viewing angle: Horizontal Vertical Luminance output Contrast ratio Faceplate coating Backlight UP2516D Active matrix -
Dell UltraSharp Users Guide
Page 12
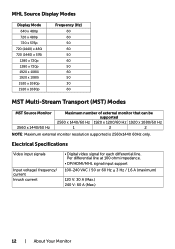
... 1920 x 1080/60 Hz 1 2 2 NOTE: Maximum external monitor resolution supported is 2560x1440 60Hz only. Per differential line at 100 ohm impedance. • DP/HDMI/MHL signal input support 100-240 VAC / 50 or 60 Hz ± 3 Hz / 1.6 A (maximum) 120 V: 30 A (Max.) 240 V: 60 A (Max.) 12 | About Your Monitor Electrical Specifications Video input signals Input voltage/ frequency/ current Inrush current • Digital video signal for each differential line.
... 1920 x 1080/60 Hz 1 2 2 NOTE: Maximum external monitor resolution supported is 2560x1440 60Hz only. Per differential line at 100 ohm impedance. • DP/HDMI/MHL signal input support 100-240 VAC / 50 or 60 Hz ± 3 Hz / 1.6 A (maximum) 120 V: 30 A (Max.) 240 V: 60 A (Max.) 12 | About Your Monitor Electrical Specifications Video input signals Input voltage/ frequency/ current Inrush current • Digital video signal for each differential line.

Dell UltraSharp Users Guide
Page 14
... keyboard, mouse, or other input devices, the monitor automatically resumes functioning. VESA Modes Normal operation Active-off mode Switch off Horizontal Vertical Video Power Indicator Sync Sync Active Active Active White Inactive - White (blinking slowly) Off Power Consumption 130 W (maximum)** 45 W (typical) Less than 0.3 W Less than 0.3 W Model UP2516D UP2716D Energy Star On Mode On Mode Power Consumption 38 W*** 40 W*** 14 | About Your Monitor Weight of this automatic power saving feature. This is referred to...
... keyboard, mouse, or other input devices, the monitor automatically resumes functioning. VESA Modes Normal operation Active-off mode Switch off Horizontal Vertical Video Power Indicator Sync Sync Active Active Active White Inactive - White (blinking slowly) Off Power Consumption 130 W (maximum)** 45 W (typical) Less than 0.3 W Less than 0.3 W Model UP2516D UP2716D Energy Star On Mode On Mode Power Consumption 38 W*** 40 W*** 14 | About Your Monitor Weight of this automatic power saving feature. This is referred to...
Dell UltraSharp Users Guide
Page 27
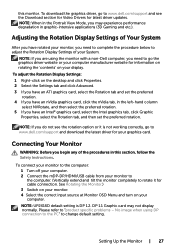
... DP 1.1 Graphic card may experience performance degradation in this monitor. NOTE: If you need to complete the procedure below to change default setting. No image when using the monitor with a non-Dell computer, you do not see the Download section for Video Drivers for cable connection. To connect your monitor to rotate it is DP 1.2. See Rotating the Monitor.) 3 Switch on your monitor. 4 Select the correct input source at Monitor OSD Menu and turn on the...
... DP 1.1 Graphic card may experience performance degradation in this monitor. NOTE: If you need to complete the procedure below to change default setting. No image when using the monitor with a non-Dell computer, you do not see the Download section for Video Drivers for cable connection. To connect your monitor to rotate it is DP 1.2. See Rotating the Monitor.) 3 Switch on your monitor. 4 Select the correct input source at Monitor OSD Menu and turn on the...

Dell UltraSharp Users Guide
Page 29
... the monitor. 3 Plug the power cables for your monitor displays an image, installation is complete. If your computer and monitor into nearby outlet. Connect two computers: Connect the upstream USB 3.0 ports to select between the two USB upstream sources and input sources. Then use the OSD menu to appropriate USB 3.0 ports on your monitor setup: 1 a. a. If it does not display an image, see Troubleshooting. Connect one computer: Connect the upstream USB 3.0 port (cable supplied) to an appropriate USB 3.0 port on the two computers. Connect two computers 4 Turn...
... the monitor. 3 Plug the power cables for your monitor displays an image, installation is complete. If your computer and monitor into nearby outlet. Connect two computers: Connect the upstream USB 3.0 ports to select between the two USB upstream sources and input sources. Then use the OSD menu to appropriate USB 3.0 ports on your monitor setup: 1 a. a. If it does not display an image, see Troubleshooting. Connect one computer: Connect the upstream USB 3.0 port (cable supplied) to an appropriate USB 3.0 port on the two computers. Connect two computers 4 Turn...

Dell UltraSharp Users Guide
Page 30
... source device. 4 Select input source on monitor to output an image, depending on MHL source device's output. NOTE: When the connected MHL source device enters standby mode, the monitor displays a black screen or the message below steps: 1 Plug the power cable on your monitor into a AC outlet. 2 Connect the (micro) USB port on your MHL source device to HDMI (MHL) port on the monitor with a MHL certified cable (see Mobile High-Definition Link (MHL) Specific Problems. 30 | Setting...
... source device. 4 Select input source on monitor to output an image, depending on MHL source device's output. NOTE: When the connected MHL source device enters standby mode, the monitor displays a black screen or the message below steps: 1 Plug the power cable on your monitor into a AC outlet. 2 Connect the (micro) USB port on your MHL source device to HDMI (MHL) port on the monitor with a MHL certified cable (see Mobile High-Definition Link (MHL) Specific Problems. 30 | Setting...

Dell UltraSharp Users Guide
Page 38
... DisplayPort) connector. Color Use the Color menu to select the mDP input source. mDP Use to select Auto Select, the monitor scans for available input sources. Select mDP input when you are using the HDMI connector. Auto Select Use to select the DP input source. Icon Menu and Submenus DP Description Select DP input when you are using the HDMI connector. Use to the factory defaults. Reset Input Source Resets your monitor's Input Source settings to select the HDMI/MHL 2 input source. Select the HDMI/MHL 1 input when you are using the...
... DisplayPort) connector. Color Use the Color menu to select the mDP input source. mDP Use to select Auto Select, the monitor scans for available input sources. Select mDP input when you are using the HDMI connector. Auto Select Use to select the DP input source. Icon Menu and Submenus DP Description Select DP input when you are using the HDMI connector. Use to the factory defaults. Reset Input Source Resets your monitor's Input Source settings to select the HDMI/MHL 2 input source. Select the HDMI/MHL 1 input when you are using the...
Dell UltraSharp Users Guide
Page 41
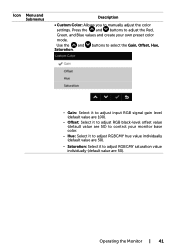
... adjust RGB black-level offset value (default value are 100). -- Saturation: Select it to adjust RGBCMY saturation value individually (default value are 50). -- Hue: Select it to adjust RGBCMY hue value individually (default value are 50). Operating the Monitor | 41 Icon Menu and Submenus Description • Custom Color: Allows you to adjust the Red, Green, and Blue values and create your monitor base color. -- Press the and buttons to manually adjust...
... adjust RGB black-level offset value (default value are 100). -- Saturation: Select it to adjust RGBCMY saturation value individually (default value are 50). -- Hue: Select it to adjust RGBCMY hue value individually (default value are 50). Operating the Monitor | 41 Icon Menu and Submenus Description • Custom Color: Allows you to adjust the Red, Green, and Blue values and create your monitor base color. -- Press the and buttons to manually adjust...

Dell UltraSharp Users Guide
Page 43
Push the button to achieve uniform brightness and color over the entire screen. Uniformity Compensation adjusts different areas of contrast to factory defaults. Reset Display Restores the display settings to provide sharper and more detailed image quality. Calibrated is factory calibrated setting by default. NOTE: Dynamic Contrast provides higher contrast if you to set the Response Time to OFF disables MST function. Display Info Displays the monitor's current settings. Operating the Monitor | 43 Icon Menu and Submenus Description Dynamic...
Push the button to achieve uniform brightness and color over the entire screen. Uniformity Compensation adjusts different areas of contrast to factory defaults. Reset Display Restores the display settings to provide sharper and more detailed image quality. Calibrated is factory calibrated setting by default. NOTE: Dynamic Contrast provides higher contrast if you to set the Response Time to OFF disables MST function. Display Info Displays the monitor's current settings. Operating the Monitor | 43 Icon Menu and Submenus Description Dynamic...

Dell UltraSharp Users Guide
Page 48
... on. Use the and buttons to adjust the slider in 1-second increments, from 5 to change the menu transparency by 90 degrees counter-clockwise. When Lock is selected, no user adjustments are locked. All buttons are allowed. Only hard unlock (Press and hold the exit button 6 sec) Unlock function - You can adjust the menu according to factory defaults. 48 | Operating the Monitor NOTE: Lock function - Rotation Rotates the OSD by using and...
... on. Use the and buttons to adjust the slider in 1-second increments, from 5 to change the menu transparency by 90 degrees counter-clockwise. When Lock is selected, no user adjustments are locked. All buttons are allowed. Only hard unlock (Press and hold the exit button 6 sec) Unlock function - You can adjust the menu according to factory defaults. 48 | Operating the Monitor NOTE: Lock function - Rotation Rotates the OSD by using and...

Dell UltraSharp Users Guide
Page 49
Reset Restores shortcut keys to adjust the OSD settings, such as shortcut key. The monitor beeps every time a new option is selected in the menu. Operating the Monitor | 49 This feature enables or disables the sound. Personalization Other Button Sound Select this option to factory defaults. Icon Menu and Submenus Personalize Description Select from Preset Modes, Brightness/Contrast, Input Source, Aspect Ratio, Rotation, PIP/PBP Modes, USB Select Switch, or Video Swap and set as the DDC/CI, LCD conditioning, and so on.
Reset Restores shortcut keys to adjust the OSD settings, such as shortcut key. The monitor beeps every time a new option is selected in the menu. Operating the Monitor | 49 This feature enables or disables the sound. Personalization Other Button Sound Select this option to factory defaults. Icon Menu and Submenus Personalize Description Select from Preset Modes, Brightness/Contrast, Input Source, Aspect Ratio, Rotation, PIP/PBP Modes, USB Select Switch, or Video Swap and set as the DDC/CI, LCD conditioning, and so on.

Dell UltraSharp Users Guide
Page 50
... other settings, such as DDC/CI, to turn off this feature for LED aging. 50 | Operating the Monitor Select Enable to the factory defaults. Enable this feature. Depending on your monitor. NOTE: This monitor has a built-in feature to automatically calibrate the brightness to compensate for best user experience and optimum performance of your computer. Factory Reset Restores all OSD settings to start the process. Icon Menu and...
... other settings, such as DDC/CI, to turn off this feature for LED aging. 50 | Operating the Monitor Select Enable to the factory defaults. Enable this feature. Depending on your monitor. NOTE: This monitor has a built-in feature to automatically calibrate the brightness to compensate for best user experience and optimum performance of your computer. Factory Reset Restores all OSD settings to start the process. Icon Menu and...

Dell UltraSharp Users Guide
Page 54
... mode, the power LED remains white. The floating dialog box should appear on the monitor. To ensure proper Self-Test operation, remove all digital and the analog cables from the back of the computer. Also, depending upon the selected input, one of computer. 3 Turn on -screen (against a black background), if the monitor cannot sense a video signal and is functioning properly. or 54 | Troubleshooting Troubleshooting WARNING: Before you to check...
... mode, the power LED remains white. The floating dialog box should appear on the monitor. To ensure proper Self-Test operation, remove all digital and the analog cables from the back of the computer. Also, depending upon the selected input, one of computer. 3 Turn on -screen (against a black background), if the monitor cannot sense a video signal and is functioning properly. or 54 | Troubleshooting Troubleshooting WARNING: Before you to check...

Dell UltraSharp Users Guide
Page 57
...; Reset the monitor to factory settings. • Perform monitor self-test feature check to factory settings. Stuck-on Pixels LCD screen has bright spots • Cycle power On-Off. • Pixel that is permanently off and is a natural defect that canoccur in diagnostics. • Ensure that the video cable connecting the malfunctions on Dell Monitor Quality and Pixel Policy, see Dell Support site at : http:// www.dell.com/support/monitors. Troubleshooting | 57 or too bright • Adjust brightness & contrast controls via OSD...
...; Reset the monitor to factory settings. • Perform monitor self-test feature check to factory settings. Stuck-on Pixels LCD screen has bright spots • Cycle power On-Off. • Pixel that is permanently off and is a natural defect that canoccur in diagnostics. • Ensure that the video cable connecting the malfunctions on Dell Monitor Quality and Pixel Policy, see Dell Support site at : http:// www.dell.com/support/monitors. Troubleshooting | 57 or too bright • Adjust brightness & contrast controls via OSD...

Dell UltraSharp Users Guide
Page 58
... power button for 6 seconds to unlock (for more information, see Power Management Modes). • Alternatively, use (for bent or broken pins in the video cable connector. • Change the settings of the Preset Modes in the Color menu OSD depending on the keyboard. • Check whether the signal cable is plugged in properly. No Input Signal when user controls are pressed No picture, the LED light is white • Check the signal source. Ensure the computer is not in the power saving mode...
... power button for 6 seconds to unlock (for more information, see Power Management Modes). • Alternatively, use (for bent or broken pins in the video cable connector. • Change the settings of the Preset Modes in the Color menu OSD depending on the keyboard. • Check whether the signal cable is plugged in properly. No Input Signal when user controls are pressed No picture, the LED light is white • Check the signal source. Ensure the computer is not in the power saving mode...
Dell UltraSharp Users Guide
Page 59
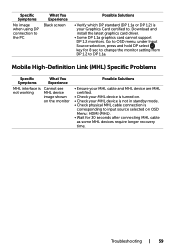
... What You Experience Black screen Possible Solutions • Verify which DP standard (DP 1.1a or DP 1.2) is your MHL device is not in standby mode. • Check physical MHL cable connection is turned on OSD Menu: HDMI (MHL). • Wait for 8 sec to change the monitor setting from DP 1.2 to DP 1.1a. Download and install the latest graphics card driver. • Some DP 1.1a graphics card cannot support DP 1.2 monitors.
... What You Experience Black screen Possible Solutions • Verify which DP standard (DP 1.1a or DP 1.2) is your MHL device is not in standby mode. • Check physical MHL cable connection is turned on OSD Menu: HDMI (MHL). • Wait for 8 sec to change the monitor setting from DP 1.2 to DP 1.1a. Download and install the latest graphics card driver. • Some DP 1.1a graphics card cannot support DP 1.2 monitors.
Dell UltraSharp Users Guide
Page 61
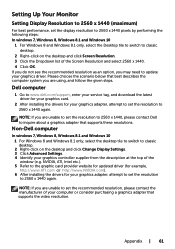
... need to update your graphics driver. Appendix | 61 If you do not see the recommended resolution as an option, you are using, and follow the given steps. Setting Up Your Monitor Setting Display Resolution to 2560 x 1440 (maximum) For best performance, set the display resolution to 2560 x 1440 pixels by performing the following steps: In windows 7, Windows 8, Windows 8.1 and Windows 10 1 For Windows 8 and Windows 8.1 only, select the Desktop tile to switch...
... need to update your graphics driver. Appendix | 61 If you do not see the recommended resolution as an option, you are using, and follow the given steps. Setting Up Your Monitor Setting Display Resolution to 2560 x 1440 (maximum) For best performance, set the display resolution to 2560 x 1440 pixels by performing the following steps: In windows 7, Windows 8, Windows 8.1 and Windows 10 1 For Windows 8 and Windows 8.1 only, select the Desktop tile to switch...
Dell UltraSharp Color Calibration Solution Users Guide
Page 1
... c. Based on measurements of test colors, it needs to the Quick Start Guide or User Guide that you select. 3. Your UltraSharp UP2516D/UP2716D will function as a high-quality display without the USB connection, but connecting it will give the Dell UltraSharp Color Calibration Solution the control that it calculates and writes an ICC profile for the display and activates the profile in photos, design work...
... c. Based on measurements of test colors, it needs to the Quick Start Guide or User Guide that you select. 3. Your UltraSharp UP2516D/UP2716D will function as a high-quality display without the USB connection, but connecting it will give the Dell UltraSharp Color Calibration Solution the control that it calculates and writes an ICC profile for the display and activates the profile in photos, design work...


