User's Guide
Page 4
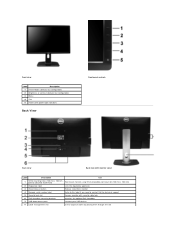
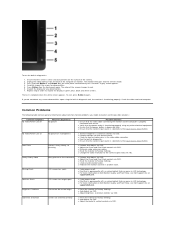
Front view Label Description 1 Preset Modes (default, but configurable) 2 Brightness & Contrast (default, but configurable) 3 Menu 4 Exit 5 Power (with power light indicator) Back View Front panel controls Back view Back view with monitor stand... from monitor 4 Barcode serial number label Refer to this label if you need to contact Dell for technical support 5 Security lock slot Secures monitor with security cable lock 6 Dell Soundbar mounting brackets Attaches the optional Dell Soundbar 7 USB downstream ports Connect your USB devices 8 Cable management slot Use to organize ...
Front view Label Description 1 Preset Modes (default, but configurable) 2 Brightness & Contrast (default, but configurable) 3 Menu 4 Exit 5 Power (with power light indicator) Back View Front panel controls Back view Back view with monitor stand... from monitor 4 Barcode serial number label Refer to this label if you need to contact Dell for technical support 5 Security lock slot Secures monitor with security cable lock 6 Dell Soundbar mounting brackets Attaches the optional Dell Soundbar 7 USB downstream ports Connect your USB devices 8 Cable management slot Use to organize ...

User's Guide
Page 16
...buttons: Front Panel Button Description 1 Use this button to go back to the main menu or exit the OSD main menu. Shortcut key / Brightness/Contrast 3 Use the MENU button to launch the on the front of the monitor to adjust the characteristics of the image being displayed. Menu ...4 Use this button to choose from a list of preset color modes. Back to Contents Page Operating the Monitor Dell™ U2412M Monitor User's Guide Using the Front Panel Controls Using the On-Screen Display (OSD) Menu PowerNap Software Setting the Maximum Resolution Using the...
...buttons: Front Panel Button Description 1 Use this button to go back to the main menu or exit the OSD main menu. Shortcut key / Brightness/Contrast 3 Use the MENU button to launch the on the front of the monitor to adjust the characteristics of the image being displayed. Menu ...4 Use this button to choose from a list of preset color modes. Back to Contents Page Operating the Monitor Dell™ U2412M Monitor User's Guide Using the Front Panel Controls Using the On-Screen Display (OSD) Menu PowerNap Software Setting the Maximum Resolution Using the...
User's Guide
Page 19
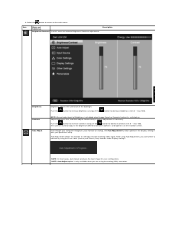
... cases, Auto Adjust produces the best image for use with your configuration. Push the button to increase contrast and push the button to activate Brightness/Contrast adjustment. NOTE: Auto Adjust option is only available when you can further tune your monitor by using the analog (VGA) connector. Icon... Menu and Submenus Brightness/Contrast Use this menu to decrease contrast (min 0 ~ max 100). 6. Select the button to return to the main menu. Even though your ...
... cases, Auto Adjust produces the best image for use with your configuration. Push the button to increase contrast and push the button to activate Brightness/Contrast adjustment. NOTE: Auto Adjust option is only available when you can further tune your monitor by using the analog (VGA) connector. Icon... Menu and Submenus Brightness/Contrast Use this menu to decrease contrast (min 0 ~ max 100). 6. Select the button to return to the main menu. Even though your ...
User's Guide
Page 21
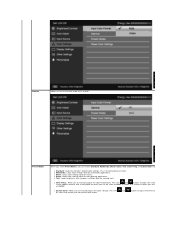
.... or Custom Color from the list. Press the and buttons to adjust the three colors (R, G, B) values and create your own preset color mode. l Text: Loads brightness and sharpness settings ideal for movies. Preset Modes When you select Preset Modes, you set the slider at 10000K.
.... or Custom Color from the list. Press the and buttons to adjust the three colors (R, G, B) values and create your own preset color mode. l Text: Loads brightness and sharpness settings ideal for movies. Preset Modes When you select Preset Modes, you set the slider at 10000K.
User's Guide
Page 40
... contains general information about common monitor problems you do not detect any abnormalities. 7. l Ensure that the screen is clean (no brightness l Increase brightness & contrast controls via OSD. The monitor then goes into the self-test mode. 3. A gray screen appears. 4. Carefully inspect... is depressed fully. l For more information on the front panel again. Press Button 4 on Dell Monitor Quality and Pixel Policy, see Dell Support site at : support.dell.com. l Ensure that can occur in diagnostic tool, the monitor is permanently off . l Pixel...
... contains general information about common monitor problems you do not detect any abnormalities. 7. l Ensure that the screen is clean (no brightness l Increase brightness & contrast controls via OSD. The monitor then goes into the self-test mode. 3. A gray screen appears. 4. Carefully inspect... is depressed fully. l For more information on the front panel again. Press Button 4 on Dell Monitor Quality and Pixel Policy, see Dell Support site at : support.dell.com. l Ensure that can occur in diagnostic tool, the monitor is permanently off . l Pixel...


