
User's Guide
Page 3
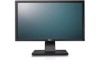
... the monitor) l Drivers and Documentation media l Quick Setup Guide l Product and Safety Information Guide Product Features The U2211H / U2311H flat panel display has an active matrix, thin-film transistor (TFT), liquid crystal display (LCD). Identifying Parts and Controls Front ...9632; Tilt, swivel, vertical extension and rotate adjustment capability. ■ Removable pedestal and Video Electronics Standards Association (VESA™) 100 mm mounting holes for flexible mounting solutions. ■ Plug and play capability if supported by your system. ■ On-Screen Display (OSD) adjustments...
... the monitor) l Drivers and Documentation media l Quick Setup Guide l Product and Safety Information Guide Product Features The U2211H / U2311H flat panel display has an active matrix, thin-film transistor (TFT), liquid crystal display (LCD). Identifying Parts and Controls Front ...9632; Tilt, swivel, vertical extension and rotate adjustment capability. ■ Removable pedestal and Video Electronics Standards Association (VESA™) 100 mm mounting holes for flexible mounting solutions. ■ Plug and play capability if supported by your system. ■ On-Screen Display (OSD) adjustments...
User's Guide
Page 4
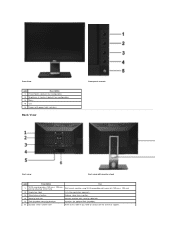
... Label Description Use VESA mounting holes (100 mm x 100 mm - 1 Wall mount monitor using VESA-compatible wall mount kit (100 mm x 100 mm) behind attached VESA Plate) 2 Regulatory label Lists the regulatory approvals. 3 Stand release button Release stand from monitor. 4 Security lock slot Secures monitor with security cable lock 5 Dell Soundbar mounting brackets Attaches the optional Dell Soundbar. 6 Barcode...
... Label Description Use VESA mounting holes (100 mm x 100 mm - 1 Wall mount monitor using VESA-compatible wall mount kit (100 mm x 100 mm) behind attached VESA Plate) 2 Regulatory label Lists the regulatory approvals. 3 Stand release button Release stand from monitor. 4 Security lock slot Secures monitor with security cable lock 5 Dell Soundbar mounting brackets Attaches the optional Dell Soundbar. 6 Barcode...
User's Guide
Page 8
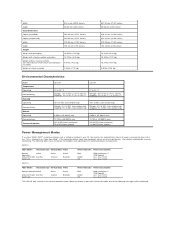
...lbs (7.65 kg) Weight with stand assembly and cables 14.22 lbs (6.45 kg) Weight without stand assembly (For wall mount or VESA mount considerations - 9.97 lbs (4.52 kg) no cables) Weight of the following table shows the power consumption and signaling of... automatically resumes functioning. Power Indicator Power Consumption Blue Amber Off 69W (maximum) ** 33W (typical) Less than 1.0 W Less than 1.0 W U2311H VESA Modes Horizontal Sync Vertical Sync Video Normal operationActive Active Active Active-off mode Inactive Switch off - Active Inactive - Inactive - This is pressed in...
...lbs (7.65 kg) Weight with stand assembly and cables 14.22 lbs (6.45 kg) Weight without stand assembly (For wall mount or VESA mount considerations - 9.97 lbs (4.52 kg) no cables) Weight of the following table shows the power consumption and signaling of... automatically resumes functioning. Power Indicator Power Consumption Blue Amber Off 69W (maximum) ** 33W (typical) Less than 1.0 W Less than 1.0 W U2311H VESA Modes Horizontal Sync Vertical Sync Video Normal operationActive Active Active Active-off mode Inactive Switch off - Active Inactive - Inactive - This is pressed in...

User's Guide
Page 34
... a soft cloth or cushion on the wall by following the instructions that come with minimum weight/load bearing capacity of 4.52 kg. Mount the LCD on a stable flat table. 2. (Screw dimension: M4 x 10 mm). Refer to Contents Page Back to the instructions that came... with the base mounting kit. Remove the stand. 3. Use a screwdriver to the LCD. 5. NOTE: For use only with UL Listed Wall Mount Bracket with the VESA-compatible base mounting kit. 1. Attach the mounting bracket from the wall mounting kit to remove the four screws securing the ...
... a soft cloth or cushion on the wall by following the instructions that come with minimum weight/load bearing capacity of 4.52 kg. Mount the LCD on a stable flat table. 2. (Screw dimension: M4 x 10 mm). Refer to Contents Page Back to the instructions that came... with the base mounting kit. Remove the stand. 3. Use a screwdriver to the LCD. 5. NOTE: For use only with UL Listed Wall Mount Bracket with the VESA-compatible base mounting kit. 1. Attach the mounting bracket from the wall mounting kit to remove the four screws securing the ...


