User's Guide
Page 1
... the entities claiming the marks and names or their products. All rights reserved. disclaims any manner whatsoever without notice. © 2010 Dell Inc. Dell™ U2211H /U2311H Monitor User's Guide About Your Monitor Setting Up the Monitor Operating the Monitor Troubleshooting Appendix Notes, Notices, and Cautions NOTE: A NOTE indicates important information that this text...
... the entities claiming the marks and names or their products. All rights reserved. disclaims any manner whatsoever without notice. © 2010 Dell Inc. Dell™ U2211H /U2311H Monitor User's Guide About Your Monitor Setting Up the Monitor Operating the Monitor Troubleshooting Appendix Notes, Notices, and Cautions NOTE: A NOTE indicates important information that this text...
User's Guide
Page 2
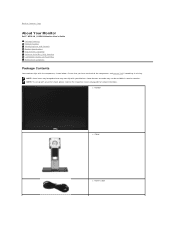
Ensure that you have received all the components and contact Dell if something is missing. NOTE: To set up with the components shown below. Back to Contents Page About Your Monitor Dell™ U2211H / U2311H Monitor User's Guide Package Contents Product Features Identifying Parts and Controls Monitor Specifications Plug and Play Capability Universal Serial Bus...
Ensure that you have received all the components and contact Dell if something is missing. NOTE: To set up with the components shown below. Back to Contents Page About Your Monitor Dell™ U2211H / U2311H Monitor User's Guide Package Contents Product Features Identifying Parts and Controls Monitor Specifications Plug and Play Capability Universal Serial Bus...

User's Guide
Page 3
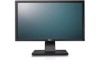
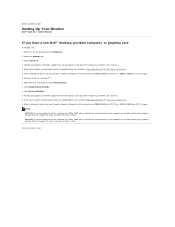
...flexible mounting solutions. ■ Plug and play capability if supported by your system. ■ On-Screen Display (OSD) adjustments for ease of set-up and screen optimization. ■ Software and documentation media includes an information file (INF), Image color Matching File (ICM), and product documentation... monitor) l Drivers and Documentation media l Quick Setup Guide l Product and Safety Information Guide Product Features The U2211H / U2311H flat panel display has an active matrix, thin-film transistor (TFT), liquid crystal display (LCD). Identifying Parts and Controls Front View
...flexible mounting solutions. ■ Plug and play capability if supported by your system. ■ On-Screen Display (OSD) adjustments for ease of set-up and screen optimization. ■ Software and documentation media includes an information file (INF), Image color Matching File (ICM), and product documentation... monitor) l Drivers and Documentation media l Quick Setup Guide l Product and Safety Information Guide Product Features The U2211H / U2311H flat panel display has an active matrix, thin-film transistor (TFT), liquid crystal display (LCD). Identifying Parts and Controls Front View

User's Guide
Page 11
...the monitor and then turn it on, the attached peripherals may take a few seconds to resume normal functionality. If you can select different settings if desired. Transfer speed High speed Full speed Low speed Data Rate Power Consumption 480 Mbps 2.5W (Max., each port) 12 Mbps... VCC DMD DPD GND USB Ports l 1 upstream - Universal Serial Bus (USB) Interface This section gives you information about changing the monitor settings, see Operating the Monitor. For more information about the USB ports that are automatic; NOTE: This monitor supports High-Speed Certified USB 2.0 ...
...the monitor and then turn it on, the attached peripherals may take a few seconds to resume normal functionality. If you can select different settings if desired. Transfer speed High speed Full speed Low speed Data Rate Power Consumption 480 Mbps 2.5W (Max., each port) 12 Mbps... VCC DMD DPD GND USB Ports l 1 upstream - Universal Serial Bus (USB) Interface This section gives you information about changing the monitor settings, see Operating the Monitor. For more information about the USB ports that are automatic; NOTE: This monitor supports High-Speed Certified USB 2.0 ...

User's Guide
Page 14
..., enter your graphics card. 2. After installing the drivers for your Graphics Adapter, attempt to set the resolution to 1920 x 1080 (for U2211H) or 1920 x 1080 (for your service tag, and download the latest driver for U2311H), please contact Dell™ to inquire about a Graphics Adapter that supports these resolutions. Go to Contents Page...
..., enter your graphics card. 2. After installing the drivers for your Graphics Adapter, attempt to set the resolution to 1920 x 1080 (for U2211H) or 1920 x 1080 (for your service tag, and download the latest driver for U2311H), please contact Dell™ to inquire about a Graphics Adapter that supports these resolutions. Go to Contents Page...
User's Guide
Page 15
...NVIDIA.com ). 6. NOTE: U2211H: If you have a non Dell™ desktop, portable computer, or graphics card In Windows XP: 1. Back to Contents Page Setting Up Your Monitor Dell™ U2211H / U2311H Monitor If you are unable to set the resolution to 1920 x 1080 (for U2211H) or 1920 x ...1080 (for U2311H) again. In Windows Vista® or Windows® 7: 1. Click Change Display Settings. 3. NVIDIA, ATI, Intel etc.)....
...NVIDIA.com ). 6. NOTE: U2211H: If you have a non Dell™ desktop, portable computer, or graphics card In Windows XP: 1. Back to Contents Page Setting Up Your Monitor Dell™ U2211H / U2311H Monitor If you are unable to set the resolution to 1920 x 1080 (for U2211H) or 1920 x ...1080 (for U2311H) again. In Windows Vista® or Windows® 7: 1. Click Change Display Settings. 3. NVIDIA, ATI, Intel etc.)....

User's Guide
Page 16
... values of the characteristics as they change. Back to Contents Page Operating the Monitor Dell™ U2211H / U2311H Monitor User's Guide Using the Front Panel Controls Using the On-Screen Display (OSD) Menu Setting the Maximum Resolution Using the Dell Soundbar (Optional) Using the Tilt, Swivel, and Vertical Extension Rotating the monitor Adjusting the...
... values of the characteristics as they change. Back to Contents Page Operating the Monitor Dell™ U2211H / U2311H Monitor User's Guide Using the Front Panel Controls Using the On-Screen Display (OSD) Menu Setting the Maximum Resolution Using the Dell Soundbar (Optional) Using the Tilt, Swivel, and Vertical Extension Rotating the monitor Adjusting the...

User's Guide
Page 17
The changes are also saved if you change the settings and then wait for display (DP) Input 5 Use the Power button to turn the monitor on and fully functional. The Blue LED indicates the monitor ...is on and off. Power (with power light indicator) Using the On-Screen Display (OSD) Menu Accessing the Menu System NOTE: If you change the settings and then either proceed to another menu or exit the OSD menu, the monitor automatically saves those changes. Main Menu for analog (VGA) Input or...
The changes are also saved if you change the settings and then wait for display (DP) Input 5 Use the Power button to turn the monitor on and fully functional. The Blue LED indicates the monitor ...is on and off. Power (with power light indicator) Using the On-Screen Display (OSD) Menu Accessing the Menu System NOTE: If you change the settings and then either proceed to another menu or exit the OSD menu, the monitor automatically saves those changes. Main Menu for analog (VGA) Input or...

User's Guide
Page 18
...Adjust Note: Dynamic Contrast provides higher contrast if you can further tune your monitor on startup, the Auto Adjustment function optimizes the display settings for a complete list of the backlight. Push the and buttons to move from one icon to the indicators on the monitor screen...allows the monitor to self-adjust to activate Brightness/Contrast adjustment. After using the Pixel Clock (Coarse) and Phase (Fine) controls under Image Settings. Push and button to select the Dynamic Contrast "On" or "Off" . Push the button to select the desired parameter. 5. Dynamic ...
...Adjust Note: Dynamic Contrast provides higher contrast if you can further tune your monitor on startup, the Auto Adjustment function optimizes the display settings for a complete list of the backlight. Push the and buttons to move from one icon to the indicators on the monitor screen...allows the monitor to self-adjust to activate Brightness/Contrast adjustment. After using the Pixel Clock (Coarse) and Phase (Fine) controls under Image Settings. Push and button to select the Dynamic Contrast "On" or "Off" . Push the button to select the desired parameter. 5. Dynamic ...

User's Guide
Page 19
...is only available when you are using the analog (VGA) connector. Select VGA input when you are different color setting sub-menus for your monitor. Select DisplayPort input when you to set the color mode to your configuration. Input Source NOTE: In most cases, Auto Adjust produces the best image ...for VGA/DVI-D and Video input. Use the Color Settings to a computer or a DVD using a VGA or DVI cable. Input Color Format Choose the RGB option if monitor is not RGB. Choose the ...
...is only available when you are using the analog (VGA) connector. Select VGA input when you are different color setting sub-menus for your monitor. Select DisplayPort input when you to set the color mode to your configuration. Input Source NOTE: In most cases, Auto Adjust produces the best image ...for VGA/DVI-D and Video input. Use the Color Settings to a computer or a DVD using a VGA or DVI cable. Input Color Format Choose the RGB option if monitor is not RGB. Choose the ...

User's Guide
Page 20
...Preset Modes When you select Graphics, you can shift color of video image to adjust the desired flesh tone color. l Multimedia: Loads color settings ideal for sports. l Cool: Decreases the color temperature. Press the and buttons to '100'. The screen appears warmer with a blue ... the hue from '0' to adjust the three colors (R, G, B) values and create your monitor is the default preset mode. l Nature: Loads color settings ideal for movies. l Video: Select this mode if your own preset color mode. l Warm: Increase the color temperature. Mode Selection You can choose...
...Preset Modes When you select Graphics, you can shift color of video image to adjust the desired flesh tone color. l Multimedia: Loads color settings ideal for sports. l Cool: Decreases the color temperature. Press the and buttons to '100'. The screen appears warmer with a blue ... the hue from '0' to adjust the three colors (R, G, B) values and create your monitor is the default preset mode. l Nature: Loads color settings ideal for movies. l Video: Select this mode if your own preset color mode. l Warm: Increase the color temperature. Mode Selection You can choose...

User's Guide
Page 21
... green shade of the video image. Use or Press to increase the purple shade of the video image. s Display Settings Use the Display Settings to the factory settings. Reset Color Setting Reset your monitor color settings to adjust image. to adjust the saturation from '0' to increase the colorful appearance of the video image. This feature...
... green shade of the video image. Use or Press to increase the purple shade of the video image. s Display Settings Use the Display Settings to the factory settings. Reset Color Setting Reset your monitor color settings to adjust image. to adjust the saturation from '0' to increase the colorful appearance of the video image. This feature...

User's Guide
Page 28
...or 1920 x 1080 (for U2311H). 4. If you do not see 1920 x 1080 (for U2211H) or 1920 x 1080 (for U2311H) as an option, you have a Dell™ desktop or a Dell™ portable computer with Microsoft® Windows® operating systems, set the display resolution to Contents ...for U2211H) or 1920 x 1080 (for U2311H). 4. Right-click on the desktop and click Personalization. 2. Back to Contents Page Setting Up Your Monitor Dell™ U2211H / U2311H Monitor Setting the display resolution to 1920 x 1080 (for U2211H) or 1920 x 1080 (for U2311H) (maximum) For maximum display performance with...
...or 1920 x 1080 (for U2311H). 4. If you do not see 1920 x 1080 (for U2211H) or 1920 x 1080 (for U2311H) as an option, you have a Dell™ desktop or a Dell™ portable computer with Microsoft® Windows® operating systems, set the display resolution to Contents ...for U2211H) or 1920 x 1080 (for U2311H). 4. Right-click on the desktop and click Personalization. 2. Back to Contents Page Setting Up Your Monitor Dell™ U2211H / U2311H Monitor Setting the display resolution to 1920 x 1080 (for U2211H) or 1920 x 1080 (for U2311H) (maximum) For maximum display performance with...

User's Guide
Page 29
.... Other trademarks and trade names may be used in the U.S. Dell Inc. A01 Trademarks used in this text: Dell and the DELL logo are either the entities claiming the marks and names or their products. Environmental Protection Agency. Dell™ U2211H / U2311H Monitor User Guide Setting the display resolution to 1920 x 1080 (for U2211H) or 1920...
.... Other trademarks and trade names may be used in the U.S. Dell Inc. A01 Trademarks used in this text: Dell and the DELL logo are either the entities claiming the marks and names or their products. Environmental Protection Agency. Dell™ U2211H / U2311H Monitor User Guide Setting the display resolution to 1920 x 1080 (for U2211H) or 1920...

User's Guide
Page 30
... the respective stand setup guide for a monitor with a stand. To connect your computer and disconnect the power cable. Back to Contents Page Setting Up the Monitor Dell™ U2211H / U2311H Monitor User's Guide Attaching the Stand Connecting the Monitor Organizing Your Cables Attaching the Soundbar (optional) Removing the Stand Wall Mounting (Optional) Attaching...
... the respective stand setup guide for a monitor with a stand. To connect your computer and disconnect the power cable. Back to Contents Page Setting Up the Monitor Dell™ U2211H / U2311H Monitor User's Guide Attaching the Stand Connecting the Monitor Organizing Your Cables Attaching the Soundbar (optional) Removing the Stand Wall Mounting (Optional) Attaching...

User's Guide
Page 33
To remove the stand: 1. Removing the Stand NOTE: To prevent scratches on the LCD screen while removing the stand, ensure that the monitor is for set up and away from the back of the monitor. 2. Wall Mounting (Optional) NOTE: The Soundbar power connector (+12 V DC output) is placed on... a flat surface. 2. Slide the Soundbar to the respective stand setup guide for the optional Dell Soundbar only. Connect the Soundbar with any device other stand is applicable for a monitor with the two tabs along the bottom of the Soundbar ...
To remove the stand: 1. Removing the Stand NOTE: To prevent scratches on the LCD screen while removing the stand, ensure that the monitor is for set up and away from the back of the monitor. 2. Wall Mounting (Optional) NOTE: The Soundbar power connector (+12 V DC output) is placed on... a flat surface. 2. Slide the Soundbar to the respective stand setup guide for the optional Dell Soundbar only. Connect the Soundbar with any device other stand is applicable for a monitor with the two tabs along the bottom of the Soundbar ...
User's Guide
Page 36
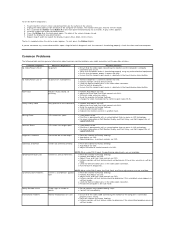
... Quality and Pixel Policy, see Dell Support site at : support.dell.com. To exit, press the Button 4 again. l Adjust the Phase and Pixel Clock controls via OSD. l Reset the monitor to Factory Settings. Brightness Problems Picture too dim or too bright l Reset the monitor to Factory Settings. l Adjust horizontal & vertical controls via OSD. l Perform...
... Quality and Pixel Policy, see Dell Support site at : support.dell.com. To exit, press the Button 4 again. l Adjust the Phase and Pixel Clock controls via OSD. l Reset the monitor to Factory Settings. Brightness Problems Picture too dim or too bright l Reset the monitor to Factory Settings. l Adjust horizontal & vertical controls via OSD. l Perform...
User's Guide
Page 37
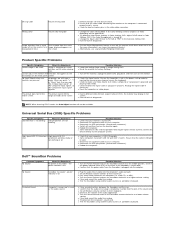
...all Windows volume controls to your monitor is turned ON. l Troubleshoot the computer's sound card. portable CD player). l Try different Color Preset Settings in plug. When you press "+", "-" or "Menu" key, the message "No S-Video input signal", or "No Composite input signal", or.... l Some computers have both USB 2.0 and USB 1.1 ports. l Reconnect the USB peripherals (downstream connector). l Reboot the computer. Dell™ Soundbar Problems Common Symptoms No Sound What You Experience No power to the middle position; power indicator is plugged in use a dynamically...
...all Windows volume controls to your monitor is turned ON. l Troubleshoot the computer's sound card. portable CD player). l Try different Color Preset Settings in plug. When you press "+", "-" or "Menu" key, the message "No S-Video input signal", or "No Composite input signal", or.... l Some computers have both USB 2.0 and USB 1.1 ports. l Reconnect the USB peripherals (downstream connector). l Reboot the computer. Dell™ Soundbar Problems Common Symptoms No Sound What You Experience No power to the middle position; power indicator is plugged in use a dynamically...

User's Guide
Page 38
...in plug is too low l Clear any obstructions between the Soundbar and the user. l Set all Windows audio balance controls (L-R) to their maximum. Back to the maximum volume setting. portable CD player). Distorted Sound Other audio source is used Unbalanced Sound Output Sound from only... the Power/Volume knob on the Soundbar counter-clockwise to their midpoints. l Decrease the volume of the audio application. l Set all Windows volume controls to a lower volume setting. l Clean and reseat the audio line-in plug. l Increase the volume of the audio source. l Clean and reseat...
...in plug is too low l Clear any obstructions between the Soundbar and the user. l Set all Windows audio balance controls (L-R) to their maximum. Back to the maximum volume setting. portable CD player). Distorted Sound Other audio source is used Unbalanced Sound Output Sound from only... the Power/Volume knob on the Soundbar counter-clockwise to their midpoints. l Decrease the volume of the audio application. l Set all Windows volume controls to a lower volume setting. l Clean and reseat the audio line-in plug. l Increase the volume of the audio source. l Clean and reseat...


