User Guide
Page 10
... . 6-7 6-5. A 250w power supply with ESD springs [1] (SAS sled shown 10-3 10-6. Library drive sled with LEDs 7-8 7-2. Library shipping lock and label storage location on the LTO Ultrium 6 Tape Cartridge 6-6 6-4. Drive sled taping diagrams . . . . . 10-17 10-18. The LTO Ultrium data cartridge . . . ....and WORM Tape Cartridges 6-3 6-3. Double-boxing tape cartridges for the left magazine 9-1 9-2. Library drive sled without ESD springs shown) . 10-5 10-8. Library front panel LEDs 10-21 viii Dell PowerVault TL2000 Tape Library and TL4000 Tape Library User's ...
... . 6-7 6-5. A 250w power supply with ESD springs [1] (SAS sled shown 10-3 10-6. Library drive sled with LEDs 7-8 7-2. Library shipping lock and label storage location on the LTO Ultrium 6 Tape Cartridge 6-6 6-4. Drive sled taping diagrams . . . . . 10-17 10-18. The LTO Ultrium data cartridge . . . ....and WORM Tape Cartridges 6-3 6-3. Double-boxing tape cartridges for the left magazine 9-1 9-2. Library drive sled without ESD springs shown) . 10-5 10-8. Library front panel LEDs 10-21 viii Dell PowerVault TL2000 Tape Library and TL4000 Tape Library User's ...
User Guide
Page 209
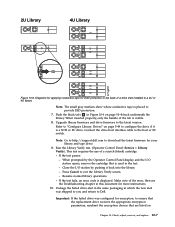
... drive was shipped to you and return to configure the drive if it back into the library. - Refer to the back of a scratch (blank) cartridge. Close the I /O station opens, remove the cartridge that are listed on page 5-49 to Dell. 2U Library 4U Library a77ug203 Figure 10-9. Diagrams for applying conductive tape for your library and tape drive. 9.
... drive was shipped to you and return to configure the drive if it back into the library. - Refer to the back of a scratch (blank) cartridge. Close the I /O station opens, remove the cartridge that are listed on page 5-49 to Dell. 2U Library 4U Library a77ug203 Figure 10-9. Diagrams for applying conductive tape for your library and tape drive. 9.
User Guide
Page 219
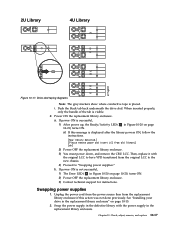
... from the original LCC to the new chassis. 4) Proceed to "Swapping power supplies." Swapping power supplies 1. Chapter 10. Power ON the replacement library enclosure. b. Check, adjust, remove, and replace 10-17 When inserted properly, only the handle of the tab is successful, 1) After power ...up, the Ready/Activity LED ( 1 in Figure 10-20 on page 10-21) turns ON. 2) Power OFF the replacement library enclosure. 3) Contact technical support for instructions. 2U Library 4U Library a77ug203 Figure 10-17. Drive sled taping diagrams Note: The gray markers show where conductive...
... from the original LCC to the new chassis. 4) Proceed to "Swapping power supplies." Swapping power supplies 1. Chapter 10. Power ON the replacement library enclosure. b. Check, adjust, remove, and replace 10-17 When inserted properly, only the handle of the tab is successful, 1) After power ...up, the Ready/Activity LED ( 1 in Figure 10-20 on page 10-21) turns ON. 2) Power OFF the replacement library enclosure. 3) Contact technical support for instructions. 2U Library 4U Library a77ug203 Figure 10-17. Drive sled taping diagrams Note: The gray markers show where conductive...