
Setup Guide
Page 5
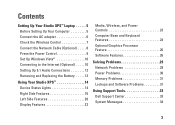
... 8 Press the Power Control 9 Set Up Windows Vista 10 Connecting to the Internet (Optional 10 Setting Up 5.1 Audio Connections 12 Removing and Replacing the Battery 13 Using Your Studio XPS 14 Device Status Lights 14 Right Side Features 16 Left Side Features 20 Display Features 22 Media, Wireless, and Power Controls 23 Computer Base and Keyboard Features 24 Optional Graphics Processor Feature 26 Software Features 26 Solving Problems 29 Network Problems 29 Power Problems 30 Memory Problems 31 Lockups and Software Problems 31 Using Support Tools 33 Dell Support Center 33...
... 8 Press the Power Control 9 Set Up Windows Vista 10 Connecting to the Internet (Optional 10 Setting Up 5.1 Audio Connections 12 Removing and Replacing the Battery 13 Using Your Studio XPS 14 Device Status Lights 14 Right Side Features 16 Left Side Features 20 Display Features 22 Media, Wireless, and Power Controls 23 Computer Base and Keyboard Features 24 Optional Graphics Processor Feature 26 Software Features 26 Solving Problems 29 Network Problems 29 Power Problems 30 Memory Problems 31 Lockups and Software Problems 31 Using Support Tools 33 Dell Support Center 33...
Setup Guide
Page 12
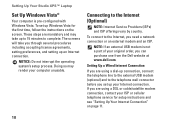
.... Setting Up Your Studio XPS™ Laptop Set Up Windows Vista® Your computer is not a part of your original order, you can purchase one from the Dell website at www.dell.com. These steps are using a DSL or cable/satellite modem connection, contact your ISP or cellular telephone service for the first time, follow the instructions on page 11. 10 NOTICE: Do not interrupt the operating system's setup...
.... Setting Up Your Studio XPS™ Laptop Set Up Windows Vista® Your computer is not a part of your original order, you can purchase one from the Dell website at www.dell.com. These steps are using a DSL or cable/satellite modem connection, contact your ISP or cellular telephone service for the first time, follow the instructions on page 11. 10 NOTICE: Do not interrupt the operating system's setup...
Setup Guide
Page 14
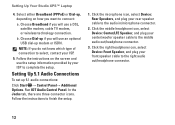
... use the setup information provided by your rear speaker cable to the audio in/microphone connector. 2. Run IDT Audio Control Panel. Follow the instructions to connect: a. Click the microphone icon, select Device: Rear Speakers, and plug your ISP to the right audio out/headphone connector. 12 b. Setting Up Your Studio XPS™ Laptop 4. Choose Broadband if you will use an optional USB dial-up 5.1 audio connections: Click Start → Control Panel→ Additional Options. In the Jacks...
... use the setup information provided by your rear speaker cable to the audio in/microphone connector. 2. Run IDT Audio Control Panel. Follow the instructions to connect: a. Click the microphone icon, select Device: Rear Speakers, and plug your ISP to the right audio out/headphone connector. 12 b. Setting Up Your Studio XPS™ Laptop 4. Choose Broadband if you will use an optional USB dial-up 5.1 audio connections: Click Start → Control Panel→ Additional Options. In the Jacks...
Setup Guide
Page 17
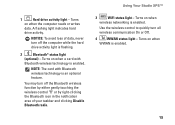
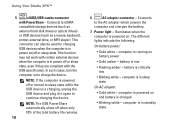
...Use the wireless control to quickly turn off the computer while the hard drive activity light is flashing. 2 Bluetooth® status light (optional) - NOTICE: To avoid loss of your taskbar and clicking Disable Bluetooth radio. Turns on when wireless networking is enabled. Using Your Studio XPS™ 3 WiFi status light - Turns on when a card with Bluetooth wireless technology is enabled. 15 Turns on when the computer reads or writes data. A flashing light indicates hard drive activity. You may turn off the Bluetooth wireless function by either gently touching...
...Use the wireless control to quickly turn off the computer while the hard drive activity light is flashing. 2 Bluetooth® status light (optional) - NOTICE: To avoid loss of your taskbar and clicking Disable Bluetooth radio. Turns on when wireless networking is enabled. Using Your Studio XPS™ 3 WiFi status light - Turns on when a card with Bluetooth wireless technology is enabled. 15 Turns on when the computer reads or writes data. A flashing light indicates hard drive activity. You may turn off the Bluetooth wireless function by either gently touching...
Setup Guide
Page 20
... function may not work with PowerShare - battery is in standby state. computer is low • Flashing amber - The different lights indicate the following: On battery power: • Solid white - battery is in sleep state On AC adapter: • Solid white - In such cases, turn the computer on . Connects to the AC adapter which powers the computer and charges the battery. 7 Power light - Using Your Studio XPS™ 5 eSATA/USB combo connector with certain external devices...
... function may not work with PowerShare - battery is in standby state. computer is low • Flashing amber - The different lights indicate the following: On battery power: • Solid white - battery is in sleep state On AC adapter: • Solid white - In such cases, turn the computer on . Connects to the AC adapter which powers the computer and charges the battery. 7 Power light - Using Your Studio XPS™ 5 eSATA/USB combo connector with certain external devices...
Setup Guide
Page 28
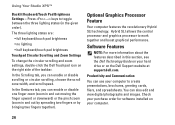
... order). Check your purchase order for software installed on your hard drive or on the right side of the taskbar. Using Your Studio XPS™ Backlit Keyboard/Touch Pad Brightness Settings - Press keys to work together and boost graphical performance. Productivity and Communication You can also edit and view digital photographs and images. You can use your computer to create presentations, brochures, greeting cards, fliers, and spreadsheets. The three lighting...
... order). Check your purchase order for software installed on your hard drive or on the right side of the taskbar. Using Your Studio XPS™ Backlit Keyboard/Touch Pad Brightness Settings - Press keys to work together and boost graphical performance. Productivity and Communication You can also edit and view digital photographs and images. You can use your computer to create presentations, brochures, greeting cards, fliers, and spreadsheets. The three lighting...
Setup Guide
Page 29
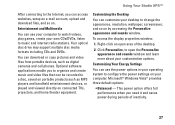
... and create music and video files that can be recorded to configure the power settings on . Right-click an open the Personalize appearance and sounds window and learn more about your computer. Microsoft® Windows Vista® provides three default options: • Balanced - You can access websites, setup an e-mail account, upload and download files, and so on your customization options. Your optical disc drive may support multiple disc media formats including...
... and create music and video files that can be recorded to configure the power settings on . Right-click an open the Personalize appearance and sounds window and learn more about your computer. Microsoft® Windows Vista® provides three default options: • Balanced - You can access websites, setup an e-mail account, upload and download files, and so on your customization options. Your optical disc drive may support multiple disc media formats including...
Setup Guide
Page 31
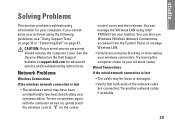
... service personnel should remove the computer cover. To turn on wireless again, with the computer turned on, gently touch the wireless control on the Dell Support website at support.dell.com for your taskbar. Solving Problems This section provides troubleshooting information for advanced service and troubleshooting instructions. You can also use Windows Wireless Network Connections, accessed from your computer. You can manage the Wireless LAN using Intel PROSet from the Control Panel, to your wireless radios. See the Service Manual on the center control cover...
... service personnel should remove the computer cover. To turn on wireless again, with the computer turned on, gently touch the wireless control on the Dell Support website at support.dell.com for your taskbar. Solving Problems This section provides troubleshooting information for advanced service and troubleshooting instructions. You can also use Windows Wireless Network Connections, accessed from your computer. You can manage the Wireless LAN using Intel PROSet from the Control Panel, to your wireless radios. See the Service Manual on the center control cover...
Setup Guide
Page 33
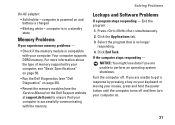
...; Reseat the memory modules (see the Service Manual on . 31 Solving Problems Lockups and Software Problems If a program stops responding - Select the program that your computer is charged • Blinking white - Turn the computer off and then turn your computer. For more information about the type of memory supported by pressing a key on and battery is successfully communicating with your computer on the Dell Support website at support.dell.com...
...; Reseat the memory modules (see the Service Manual on . 31 Solving Problems Lockups and Software Problems If a program stops responding - Select the program that your computer is charged • Blinking white - Turn the computer off and then turn your computer. For more information about the type of memory supported by pressing a key on and battery is successfully communicating with your computer on the Dell Support website at support.dell.com...
Setup Guide
Page 36
... checkpoint and contact Dell Technical Support - Replace the battery. dell.com or see "Contacting Dell" on page 47 for assistance. Hard-disk drive failure - Hard-disk drive read failure - Keyboard failure - Possible hard-disk drive (HDD) failure during HDD boot test, see "Contacting Dell" on hard-disk drive, the hard-disk drive cable is loose. Keyboard has failed or the keyboard cable is loose, or no bootable device exists. 34 The computer failed to resolve the issue. See the Service Manual on page...
... checkpoint and contact Dell Technical Support - Replace the battery. dell.com or see "Contacting Dell" on page 47 for assistance. Hard-disk drive failure - Hard-disk drive read failure - Keyboard failure - Possible hard-disk drive (HDD) failure during HDD boot test, see "Contacting Dell" on hard-disk drive, the hard-disk drive cable is loose. Keyboard has failed or the keyboard cable is loose, or no bootable device exists. 34 The computer failed to resolve the issue. See the Service Manual on page...
Setup Guide
Page 37
... can use the Hardware Troubleshooter to function properly. Type hardware troubleshooter in the BIOS setup. Your USB device needs more power to resolve the incompatibility. In the search results, select the option that a parameter has exceeded its normal operating range. USB over current error - To start the search. 3. Using Support Tools • If the hard drive is your boot device, ensure that the cables are connected and that the drive is installed properly and partitioned as a boot device. • Enter system setup and...
... can use the Hardware Troubleshooter to function properly. Type hardware troubleshooter in the BIOS setup. Your USB device needs more power to resolve the incompatibility. In the search results, select the option that a parameter has exceeded its normal operating range. USB over current error - To start the search. 3. Using Support Tools • If the hard drive is your boot device, ensure that the cables are connected and that the drive is installed properly and partitioned as a boot device. • Enter system setup and...

Setup Guide
Page 38
... is located on a hidden diagnostic utility partition on -screen instructions. Hold down the key while pressing the power button to be working properly. 2. The diagnostics beeps while testing the display. Ensure that the computer is connected to an electrical outlet that you print this procedure before you contact Dell for technical assistance. Using Support Tools Dell Diagnostics If you experience a problem with your computer cannot display a screen image...
... is located on a hidden diagnostic utility partition on -screen instructions. Hold down the key while pressing the power button to be working properly. 2. The diagnostics beeps while testing the display. Ensure that the computer is connected to an electrical outlet that you print this procedure before you contact Dell for technical assistance. Using Support Tools Dell Diagnostics If you experience a problem with your computer cannot display a screen image...
Setup Guide
Page 43
.... System Restore Options Reinstalling Windows Vista® The reinstallation process can take one time only. Insert the Operating System disc. 3. On the next start-up, the computer boots according to complete the installation. 41 After you reinstall the operating system, you wait too long and the operating system logo appears, continue to Boot from CD-ROM. Press any open files and exit any key to...
.... System Restore Options Reinstalling Windows Vista® The reinstallation process can take one time only. Insert the Operating System disc. 3. On the next start-up, the computer boots according to complete the installation. 41 After you reinstall the operating system, you wait too long and the operating system logo appears, continue to Boot from CD-ROM. Press any open files and exit any key to...

Setup Guide
Page 50
... memory, or a new hard drive. upgrade your operating system, maintaining peripherals, RAID, Internet, Bluetooth®, networking, and e-mail. the Drivers and Utilities media. See: the Operating System media. the Dell Technology Guide installed on the Dell Support website at support.dell.com. Finding More Information and Resources If you need to: reinstall your computer. 48 reinstall or replace a worn or defective part. the Service Manual on your hard drive. Check your warranty and return policies before working inside your operating...
... memory, or a new hard drive. upgrade your operating system, maintaining peripherals, RAID, Internet, Bluetooth®, networking, and e-mail. the Drivers and Utilities media. See: the Operating System media. the Dell Technology Guide installed on the Dell Support website at support.dell.com. Finding More Information and Resources If you need to: reinstall your computer. 48 reinstall or replace a worn or defective part. the Service Manual on your hard drive. Check your warranty and return policies before working inside your operating...
Setup Guide
Page 52
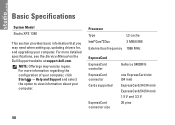
Basic Specifications System Model Studio XPS 1340 This section provides basic information that you may vary by region. For more detailed specifications, see the Service Manual on the Dell Support website at support.dell.com. Processor Type Intel® Core™2 Duo L2 cache 3 MB/6 MB External bus frequency 1066 MHz ExpressCard ExpressCard controller ExpressCard connector Cards supported ExpressCard connector size GeForce 9400M G one ExpressCard slot (54 mm...
Basic Specifications System Model Studio XPS 1340 This section provides basic information that you may vary by region. For more detailed specifications, see the Service Manual on the Dell Support website at support.dell.com. Processor Type Intel® Core™2 Duo L2 cache 3 MB/6 MB External bus frequency 1066 MHz ExpressCard ExpressCard controller ExpressCard connector Cards supported ExpressCard connector size GeForce 9400M G one ExpressCard slot (54 mm...

Setup Guide
Page 62
Index Dell Technology Guide for futher information 48 Device Status Lights 14 Diagnostic Checklist 46 disc drive supported disc sizes 19 discs ejecting 19 using 19 drivers and downloads 49 DVDs, playing and creating 27 E email addresses for technical support 44 energy conserving 27 expansion bus 51 60 F finding more information 48 FTP login, anonymous 44 H hardware problems diagnosing 35 Hardware Troubleshooter 35 horizontal and vertical stand options 5 I installing the stand 5 internet connection 10 ISP Internet Service Provider 10 M memory support 50, 51
Index Dell Technology Guide for futher information 48 Device Status Lights 14 Diagnostic Checklist 46 disc drive supported disc sizes 19 discs ejecting 19 using 19 drivers and downloads 49 DVDs, playing and creating 27 E email addresses for technical support 44 energy conserving 27 expansion bus 51 60 F finding more information 48 FTP login, anonymous 44 H hardware problems diagnosing 35 Hardware Troubleshooter 35 horizontal and vertical stand options 5 I installing the stand 5 internet connection 10 ISP Internet Service Provider 10 M memory support 50, 51

Owner's Manual (PDF)
Page 70
... enable or disable external USB ports. Miscellaneous Devices External USB Ports Security Set Service Tag Admin Password is: System Password is lost or stolen. 70 System Setup Utility Entry on S3 critical battery event If enabled, will allow you to set the admin password. Allows you when the battery level is low. Entry after If enabled, will wake the computer and alert you to set the system password. Intel (R) Rapid Start Technology iRST Support If enabled...
... enable or disable external USB ports. Miscellaneous Devices External USB Ports Security Set Service Tag Admin Password is: System Password is lost or stolen. 70 System Setup Utility Entry on S3 critical battery event If enabled, will allow you to set the admin password. Allows you when the battery level is low. Entry after If enabled, will wake the computer and alert you to set the system password. Intel (R) Rapid Start Technology iRST Support If enabled...
Owner's Manual (PDF)
Page 71
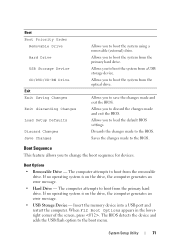
... no operating system is on the drive, the computer generates an error message. • Hard Drive - The computer attempts to the boot menu. The BIOS detects the device and adds the USB flash option to boot from a USB storage device. Boot Boot Priority Order Removable Drive Hard Drive USB Storage Device CD/DVD/CD-RW Drive Exit Exit Saving Changes Exit discarding Changes Load Setup Defaults Discard Changes Save Changes Allows you to the BIOS. System Setup Utility 71 Discards the changes made to boot the system using a removable (external) drive.
... no operating system is on the drive, the computer generates an error message. • Hard Drive - The computer attempts to the boot menu. The BIOS detects the device and adds the USB flash option to boot from a USB storage device. Boot Boot Priority Order Removable Drive Hard Drive USB Storage Device CD/DVD/CD-RW Drive Exit Exit Saving Changes Exit discarding Changes Load Setup Defaults Discard Changes Save Changes Allows you to the BIOS. System Setup Utility 71 Discards the changes made to boot the system using a removable (external) drive.
Owner's Manual (PDF)
Page 72
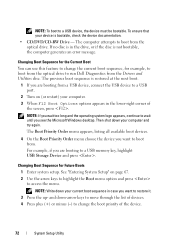
... change the current boot sequence, for Future Boots 1 Enter system setup. For example, if you are booting from the Drivers and Utilities disc. and down your computer and try again. NOTE: To boot to change the boot priority of the screen, press . Changing Boot Sequence for example, to boot from the optical drive to run Dell Diagnostics from a USB device, connect the USB device to a USB port. 2 Turn on page 67. 2 Use the arrow keys to highlight the Boot menu option...
... change the current boot sequence, for Future Boots 1 Enter system setup. For example, if you are booting from the Drivers and Utilities disc. and down your computer and try again. NOTE: To boot to change the boot priority of the screen, press . Changing Boot Sequence for example, to boot from the optical drive to run Dell Diagnostics from a USB device, connect the USB device to a USB port. 2 Turn on page 67. 2 Use the arrow keys to highlight the Boot menu option...
Owner's Manual (PDF)
Page 73
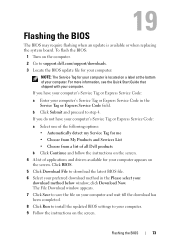
... Service Code: a Enter your computer appears on your computer and wait till the download has been completed. 8 Click Run to install the updated BIOS settings to support.dell.com/support/downloads. 3 Locate the BIOS update file for your computer: NOTE: The Service Tag for your computer is available or when replacing the system board. b Click Submit and proceed to save the file on the screen. click Download Now. Click BIOS. 5 Click Download...
... Service Code: a Enter your computer appears on your computer and wait till the download has been completed. 8 Click Run to install the updated BIOS settings to support.dell.com/support/downloads. 3 Locate the BIOS update file for your computer: NOTE: The Service Tag for your computer is available or when replacing the system board. b Click Submit and proceed to save the file on the screen. click Download Now. Click BIOS. 5 Click Download...


