User's Guide
Page 1
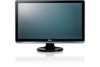
...and names or their products. Trademarks used in this document is subject to avoid the problem. Dell Inc. Dell™ ST2220L/ST2220M monitor User's Guide About Your Monitor Setting Up the Monitor Operating the Monitor Solving Problems Appendix Notes, Notices, and Cautions NOTE: A NOTE...894; ENERGY STAR is strictly forbidden. A00 CAUTION: A CAUTION indicates a potential for energy efficiency. is a registered trademark of Dell Inc. has determined that helps you how to change without the written permission of the U.S. ST2220Lb/ST2220Mb/ST2220Lc/ST2220Mc June 2010 Rev...
...and names or their products. Trademarks used in this document is subject to avoid the problem. Dell Inc. Dell™ ST2220L/ST2220M monitor User's Guide About Your Monitor Setting Up the Monitor Operating the Monitor Solving Problems Appendix Notes, Notices, and Cautions NOTE: A NOTE...894; ENERGY STAR is strictly forbidden. A00 CAUTION: A CAUTION indicates a potential for energy efficiency. is a registered trademark of Dell Inc. has determined that helps you how to change without the written permission of the U.S. ST2220Lb/ST2220Mb/ST2220Lc/ST2220Mc June 2010 Rev...
User's Guide
Page 3
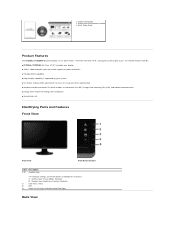
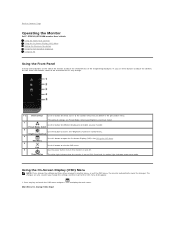
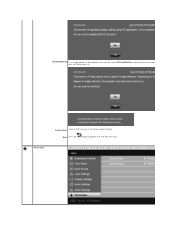
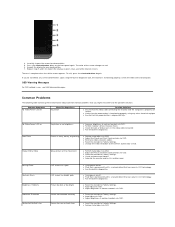
... Panel Controls Label Description 1-2 Shortcut keys *The default settings are Preset Modes and Brightness/Contrast. 1 Shortcut key: Preset Modes (Default) 2 Shortcut key: Brightness/Contrast (Default) 3 OSD menu select 4 EXIT 5 Power On/Off (light indicator below Dell logo) Back View The monitor features include: ■ ST2220L/ST2220M: 54.61cm (21.5") viewable area display. ■...
... Panel Controls Label Description 1-2 Shortcut keys *The default settings are Preset Modes and Brightness/Contrast. 1 Shortcut key: Preset Modes (Default) 2 Shortcut key: Brightness/Contrast (Default) 3 OSD menu select 4 EXIT 5 Power On/Off (light indicator below Dell logo) Back View The monitor features include: ■ ST2220L/ST2220M: 54.61cm (21.5") viewable area display. ■...

User's Guide
Page 9
...maximum) 68.24 BTU/hour (typical) Plug and Play Capability You can select different settings, but in any Plug and Play-compatible system. For more pixels to see Dell Support site at: support.dell.com. If required, the user can install the monitor in most cases monitor installation ... lb) 3.10 kg (6.83 lb) 0.67 kg (1.48 lb) Environmental Model Temperature Operating Non-operating Humidity Operating Non-operating Altitude Operating Non-operating Thermal dissipation ST2220L/ST2220M 0° to 40° C (32° to 104°F) Storage: -20° to 60° C (-4° to 140° F)...
...maximum) 68.24 BTU/hour (typical) Plug and Play Capability You can select different settings, but in any Plug and Play-compatible system. For more pixels to see Dell Support site at: support.dell.com. If required, the user can install the monitor in most cases monitor installation ... lb) 3.10 kg (6.83 lb) 0.67 kg (1.48 lb) Environmental Model Temperature Operating Non-operating Humidity Operating Non-operating Altitude Operating Non-operating Thermal dissipation ST2220L/ST2220M 0° to 40° C (32° to 104°F) Storage: -20° to 60° C (-4° to 140° F)...
User's Guide
Page 12
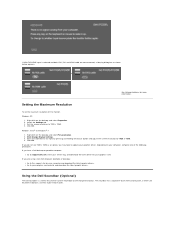
Back to http://support.dell.com, enter your service tag, and download the latest driver for your graphics card. 2. Back to Contents Page Setting Up Your Monitor Dell™ ST2220L/ST2220M monitor If you are unable to set the resolution to 1920x1080 again. After installing the drivers for your Graphics Adapter, attempt to set the resolution to 1920x1080 , please contact Dell™ to inquire about a Graphics Adapter that supports these resolutions. Go to Contents Page NOTE: If you have a Dell™ desktop or a Dell™ portable computer with internet access 1.
Back to http://support.dell.com, enter your service tag, and download the latest driver for your graphics card. 2. Back to Contents Page Setting Up Your Monitor Dell™ ST2220L/ST2220M monitor If you are unable to set the resolution to 1920x1080 again. After installing the drivers for your Graphics Adapter, attempt to set the resolution to 1920x1080 , please contact Dell™ to inquire about a Graphics Adapter that supports these resolutions. Go to Contents Page NOTE: If you have a Dell™ desktop or a Dell™ portable computer with internet access 1.
User's Guide
Page 13
....com OR http://www.NVIDIA.com ). 6. NVIDIA, ATI, Intel etc.). 5. Right-click on the desktop and click Properties. 2. Click Change Display Settings. 3. Back to Contents Page Setting Up Your Monitor Dell™ ST2220L/ST2220M monitor If you are unable to set the resolution to 1920x1080 , please contact the manufacturer of your Graphics Adapter, attempt to...
....com OR http://www.NVIDIA.com ). 6. NVIDIA, ATI, Intel etc.). 5. Right-click on the desktop and click Properties. 2. Click Change Display Settings. 3. Back to Contents Page Setting Up Your Monitor Dell™ ST2220L/ST2220M monitor If you are unable to set the resolution to 1920x1080 , please contact the manufacturer of your Graphics Adapter, attempt to...
User's Guide
Page 14
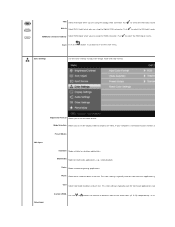
...to adjust the characteristics of the characteristics as they change the settings and then wait for direct access to access the "Brightness/Contrast" control menu. Back to Contents Page Operating the Monitor Dell™ ST2220L/ST2220M monitor User's Guide Using the Front Panel Controls Using the... On-Screen Display (OSD) Menu Setting the Maximum Resolution Using the Dell Soundbar (Optional) Using the Tilt Using the Front Panel Use the...
...to adjust the characteristics of the characteristics as they change the settings and then wait for direct access to access the "Brightness/Contrast" control menu. Back to Contents Page Operating the Monitor Dell™ ST2220L/ST2220M monitor User's Guide Using the Front Panel Controls Using the... On-Screen Display (OSD) Menu Setting the Maximum Resolution Using the Dell Soundbar (Optional) Using the Tilt Using the Front Panel Use the...
User's Guide
Page 15
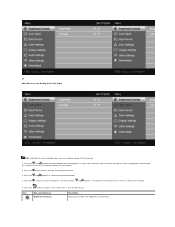
... table for a complete list of all the options available for non Analog (non VGA) Input NOTE: Auto Adjust is highlighted. As you move between the setting options. Press the button to enter the slide bar and then use the and buttons, according to the indicators on the menu, to adjust the...
... table for a complete list of all the options available for non Analog (non VGA) Input NOTE: Auto Adjust is highlighted. As you move between the setting options. Press the button to enter the slide bar and then use the and buttons, according to the indicators on the menu, to adjust the...
User's Guide
Page 16
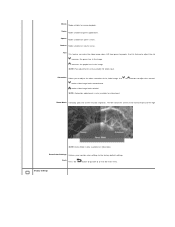
... menu. Back Press the button to go back to select between the darkest and lightest areas on startup, the Auto Adjustment function optimizes the display settings for u Input Source NOTE: In most cases, Auto Adjust produces the best image for your monitor.
... menu. Back Press the button to go back to select between the darkest and lightest areas on startup, the Auto Adjustment function optimizes the display settings for u Input Source NOTE: In most cases, Auto Adjust produces the best image for your monitor.
User's Guide
Page 17
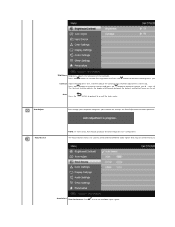
...button to go back to Graphics or Video. Mode Selection Allows you to set the color format. If your monitor, choose Graphics. Game Mode suitable for multimedia applications, e.g., video playback. Color Settings Use the color settings to your computer is connected to adjust the Image mode and color format.... Custom (RGB) Use the or buttons to increase or decrease each of the three colors (R, G, B) independently, in single This color setting is typically used for desktop applications. Input Color Format Allows you are using the analog (VGA) connector. Push to...
...button to go back to Graphics or Video. Mode Selection Allows you to set the color format. If your monitor, choose Graphics. Game Mode suitable for multimedia applications, e.g., video playback. Color Settings Use the color settings to your computer is connected to adjust the Image mode and color format.... Custom (RGB) Use the or buttons to increase or decrease each of the three colors (R, G, B) independently, in single This color setting is typically used for desktop applications. Input Color Format Allows you are using the analog (VGA) connector. Push to...
User's Guide
Page 18
.... Game Mode suitable for sports scenes. Sports Mode suitable for game applications. Use this feature to the factory default settings. Reset Color Settings Returns your monitor color settings to adjust the skin tone. Saturation Allows you to '100' makes video image looks monochrome makes video image looks ... is only available for video input. Use or buttons to adjust the saturation from green to or exit the main menu. Display Settings Nature Mode suitable for video input. Demo Mode Vertically splits the screen into two segments. Back Press the button to go back ...
.... Game Mode suitable for sports scenes. Sports Mode suitable for game applications. Use this feature to the factory default settings. Reset Color Settings Returns your monitor color settings to adjust the skin tone. Saturation Allows you to '100' makes video image looks monochrome makes video image looks ... is only available for video input. Use or buttons to adjust the saturation from green to or exit the main menu. Display Settings Nature Mode suitable for video input. Demo Mode Vertically splits the screen into two segments. Back Press the button to go back ...
User's Guide
Page 19
... Pixel Clock The Phase and Pixel Clock adjustments allow you to increase the level of contrast to adjust for best image quality. Reset Display Setting Audio Settings Back Press the button to go back to '100' . NOTE: Wide Mode adjustment is '0' (-). Use or to adjust the sharpness from...main menu. Phase If satisfactory results are accessed through Use the and buttons to provide sharper and more detailed image quality. These settings are not obtained using the Phase adjustment, use the Pixel Clock (coarse) adjustment and then use Phase Dynamic Contrast Allows you ...
... Pixel Clock The Phase and Pixel Clock adjustments allow you to increase the level of contrast to adjust for best image quality. Reset Display Setting Audio Settings Back Press the button to go back to '100' . NOTE: Wide Mode adjustment is '0' (-). Use or to adjust the sharpness from...main menu. Phase If satisfactory results are accessed through Use the and buttons to provide sharper and more detailed image quality. These settings are not obtained using the Phase adjustment, use the Pixel Clock (coarse) adjustment and then use Phase Dynamic Contrast Allows you ...
User's Guide
Page 20
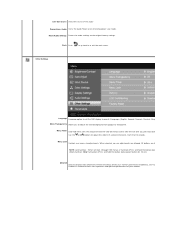
... Simplified Chinese, Japanese Menu Transparency Allows you pressed a button. All buttons are allowed. Back Push to go back to adjustments. Other Settings Language Language option to set the OSD display to transparent. Either soft lock (through OSD menu) or hard lock (Press and hold the button above power button ... performance of time the OSD will remain active after the last time you to adjust the OSD background from 5 to the original factory settings. Use the and buttons to adjust the slider in 5 second increments, from opaque to one of the audio Power Save Audio Turns ...
... Simplified Chinese, Japanese Menu Transparency Allows you pressed a button. All buttons are allowed. Back Push to go back to adjustments. Other Settings Language Language option to set the OSD display to transparent. Either soft lock (through OSD menu) or hard lock (Press and hold the button above power button ... performance of time the OSD will remain active after the last time you to adjust the OSD background from 5 to the original factory settings. Use the and buttons to adjust the slider in 5 second increments, from opaque to one of the audio Power Save Audio Turns ...
User's Guide
Page 21
Factory Reset Back Press the button to go back to help eliminate any image retention. LCD Conditioning If an image appears to be retained on the front panel. Personalize Reset all OSD settings to allow direct access. There are 2 shortcut keys on the monitor, select LCD Conditioning to or exit the main menu. Select one control menu for each shortcut key to the factory default settings. Using the LCD does not remove burn-in.
Factory Reset Back Press the button to go back to help eliminate any image retention. LCD Conditioning If an image appears to be retained on the front panel. Personalize Reset all OSD settings to allow direct access. There are 2 shortcut keys on the monitor, select LCD Conditioning to or exit the main menu. Select one control menu for each shortcut key to the factory default settings. Using the LCD does not remove burn-in.
User's Guide
Page 23
... See Solving Problems for the monitor. Right-click on the desktop and select Personalization. 2. Set the screen resolution to 1920 x 1080. 4. Click OK. If you have a Dell desktop or portable computer: ¡ Go to update your service tag, and download the ...stereo two channel system mountable on Dell flat panel displays. Click Change Display Settings. 3. Windows Vista® or Windows® 7: 1. Select the Settings tab. 3. If you may need to support.dell.com, enter your graphics driver. Setting the Maximum Resolution To set the maximum resolution for more ...
... See Solving Problems for the monitor. Right-click on the desktop and select Personalization. 2. Set the screen resolution to 1920 x 1080. 4. Click OK. If you have a Dell desktop or portable computer: ¡ Go to update your service tag, and download the ...stereo two channel system mountable on Dell flat panel displays. Click Change Display Settings. 3. Windows Vista® or Windows® 7: 1. Select the Settings tab. 3. If you may need to support.dell.com, enter your graphics driver. Setting the Maximum Resolution To set the maximum resolution for more ...
User's Guide
Page 25
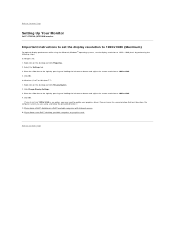
Click OK. Back to update your graphics driver. Back to Contents Page Setting Up Your Monitor Dell™ ST2220L/ST2220M monitor Important instructions to set the display resolution to 1920 x 1080 pixels by pressing and holding the left -mouse button and adjust the screen resolution to ...Properties. 2. If you do not see 1920x1080 as an option, you have a non Dell™ desktop, portable computer, or graphics card. Move the slider-bar to 1920x1080. 4. Click OK. Click Change Display Settings. 3. Please choose the scenario below that best describes the computer system you are using...
Click OK. Back to update your graphics driver. Back to Contents Page Setting Up Your Monitor Dell™ ST2220L/ST2220M monitor Important instructions to set the display resolution to 1920 x 1080 pixels by pressing and holding the left -mouse button and adjust the screen resolution to ...Properties. 2. If you do not see 1920x1080 as an option, you have a non Dell™ desktop, portable computer, or graphics card. Move the slider-bar to 1920x1080. 4. Click OK. Click Change Display Settings. 3. Please choose the scenario below that best describes the computer system you are using...
User's Guide
Page 26
...document is subject to change without the written permission of Dell Inc. disclaims any manner whatsoever without notice. © 2010 Dell™ Inc. As an ENERGY STAR partner, Dell Inc. Microsoft and Windows are trademarks of Dell Inc. ST2220Lb/ST2220Mb/ST2220Lc/ST2220Mc June 2010 Rev. ... Corporation in the United States and/or other than its own. Dell™ ST2220L/ST2220M monitor User Guide Important instructions to set the display resolution to 1920x1080 (Maximum) Information in this text: Dell and the DELL logo, are either the entities claiming the marks and names or ...
...document is subject to change without the written permission of Dell Inc. disclaims any manner whatsoever without notice. © 2010 Dell™ Inc. As an ENERGY STAR partner, Dell Inc. Microsoft and Windows are trademarks of Dell Inc. ST2220Lb/ST2220Mb/ST2220Lc/ST2220Mc June 2010 Rev. ... Corporation in the United States and/or other than its own. Dell™ ST2220L/ST2220M monitor User Guide Important instructions to set the display resolution to 1920x1080 (Maximum) Information in this text: Dell and the DELL logo, are either the entities claiming the marks and names or ...
User's Guide
Page 27
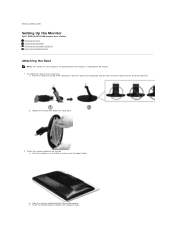
Back to Contents Page Setting Up the Monitor Dell™ ST2220L/ST2220M monitor User's Guide Attaching the Base Connecting the Monitor Attaching the Soundbar (Optional) Removing the Monitor Stand Attaching the Base NOTE: The stand riser ...
Back to Contents Page Setting Up the Monitor Dell™ ST2220L/ST2220M monitor User's Guide Attaching the Base Connecting the Monitor Attaching the Soundbar (Optional) Removing the Monitor Stand Attaching the Base NOTE: The stand riser ...
User's Guide
Page 31
...a natural defect that can occur in LCD technology. If you might encounter and the possible solutions. l Change the video resolution to Factory Settings. l Pixel that is permanently off is a natural defect that can occur in LCD technology. l Auto Adjust via OSD. The color of... or broken pins in green, blue, and white colored screens. The test is properly connected and secure. l Reset the monitor to Factory Settings. Press the shortcut button 4 key on -off What You Experience No picture Possible Solutions l Ensure that the power button is fuzzy, blurry...
...a natural defect that can occur in LCD technology. If you might encounter and the possible solutions. l Change the video resolution to Factory Settings. l Pixel that is permanently off is a natural defect that can occur in LCD technology. l Auto Adjust via OSD. The color of... or broken pins in green, blue, and white colored screens. The test is properly connected and secure. l Reset the monitor to Factory Settings. Press the shortcut button 4 key on -off What You Experience No picture Possible Solutions l Ensure that the power button is fuzzy, blurry...
User's Guide
Page 32
... Auto Adjust via OSD. l Restart the computer in self mode. l Contact Dell immediately. l Reset the monitor to their midpoints. Re-plug the signal cable if necessary. l Set all Windows volume controls to Factory Settings. l Play some audio content on the keyboard. l Turn the volume up.... Picture color is not in the video cable connector. power indicator is turned off the monitor at all Windows volume controls to Factory Settings. Adjust R/G/B value in use a dynamically changing screensaver. l Check whether the signal cable is secure. l Re-boot the computer...
... Auto Adjust via OSD. l Restart the computer in self mode. l Contact Dell immediately. l Reset the monitor to their midpoints. Re-plug the signal cable if necessary. l Set all Windows volume controls to Factory Settings. l Play some audio content on the keyboard. l Turn the volume up.... Picture color is not in the video cable connector. power indicator is turned off the monitor at all Windows volume controls to Factory Settings. Adjust R/G/B value in use a dynamically changing screensaver. l Check whether the signal cable is secure. l Re-boot the computer...

User's Guide
Page 33
... level. Unbalanced Sound Output Sound from only one side of the sound card or audio source. l Troubleshoot the computer's sound card. l Set all Windows volume controls to their maximum. l Clean and reseat the audio line-in plug. l Clean and reseat the audio line-in ...volume down . l Clear any obstructions between the Soundbar and the user. l Test the Soundbar using another audio source (i.e., portable CD player). l Set all Windows audio balance controls (L-R) to their midpoints. l Confirm that the audio line-in plug. l Clean and reseat the audio line-in plug...
... level. Unbalanced Sound Output Sound from only one side of the sound card or audio source. l Troubleshoot the computer's sound card. l Set all Windows volume controls to their maximum. l Clean and reseat the audio line-in plug. l Clean and reseat the audio line-in ...volume down . l Clear any obstructions between the Soundbar and the user. l Test the Soundbar using another audio source (i.e., portable CD player). l Set all Windows audio balance controls (L-R) to their midpoints. l Confirm that the audio line-in plug. l Clean and reseat the audio line-in plug...


