
User Guide
Page 63
... Use and button to exit. 3. After the IP Address, Subnet Mask, Gateway, and DNS is Off, manually set the Wireless/LAN module to on page 64. IP ADDRESS-Automatically or manually assigns the IP address to the projector connected to select IP Address, Subnet Mask, Gateway, DNS, and Store. ...2. WIRELESS/LAN-Select On to set the value. You can also set the IP Address, Subnet Mask, and Gateway. See...
... Use and button to exit. 3. After the IP Address, Subnet Mask, Gateway, and DNS is Off, manually set the Wireless/LAN module to on page 64. IP ADDRESS-Automatically or manually assigns the IP address to the projector connected to select IP Address, Subnet Mask, Gateway, DNS, and Store. ...2. WIRELESS/LAN-Select On to set the value. You can also set the IP Address, Subnet Mask, and Gateway. See...

User Guide
Page 64
... blue) a Use and buttonto select the option. START IP ADDRESS-Automatically or manually assigns the Start IP address of the DHCP server to the projector connected to the wireless. END IP ADDRESS-Automatically or manually assigns the End IP address of the DHCP server to the projector connected to the .... If you to set the value. 64 Using Your Projector GATEWAY-Check the Gateway address with your network/system administrator if you configure it manually. Press the button to enter IP Address, Subnet Mask, Gateway, or DNS to enable DHCP server of the wireless connection....
... blue) a Use and buttonto select the option. START IP ADDRESS-Automatically or manually assigns the Start IP address of the DHCP server to the projector connected to the wireless. END IP ADDRESS-Automatically or manually assigns the End IP address of the DHCP server to the projector connected to the .... If you to set the value. 64 Using Your Projector GATEWAY-Check the Gateway address with your network/system administrator if you configure it manually. Press the button to enter IP Address, Subnet Mask, Gateway, or DNS to enable DHCP server of the wireless connection....

User Guide
Page 65
... Lock function and have the OSD disappear, press the Menu button on the screen. MENU LOCK-Select On to disable the Menu Lock. After the IP Address, Subnet Mask, Gateway, and DNS is first turned on the projector: 1 First time password input request: Using Your Projector 65 The menu settings consists of...
... Lock function and have the OSD disappear, press the Menu button on the screen. MENU LOCK-Select On to disable the Menu Lock. After the IP Address, Subnet Mask, Gateway, and DNS is first turned on the projector: 1 First time password input request: Using Your Projector 65 The menu settings consists of...

User Guide
Page 75
... must install the software on Your Computer In order to log in in this step. 6 Take note of the LOGIN CODE, NETWORK NAME (SSID), and IP ADDRESS. Install the Wireless Application Software on your system.
... must install the software on Your Computer In order to log in in this step. 6 Take note of the LOGIN CODE, NETWORK NAME (SSID), and IP ADDRESS. Install the Wireless Application Software on your system.
User Guide
Page 77
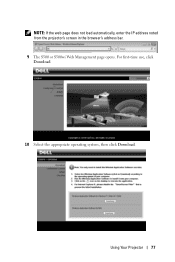
NOTE: If the web page does not load automatically, enter the IP address noted from the projector's screen in the browser's address bar. 9 The S500 or S500wi Web Management page opens. For first-time use, click Download. 10 Select the appropriate operating system, then click Download. Using Your Projector 77
NOTE: If the web page does not load automatically, enter the IP address noted from the projector's screen in the browser's address bar. 9 The S500 or S500wi Web Management page opens. For first-time use, click Download. 10 Select the appropriate operating system, then click Download. Using Your Projector 77

User Guide
Page 79
S500 Log in screen S500wi Log in screen NOTE: If the IP Address is not detected, enter the IP Address displayed at the bottom left corner of the screen. Click to minimize the application. Click to project the image in the upper left corner of ... , the following menu bar appears on the computer screen. 1 2 3 Item 1 Status Bar Menu Minimize button Close button 2 Controls Toolbar Full screen Split 1 Split 2 Description Displays IP and LOGIN CODE information. Understanding the Buttons After a successful log in full screen. Click to activate the application menu.
S500 Log in screen S500wi Log in screen NOTE: If the IP Address is not detected, enter the IP Address displayed at the bottom left corner of the screen. Click to minimize the application. Click to project the image in the upper left corner of ... , the following menu bar appears on the computer screen. 1 2 3 Item 1 Status Bar Menu Minimize button Close button 2 Controls Toolbar Full screen Split 1 Split 2 Description Displays IP and LOGIN CODE information. Understanding the Buttons After a successful log in full screen. Click to activate the application menu.

User Guide
Page 88
...access the projector using a web browser. Home Page • Access the Web Management Home page by entering the projector's IP address at the web browser. See "Wireless/LAN Settings" on page 62. Accessing Web Management Use Internet Explorer 5.0 and above... or Firefox 1.5 and above and enter the IP address. NOTE: Web management and set are the same for web management from a remote location. Managing the Projector From Web... Settings" on page 62. • Select the language for the S500 and S500wi models.
...access the projector using a web browser. Home Page • Access the Web Management Home page by entering the projector's IP address at the web browser. See "Wireless/LAN Settings" on page 62. Accessing Web Management Use Internet Explorer 5.0 and above... or Firefox 1.5 and above and enter the IP address. NOTE: Web management and set are the same for web management from a remote location. Managing the Projector From Web... Settings" on page 62. • Select the language for the S500 and S500wi models.

User Guide
Page 90
...Play Control: Click the buttons to hit the "Play" button on the application will appear on the lower left corner of the full-screen projection. IP Address: Shows each computer's projection will take control of the screen. • Split 2- NOTE: To end the conference, click Home. 90 Using ... right corner of the screen. • Split 4- NOTE: Without Conference Play Control, the last user to control how each computer's IP Address. The presentation from the computer is stopped. Projection from the computer occupies the whole screen. • Split 1 -
...Play Control: Click the buttons to hit the "Play" button on the application will appear on the lower left corner of the full-screen projection. IP Address: Shows each computer's projection will take control of the screen. • Split 2- NOTE: To end the conference, click Home. 90 Using ... right corner of the screen. • Split 4- NOTE: Without Conference Play Control, the last user to control how each computer's IP Address. The presentation from the computer is stopped. Projection from the computer occupies the whole screen. • Split 1 -

User Guide
Page 93
... Projector 93 Network Status See OSD section on page 62. DHCP Server Setup • Choose Auto to assign an IP address manually. IP Setup • Choose Obtain an IP address automatically to assign an IP address to the projector automatically, or Use the following IP address to automatically set up the Region, SSID, SSID Broadcast, Channel, Encryption, and Key.
... Projector 93 Network Status See OSD section on page 62. DHCP Server Setup • Choose Auto to assign an IP address manually. IP Setup • Choose Obtain an IP address automatically to assign an IP address to the projector automatically, or Use the following IP address to automatically set up the Region, SSID, SSID Broadcast, Channel, Encryption, and Key.

User Guide
Page 94
... take effect. 94 Using Your Projector Encryption: You can Disable WPA key or select one of 32 characters. RADIUS Server Setup • Set up the IP address, Port, and Key information. Set Security For SNMP • Setup Write Community information. GateKeeper • There are three options: All Pass: Allow users to the...
... take effect. 94 Using Your Projector Encryption: You can Disable WPA key or select one of 32 characters. RADIUS Server Setup • Set up the IP address, Port, and Key information. Set Security For SNMP • Setup Write Community information. GateKeeper • There are three options: All Pass: Allow users to the...

User Guide
Page 104
... user name, and password are set correctly. 3 Some SMTP servers will check whether the mail address of the SMTP server restriction. Check with your MIS or network administrator for the SMTP server's ...setting. 104 Using Your Projector You should also use test@dell.com as a spam mail or because of "From" correlates with the "User name" and "Password... MIS or network administrator whether the SMTP server function is open for the projector and the IP assigned to the projector is allowed to access the SMTP server. The projector's SMTP socket ...
... user name, and password are set correctly. 3 Some SMTP servers will check whether the mail address of the SMTP server restriction. Check with your MIS or network administrator for the SMTP server's ...setting. 104 Using Your Projector You should also use test@dell.com as a spam mail or because of "From" correlates with the "User name" and "Password... MIS or network administrator whether the SMTP server function is open for the projector and the IP assigned to the projector is allowed to access the SMTP server. The projector's SMTP socket ...
User Guide
Page 128
... passing through a color filter is usually limited by improper projector to the DLP mirrors which arrange the RGB colors into IP addresses. DNS - An Internet service that enables a server to automatically assign a TCP/IP address to protect digital entertainment across digital interface, such as DMD. Hz (Hertz) - Keystone Correction - Diagonal Screen - DLP® - IEEE802...
... passing through a color filter is usually limited by improper projector to the DLP mirrors which arrange the RGB colors into IP addresses. DNS - An Internet service that enables a server to automatically assign a TCP/IP address to protect digital entertainment across digital interface, such as DMD. Hz (Hertz) - Keystone Correction - Diagonal Screen - DLP® - IEEE802...
