User Guide
Page 4
low battery 40 OSD warning messages - out of range 40 Combinations of buttons 40 Using the Wrist Strap (for S500wi only 42 Installing the Remote Control Batteries 43 Charging the Interactive Pen Battery (for S500wi only 39 OSD warning messages - Professional Installation Options: Installation for Driving Automatic Screen 25 Connection With Commercial RS232 Control...
low battery 40 OSD warning messages - out of range 40 Combinations of buttons 40 Using the Wrist Strap (for S500wi only 42 Installing the Remote Control Batteries 43 Charging the Interactive Pen Battery (for S500wi only 39 OSD warning messages - Professional Installation Options: Installation for Driving Automatic Screen 25 Connection With Commercial RS232 Control...
User Guide
Page 5
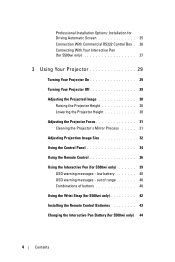
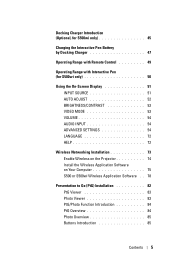
... 45 Charging the Interactive Pen Battery by Docking Charger 47 Operating Range with Remote Control 49 Operating Range with Interactive Pen (for S500wi only 50 Using the On-Screen Display 51 INPUT SOURCE 51 AUTO ADJUST 52 BRIGHTNESS/CONTRAST 53 VIDEO MODE 53 VOLUME 54...LANGUAGE 72 HELP 72 Wireless Networking Installation 73 Enable Wireless on the Projector 74 Install the Wireless Application Software on Your Computer 75 S500 or S500wi Wireless Application Software . . 78 Presentation to Go (PtG) Installation 82 PtG Viewer 83 Photo Viewer 83 PtG/Photo Function Introduction 84 ...
... 45 Charging the Interactive Pen Battery by Docking Charger 47 Operating Range with Remote Control 49 Operating Range with Interactive Pen (for S500wi only 50 Using the On-Screen Display 51 INPUT SOURCE 51 AUTO ADJUST 52 BRIGHTNESS/CONTRAST 53 VIDEO MODE 53 VOLUME 54...LANGUAGE 72 HELP 72 Wireless Networking Installation 73 Enable Wireless on the Projector 74 Install the Wireless Application Software on Your Computer 75 S500 or S500wi Wireless Application Software . . 78 Presentation to Go (PtG) Installation 82 PtG Viewer 83 Photo Viewer 83 PtG/Photo Function Introduction 84 ...
User Guide
Page 7
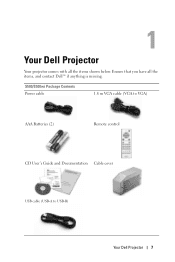
Ensure that you have all the items shown below. S500/S500wi Package Contents Power cable 1.8 m VGA cable (VGA to VGA) AAA Batteries (2) Remote control CD User's Guide and Documentation Cable cover USB cable (USB-A to USB-B) Your Dell Projector 7 1 Your Dell Projector Your projector comes with all the items, and contact Dell™ if anything is missing.
Ensure that you have all the items shown below. S500/S500wi Package Contents Power cable 1.8 m VGA cable (VGA to VGA) AAA Batteries (2) Remote control CD User's Guide and Documentation Cable cover USB cable (USB-A to USB-B) Your Dell Projector 7 1 Your Dell Projector Your projector comes with all the items, and contact Dell™ if anything is missing.
User Guide
Page 12
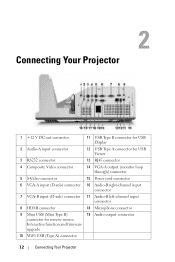
...-A input connector 3 RS232 connector 4 Composite Video connector 5 S-Video connector 6 VGA-A input (D-sub) connector 7 VGA-B input (D-sub) connector 8 HDMI connector 9 Mini USB (Mini Type B) connector for remote mouse, Interactive function and firmware upgrade 10 WiFi USB (Type A) connector 11 USB Type B connector for USB Display 12 USB Type A connector for USB Viewer...
...-A input connector 3 RS232 connector 4 Composite Video connector 5 S-Video connector 6 VGA-A input (D-sub) connector 7 VGA-B input (D-sub) connector 8 HDMI connector 9 Mini USB (Mini Type B) connector for remote mouse, Interactive function and firmware upgrade 10 WiFi USB (Type A) connector 11 USB Type B connector for USB Display 12 USB Type A connector for USB Viewer...
User Guide
Page 15
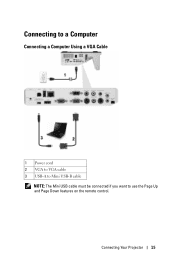
Connecting to a Computer Connecting a Computer Using a VGA Cable 1 Power cord 2 VGA to VGA cable 3 USB-A to Mini USB-B cable NOTE: The Mini USB cable must be connected if you want to use the Page Up and Page Down features on the remote control. Connecting Your Projector 15
Connecting to a Computer Connecting a Computer Using a VGA Cable 1 Power cord 2 VGA to VGA cable 3 USB-A to Mini USB-B cable NOTE: The Mini USB cable must be connected if you want to use the Page Up and Page Down features on the remote control. Connecting Your Projector 15
User Guide
Page 17
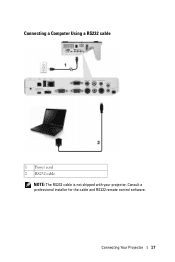
Consult a professional installer for the cable and RS232 remote control software. Connecting Your Projector 17 Connecting a Computer Using a RS232 cable 1 Power cord 2 RS232 cable NOTE: The RS232 cable is not shipped with your projector.
Consult a professional installer for the cable and RS232 remote control software. Connecting Your Projector 17 Connecting a Computer Using a RS232 cable 1 Power cord 2 RS232 cable NOTE: The RS232 cable is not shipped with your projector.
User Guide
Page 29
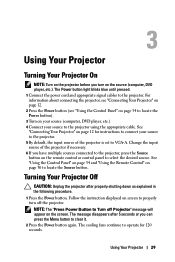
...will appear on screen to properly turn on the source (computer, DVD player, etc.). See "Using the Control Panel" on page 34 and "Using the Remote Control" on your source (computer, DVD player, etc.) 4 Connect your source to the projector. 5 By default, the input source of the projector if...have multiple sources connected to the projector, press the Source button on page 12 for 120 seconds. See "Connecting Your Projector" on the remote control or control panel to select the desired source. Change the input source of the projector is set to VGA-A. Follow the instruction displayed ...
...will appear on screen to properly turn on the source (computer, DVD player, etc.). See "Using the Control Panel" on page 34 and "Using the Remote Control" on your source (computer, DVD player, etc.) 4 Connect your source to the projector. 5 By default, the input source of the projector if...have multiple sources connected to the projector, press the Source button on page 12 for 120 seconds. See "Connecting Your Projector" on the remote control or control panel to select the desired source. Change the input source of the projector is set to VGA-A. Follow the instruction displayed ...

User Guide
Page 34
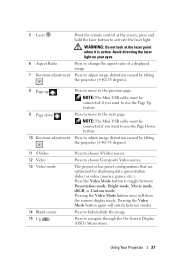
... when multiple sources are connected to the projector. 5 Menu Press to the input source. Using the Control Panel 12 34 10 5 9 8 7 6 1 IR Receiver Point the remote control towards the IR receiver and press a button. 2 Left / Auto Adjust Press to navigate through the On-Screen Display (OSD) Menu items. Press to synchronize...
... when multiple sources are connected to the projector. 5 Menu Press to the input source. Using the Control Panel 12 34 10 5 9 8 7 6 1 IR Receiver Point the remote control towards the IR receiver and press a button. 2 Left / Auto Adjust Press to navigate through the On-Screen Display (OSD) Menu items. Press to synchronize...

User Guide
Page 36
Press to navigate through the On-Screen Display (OSD) Menu items. Press to confirm the selection. Press to navigate through the On-Screen Display (OSD) Menu items. 36 Using Your Projector Using the Remote Control 1 15 2 16 3 4 17 5 18 6 19 7 21 8 20 9 22 10 23 11 24 12 25 13 26 14 1 Power 2 Enter 3 Right 4 Down Turns the projector on page 29. For more information, see "Turning Your Projector On" on page 29 and "Turning Your Projector Off" on or off.
Press to navigate through the On-Screen Display (OSD) Menu items. Press to confirm the selection. Press to navigate through the On-Screen Display (OSD) Menu items. 36 Using Your Projector Using the Remote Control 1 15 2 16 3 4 17 5 18 6 19 7 21 8 20 9 22 10 23 11 24 12 25 13 26 14 1 Power 2 Enter 3 Right 4 Down Turns the projector on page 29. For more information, see "Turning Your Projector On" on page 29 and "Turning Your Projector Off" on or off.
User Guide
Page 37
... Mode button once will switch between Presentation mode, Bright mode, Movie mode, sRGB, or Custom mode. Press to choose Composite Video source. 5 Laser Point the remote control at the laser point when it is active. The projector has preset configurations that are optimized for displaying data (presentation slides) or video (movies...
... Mode button once will switch between Presentation mode, Bright mode, Movie mode, sRGB, or Custom mode. Press to choose Composite Video source. 5 Laser Point the remote control at the laser point when it is active. The projector has preset configurations that are optimized for displaying data (presentation slides) or video (movies...

User Guide
Page 43
Installing the Remote Control Batteries NOTE: Remove the batteries from the remote control when not in use. 1 Press the tab to lift the battery compartment cover. 1 2 Check the polarity (+/-) marking on the batteries. 2 3 Insert the batteries and align their polarity correctly 3 according to the marking in the battery compartment. NOTE: Avoid mixing different types of batteries or using new and old batteries together. 4 Slip the battery cover back. 4 Using Your Projector 43
Installing the Remote Control Batteries NOTE: Remove the batteries from the remote control when not in use. 1 Press the tab to lift the battery compartment cover. 1 2 Check the polarity (+/-) marking on the batteries. 2 3 Insert the batteries and align their polarity correctly 3 according to the marking in the battery compartment. NOTE: Avoid mixing different types of batteries or using new and old batteries together. 4 Slip the battery cover back. 4 Using Your Projector 43

User Guide
Page 49
Using Your Projector 49 Weak batteries will also prevent the remote control from the diagram. Operating Range with Remote Control Operating range Angle ±20° Distance 7 m/22.97 feet Distance Angle Distance Angle NOTE: Actual operating range may slightly differ from properly operating the projector.
Using Your Projector 49 Weak batteries will also prevent the remote control from the diagram. Operating Range with Remote Control Operating range Angle ±20° Distance 7 m/22.97 feet Distance Angle Distance Angle NOTE: Actual operating range may slightly differ from properly operating the projector.
User Guide
Page 51
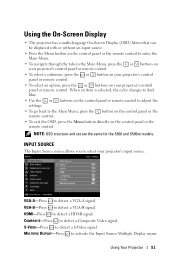
... menu. INPUT SOURCE The Input Source menu allows you to select your projector's control panel or remote control. VGA-A-Press to detect a VGA-B signal. NOTE: OSD structure and set are the same for the S500 and S500wi models. Using Your Projector 51 VGA-B-Press to detect a VGA-A signal. Using the On-Screen...
... menu. INPUT SOURCE The Input Source menu allows you to select your projector's control panel or remote control. VGA-A-Press to detect a VGA-B signal. NOTE: OSD structure and set are the same for the S500 and S500wi models. Using Your Projector 51 VGA-B-Press to detect a VGA-A signal. Using the On-Screen...

User Guide
Page 57
If you to change the display data clock frequency to correct it. This is a coarse adjustment. Select Origin to maintain the aspect ratio of your remote control only. The input source scales to the input source. •16:9 - Adjust the image scale by pressing or and press to navigate the projection ...
If you to change the display data clock frequency to correct it. This is a coarse adjustment. Select Origin to maintain the aspect ratio of your remote control only. The input source scales to the input source. •16:9 - Adjust the image scale by pressing or and press to navigate the projection ...
User Guide
Page 59
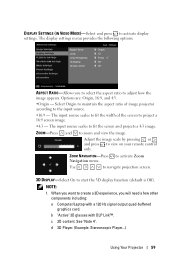
.... •4:3 - Adjust the image scale by pressing or and press to zoom and view the image. See "Note 4". ZOOM-Press and to view on your remote control only. When you want to the input source. •16:9 - DISPLAY SETTINGS (IN VIDEO MODE)-Select and press to start the 3D display function...
.... •4:3 - Adjust the image scale by pressing or and press to zoom and view the image. See "Note 4". ZOOM-Press and to view on your remote control only. When you want to the input source. •16:9 - DISPLAY SETTINGS (IN VIDEO MODE)-Select and press to start the 3D display function...

User Guide
Page 65
... and have the OSD disappear, press the Menu button on the screen. The menu settings consists of the OSD menu on the control panel or remote control for an OSD timeout. If you want to disable the Menu Lock. After the IP Address, Subnet Mask, Gateway, and DNS is enabled, a Password...
... and have the OSD disappear, press the Menu button on the screen. The menu settings consists of the OSD menu on the control panel or remote control for an OSD timeout. If you want to disable the Menu Lock. After the IP Address, Subnet Mask, Gateway, and DNS is enabled, a Password...

User Guide
Page 74
... SOURCE menu, select Multuple Display and then select Wireless Display on the sub-menu. See "Wireless/LAN Settings (in S500). NOTE: Wireless dongle embedded for S500wi. 2 Connect the power cable to select. 4 The wireless connection default is enable. See "INPUT SOURCE MULTIPLE DISPLAY" on page 13. Enable Wireless on the Projector...
... SOURCE menu, select Multuple Display and then select Wireless Display on the sub-menu. See "Wireless/LAN Settings (in S500). NOTE: Wireless dongle embedded for S500wi. 2 Connect the power cable to select. 4 The wireless connection default is enable. See "INPUT SOURCE MULTIPLE DISPLAY" on page 13. Enable Wireless on the Projector...

User Guide
Page 85
... NOTE: If you enter the OSD menu while using PtG, PtG navigation by the up , down , and left buttons to navigate and control panel or remote control to select. Photo Overview NOTE: Supports 14 languages of photo files name format (Languages: English, Dutch, French, German, Italian, Japanese, Korean, Polish, Portuguese, Russian...
... NOTE: If you enter the OSD menu while using PtG, PtG navigation by the up , down , and left buttons to navigate and control panel or remote control to select. Photo Overview NOTE: Supports 14 languages of photo files name format (Languages: English, Dutch, French, German, Italian, Japanese, Korean, Polish, Portuguese, Russian...

User Guide
Page 88
... the projector using a web browser. NOTE: Web management and set are the same for web management from a remote location. See "Wireless/LAN Settings" on page 62. • Select the language for the S500 and S500wi models. Accessing Web Management Use Internet Explorer 5.0 and above or Firefox 1.5 and above and enter the IP...
... the projector using a web browser. NOTE: Web management and set are the same for web management from a remote location. See "Wireless/LAN Settings" on page 62. • Select the language for the S500 and S500wi models. Accessing Web Management Use Internet Explorer 5.0 and above or Firefox 1.5 and above and enter the IP...

User Guide
Page 103
... tab Temporary Internet Files Settings Select Every visit to the pages. 2 Some firewall or anti-virus may block the HTTP application. FAQS: I would like to remotely access the projector via the Internet. I open for the browser? What which the projector uses. Using Your Projector 103 If possible, turn off the firewall... or anti-virus. What is in the firewall? socket port number should I would like to remotely access The following are the TCP/IP socket ports the projector via Internet.
... tab Temporary Internet Files Settings Select Every visit to the pages. 2 Some firewall or anti-virus may block the HTTP application. FAQS: I would like to remotely access the projector via the Internet. I open for the browser? What which the projector uses. Using Your Projector 103 If possible, turn off the firewall... or anti-virus. What is in the firewall? socket port number should I would like to remotely access The following are the TCP/IP socket ports the projector via Internet.


