
Monitor Users Guide
Page 3
... instructions 6 About your monitor 7 Package contents 7 Product features 8 Identifying parts and controls 9 Front view 9 Side View 10 Back view 10 Bottom view 11 Resolution specifications 15 Supported video modes 15 Preset display modes 15 Electrical specifications 17 Physical characteristics 18 Environmental characteristics 19 Pin assignments 20 Plug and play capability 21 Universal Serial Bus (USB) interface 21 SuperSpeed USB 5 Gbps (USB3.2 Gen 1 21 USB Type-C 21 USB Type-C connector 22 USB 3.2 Gen 1 (5 Gbps) downstream connector...
... instructions 6 About your monitor 7 Package contents 7 Product features 8 Identifying parts and controls 9 Front view 9 Side View 10 Back view 10 Bottom view 11 Resolution specifications 15 Supported video modes 15 Preset display modes 15 Electrical specifications 17 Physical characteristics 18 Environmental characteristics 19 Pin assignments 20 Plug and play capability 21 Universal Serial Bus (USB) interface 21 SuperSpeed USB 5 Gbps (USB3.2 Gen 1 21 USB Type-C 21 USB Type-C connector 22 USB 3.2 Gen 1 (5 Gbps) downstream connector...

Monitor Users Guide
Page 4
... Connecting the USB Type-C and power cables 31 Connecting the HDMI and power cables (optional 32 Organizing your cables 32 Turning on your monitor 32 Securing your monitor using Kensington lock (optional). 33 Removing the monitor stand 34 VESA wall mounting (optional 34 Operating the monitor 36 Turning on the monitor 36 Using the front-panel controls 36 Front-panel button 37 Using the On-Screen Display (OSD) menu 38 Accessing the menu system 38 OSD warning message 51 Setting the maximum resolution 55 Using the tilt, swivel, and vertical...
... Connecting the USB Type-C and power cables 31 Connecting the HDMI and power cables (optional 32 Organizing your cables 32 Turning on your monitor 32 Securing your monitor using Kensington lock (optional). 33 Removing the monitor stand 34 VESA wall mounting (optional 34 Operating the monitor 36 Turning on the monitor 36 Using the front-panel controls 36 Front-panel button 37 Using the On-Screen Display (OSD) menu 38 Accessing the menu system 38 OSD warning message 51 Setting the maximum resolution 55 Using the tilt, swivel, and vertical...
Monitor Users Guide
Page 8
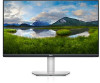
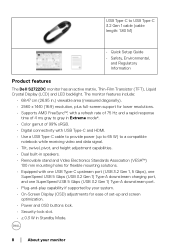
... port. • Plug-and-play capability if supported by your system. • On-Screen Display (OSD) adjustments for lower resolutions. • Supports AMD FreeSync™, with a refresh rate of 75 Hz and a rapid response time of 4 ms gray to gray in Extreme mode*. • Color gamut of 99% sRGB. • Digital connectivity with USB Type-C and HDMI. • Use a USB Type-C cable to provide power (up and screen optimization. • Power and OSD buttons lock. • Security-lock...
... port. • Plug-and-play capability if supported by your system. • On-Screen Display (OSD) adjustments for lower resolutions. • Supports AMD FreeSync™, with a refresh rate of 75 Hz and a rapid response time of 4 ms gray to gray in Extreme mode*. • Color gamut of 99% sRGB. • Digital connectivity with USB Type-C and HDMI. • Use a USB Type-C cable to provide power (up and screen optimization. • Power and OSD buttons lock. • Security-lock...

Monitor Users Guide
Page 9
..., digital eye strain, and so on or off. About your monitor │ 9 Identifying parts and controls Front view Label Description 1 Function buttons 2 Power On/Off button (with a flicker-free screen and ComfortView feature which minimizes blue light emission. • Optimize eye comfort with LED indicator) Use For more information, see Operating the monitor. However, this may cause damage to -gray mode is right for them. To turn the monitor on...
..., digital eye strain, and so on or off. About your monitor │ 9 Identifying parts and controls Front view Label Description 1 Function buttons 2 Power On/Off button (with a flicker-free screen and ComfortView feature which minimizes blue light emission. • Optimize eye comfort with LED indicator) Use For more information, see Operating the monitor. However, this may cause damage to -gray mode is right for them. To turn the monitor on...

Monitor Users Guide
Page 12
... a maximum resolution of Windows prior to Windows 10. 6 Line-out port Connect your monitor to the computer. NOTE: To use a USB Type-C to USB Type-A cable (sold separately) to connect the monitor to your computer. 12 │ About your USB device. NOTE: If your computer does not have a USB Type-C port, use this port, you must connect the downstream port with USB Type-C cable that came with port your speakers. This port supports USB Power Delivery, Data...
... a maximum resolution of Windows prior to Windows 10. 6 Line-out port Connect your monitor to the computer. NOTE: To use a USB Type-C to USB Type-A cable (sold separately) to connect the monitor to your computer. 12 │ About your USB device. NOTE: If your computer does not have a USB Type-C port, use this port, you must connect the downstream port with USB Type-C cable that came with port your speakers. This port supports USB Power Delivery, Data...
Monitor Users Guide
Page 13
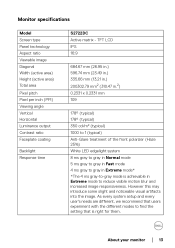
About your monitor │ 13 Monitor specifications Model Screen type Panel technology Aspect ratio Viewable image Diagonal Width (active area) Height (active area) Total area Pixel pitch Pixel per inch (PPI) Viewing angle Vertical Horizontal Luminance output Contrast ratio Faceplate coating Backlight Response time S2722DC Active matrix - As every system setup and every user's needs are different, we recommend that is achievable in Extreme mode* *The 4 ms gray-to-gray mode is right...
About your monitor │ 13 Monitor specifications Model Screen type Panel technology Aspect ratio Viewable image Diagonal Width (active area) Height (active area) Total area Pixel pitch Pixel per inch (PPI) Viewing angle Vertical Horizontal Luminance output Contrast ratio Faceplate coating Backlight Response time S2722DC Active matrix - As every system setup and every user's needs are different, we recommend that is achievable in Extreme mode* *The 4 ms gray-to-gray mode is right...
Monitor Users Guide
Page 34
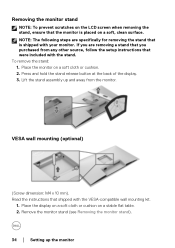
... the display. 3. Removing the monitor stand NOTE: To prevent scratches on the LCD screen when removing the stand, ensure that were included with the stand. Place the monitor on a stable flat table. 2. Read the instructions that is placed on a soft, clean surface. Remove the monitor stand (see Removing the monitor stand). 34 │ Setting up and away from any other source, follow the setup instructions that the monitor is shipped with the VESA-compatible wall mounting kit. 1. VESA wall mounting (optional) (Screw...
... the display. 3. Removing the monitor stand NOTE: To prevent scratches on the LCD screen when removing the stand, ensure that were included with the stand. Place the monitor on a stable flat table. 2. Read the instructions that is placed on a soft, clean surface. Remove the monitor stand (see Removing the monitor stand). 34 │ Setting up and away from any other source, follow the setup instructions that the monitor is shipped with the VESA-compatible wall mounting kit. 1. VESA wall mounting (optional) (Screw...

Monitor Users Guide
Page 40
... different video signals that may be connected to confirm the selection. USB-C Select the USB-C input when you are using the HDMI connector. Press the button to the factory Source settings. 40 │ Operating the monitor HDMI 1 Select the HDMI 1 or HDMI 2 input when you are HDMI 2 using the USB Type-C connector. Reset Input Resets your monitor. Auto Select Automatically scans for you to set Auto Select for USB-C to: • Prompt for Multiple Inputs: Always displays the "Switch to USB-C video input when the USB Type-C cable...
... different video signals that may be connected to confirm the selection. USB-C Select the USB-C input when you are using the HDMI connector. Press the button to the factory Source settings. 40 │ Operating the monitor HDMI 1 Select the HDMI 1 or HDMI 2 input when you are HDMI 2 using the USB Type-C connector. Reset Input Resets your monitor. Auto Select Automatically scans for you to set Auto Select for USB-C to: • Prompt for Multiple Inputs: Always displays the "Switch to USB-C video input when the USB Type-C cable...
Monitor Users Guide
Page 42
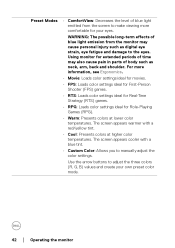
Use the arrow buttons to manually adjust the color settings. Preset Modes • ComfortView: Decreases the level of blue light emitted from the monitor may also cause pain in parts of body such as digital eye strain, eye fatigue and damage to make viewing more information, see Ergonomics. • Movie: Loads color settings ideal for movies. • FPS: Loads color settings ideal for First-Person Shooter (FPS) games. •...
Use the arrow buttons to manually adjust the color settings. Preset Modes • ComfortView: Decreases the level of blue light emitted from the monitor may also cause pain in parts of body such as digital eye strain, eye fatigue and damage to make viewing more information, see Ergonomics. • Movie: Loads color settings ideal for movies. • FPS: Loads color settings ideal for First-Person Shooter (FPS) games. •...

Monitor Users Guide
Page 43
... color of the video image. Hue Saturation Reset Color This feature can adjust the color saturation of the video image to the factory settings. NOTE: Hue adjustment is connected to a computer or a media player that supports RGB output. • YCbCr: Select this option if your media player supports only YCbCr output. Operating the monitor │ 43 Resets your monitor's color settings to green or purple. Input Color Format Allows you to set the video input mode to: • RGB...
... color of the video image. Hue Saturation Reset Color This feature can adjust the color saturation of the video image to the factory settings. NOTE: Hue adjustment is connected to a computer or a media player that supports RGB output. • YCbCr: Select this option if your media player supports only YCbCr output. Operating the monitor │ 43 Resets your monitor's color settings to green or purple. Input Color Format Allows you to set the video input mode to: • RGB...

Monitor Users Guide
Page 47
... OSD settings to set the lock options. Operating the monitor │ 47 NOTE: To unlock the button(s), press and hold the Menu/ function button next to the Power button for 4 seconds to the factory preset values. It also prevents accidental activation in multiple monitors side-by the user. Reset Menu • Menu Buttons: All Menu/function buttons (except the Power button) are locked and not accessible by the user. • Power Button: Only the Power button is Disable. The default setting...
... OSD settings to set the lock options. Operating the monitor │ 47 NOTE: To unlock the button(s), press and hold the Menu/ function button next to the Power button for 4 seconds to the factory preset values. It also prevents accidental activation in multiple monitors side-by the user. Reset Menu • Menu Buttons: All Menu/function buttons (except the Power button) are locked and not accessible by the user. • Power Button: Only the Power button is Disable. The default setting...
Monitor Users Guide
Page 50
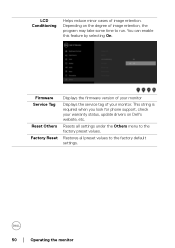
... required when you look for phone support, check your monitor. LCD Conditioning Helps reduce minor cases of image retention, the program may take some time to run. Resets all preset values to the factory default settings. 50 │ Operating the monitor Depending on Dell's website, etc. Firmware Service Tag Reset Others Factory Reset Displays the firmware version of your monitor Displays the service tag of your warranty status, update drivers on the degree of...
... required when you look for phone support, check your monitor. LCD Conditioning Helps reduce minor cases of image retention, the program may take some time to run. Resets all preset values to the factory default settings. 50 │ Operating the monitor Depending on Dell's website, etc. Firmware Service Tag Reset Others Factory Reset Displays the firmware version of your monitor Displays the service tag of your warranty status, update drivers on the degree of...
Monitor Users Guide
Page 55
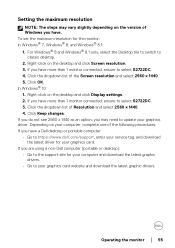
...://www.dell.com/support, enter your service tag, and download the latest driver for the monitor: In Windows® 7, Windows® 8, and Windows® 8.1: 1. For Windows® 8 and Windows® 8.1 only, select the Desktop tile to switch to classic desktop. 2. In Windows® 10: 1. If you have more than 1 monitor connected, ensure to select S2722DC. 3. Setting the maximum resolution NOTE: The steps may need to update your graphics card website and download...
...://www.dell.com/support, enter your service tag, and download the latest driver for the monitor: In Windows® 7, Windows® 8, and Windows® 8.1: 1. For Windows® 8 and Windows® 8.1 only, select the Desktop tile to switch to classic desktop. 2. In Windows® 10: 1. If you have more than 1 monitor connected, ensure to select S2722DC. 3. Setting the maximum resolution NOTE: The steps may need to update your graphics card website and download...

Monitor Users Guide
Page 60
.... 3. While in this section, follow the Safety instructions. Turn Off both your computer and the monitor. 2. This box also appears during normal system operation, if the video cable becomes disconnected or damaged. 5. Turn On the monitor. The floating dialog box should appear on the connected input signal. 4. Troubleshooting WARNING: Before you begin any of the procedures in self-test mode, the power LED remains white.
.... 3. While in this section, follow the Safety instructions. Turn Off both your computer and the monitor. 2. This box also appears during normal system operation, if the video cable becomes disconnected or damaged. 5. Turn On the monitor. The floating dialog box should appear on the connected input signal. 4. Troubleshooting WARNING: Before you begin any of the procedures in self-test mode, the power LED remains white.

Monitor Users Guide
Page 64
... off Picture missing color Picture color not good • Reset the monitor to factory settings. • Invoke the self-test feature (see Selftest) and determine if these lines are also flagged in the self-test mode. • Check for bent or broken pins in the video cable connector. • Restart the computer in the safe mode. • Do not perform any troubleshooting steps. • Contact Dell...
... off Picture missing color Picture color not good • Reset the monitor to factory settings. • Invoke the self-test feature (see Selftest) and determine if these lines are also flagged in the self-test mode. • Check for bent or broken pins in the video cable connector. • Restart the computer in the safe mode. • Do not perform any troubleshooting steps. • Contact Dell...
Monitor Users Guide
Page 65
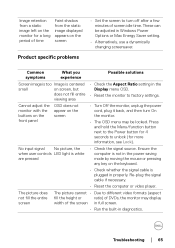
... setting in the Display menu OSD. • Reset the monitor to unlock (for 4 seconds to factory settings. Common symptoms What you experience Possible solutions Screen image is too Image is centered smal l on the keyboard. • Check whether the signal cable is white are pressed • Check the signal source. Troubleshooting │ 65 Press and hold the Menu/function button next to the Power button for more information, see Lock). These can be locked. Re-plug the signal cable...
... setting in the Display menu OSD. • Reset the monitor to unlock (for 4 seconds to factory settings. Common symptoms What you experience Possible solutions Screen image is too Image is centered smal l on the keyboard. • Check whether the signal cable is white are pressed • Check the signal source. Troubleshooting │ 65 Press and hold the Menu/function button next to the Power button for more information, see Lock). These can be locked. Re-plug the signal cable...

Monitor Users Guide
Page 67
... SuperSpeed USB 5 Gbps (USB 3.2 Gen 1)-compatible. • Some computers have USB 3.2, USB 2.0, and USB 1.1 ports. Speakers Specific Problems Common symptoms What you experience No sound coming Cannot hear any from the speakers sound Possible solutions • Turn Off the monitor, unplug the monitor power cord, replug it, and then turn On the monitor. • Check the audio cable connection is connected correctly to the audio lineout port of the computer. • Unplug the audio cable from the USB 3.2 port. SuperSpeed USB 5 Gbps (USB...
... SuperSpeed USB 5 Gbps (USB 3.2 Gen 1)-compatible. • Some computers have USB 3.2, USB 2.0, and USB 1.1 ports. Speakers Specific Problems Common symptoms What you experience No sound coming Cannot hear any from the speakers sound Possible solutions • Turn Off the monitor, unplug the monitor power cord, replug it, and then turn On the monitor. • Check the audio cable connection is connected correctly to the audio lineout port of the computer. • Unplug the audio cable from the USB 3.2 port. SuperSpeed USB 5 Gbps (USB...
Monitor Display Manager Users Guide
Page 4
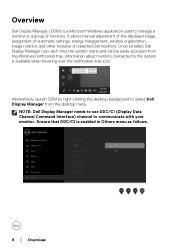
... right-clicking the desktop background to communicate with your monitor. Overview Dell Display Manager (DDM) is available when hovering over the notification-tray icon. It allows manual adjustment of the displayed image, assignment of monitors. Once installed, Dell Display Manager runs each time the system starts and can be easily accessed from the desktop menu. Ensure that DDC/CI is enabled in Others...
... right-clicking the desktop background to communicate with your monitor. Overview Dell Display Manager (DDM) is available when hovering over the notification-tray icon. It allows manual adjustment of the displayed image, assignment of monitors. Once installed, Dell Display Manager runs each time the system starts and can be easily accessed from the desktop menu. Ensure that DDC/CI is enabled in Others...
Monitor Display Manager Users Guide
Page 5
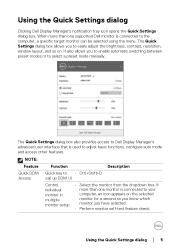
... . The Quick Settings dialog box allows you have selected. • Perform monitor self-test feature check. When more than one monitor is connected to easily adjust the brightness, contrast, resolution, window layout, and so on the selected monitor for a second so you know which monitor you to the computer, a specific target monitor can be selected using the menu. Using the Quick Settings dialog Clicking Dell Display Manager's notification tray icon opens the Quick Settings dialog...
... . The Quick Settings dialog box allows you have selected. • Perform monitor self-test feature check. When more than one monitor is connected to easily adjust the brightness, contrast, resolution, window layout, and so on the selected monitor for a second so you know which monitor you to the computer, a specific target monitor can be selected using the menu. Using the Quick Settings dialog Clicking Dell Display Manager's notification tray icon opens the Quick Settings dialog...

Monitor Display Manager Users Guide
Page 10
... often work between inputs while working with your monitor even when the monitor is displaying video from it easy to any input source. You can define a shortcut key to quickly switch to the monitor. 10 │ Managing multiple video inputs This makes it . You can give each input a name. You can use and control input switching from another shortcut key to quickly switch between two inputs if you to manage multiple video inputs connected to your changes...
... often work between inputs while working with your monitor even when the monitor is displaying video from it easy to any input source. You can define a shortcut key to quickly switch to the monitor. 10 │ Managing multiple video inputs This makes it . You can give each input a name. You can use and control input switching from another shortcut key to quickly switch between two inputs if you to manage multiple video inputs connected to your changes...


