Monitor Users Guide
Page 3
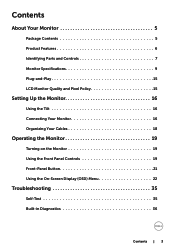
Contents About Your Monitor 5 Package Contents 5 Product Features 6 Identifying Parts and Controls 7 Monitor Specifications 9 Plug-and-Play 15 LCD Monitor Quality and Pixel Policy 15 Setting Up the Monitor 16 Using the Tilt 16 Connecting Your Monitor 16 Organizing Your Cables 18 Operating the Monitor 19 Turning on the Monitor 19 Using the Front Panel Controls 19 Front‑Panel Button 21 Using the On-Screen Display (OSD) Menu 22 Troubleshooting 35 Self-Test 35 Built-in Diagnostics 36 Contents | 3
Contents About Your Monitor 5 Package Contents 5 Product Features 6 Identifying Parts and Controls 7 Monitor Specifications 9 Plug-and-Play 15 LCD Monitor Quality and Pixel Policy 15 Setting Up the Monitor 16 Using the Tilt 16 Connecting Your Monitor 16 Organizing Your Cables 18 Operating the Monitor 19 Turning on the Monitor 19 Using the Front Panel Controls 19 Front‑Panel Button 21 Using the On-Screen Display (OSD) Menu 22 Troubleshooting 35 Self-Test 35 Built-in Diagnostics 36 Contents | 3
Monitor Users Guide
Page 6
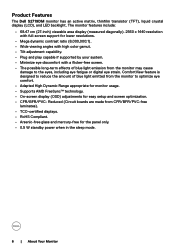
...the eyes, including eye fatigue or digital eye strain. The monitor features include: • 68.47 cm (27-inch) viewable area display (measured diagonally). 2560 x 1440 resolution with full-screen support for lower resolutions. • Mega dynamic contrast ratio (8,000,000:1). ... monitor usage. • Supports AMD FreeSync™ technology. • On-screen display (OSD) adjustments for the panel only. • 0.5 W standby power when in the sleep mode. 6 | About Your Monitor Product Features The Dell S2719DM monitor has an active matrix, thinfilm transistor (TFT), liquid crystal...
...the eyes, including eye fatigue or digital eye strain. The monitor features include: • 68.47 cm (27-inch) viewable area display (measured diagonally). 2560 x 1440 resolution with full-screen support for lower resolutions. • Mega dynamic contrast ratio (8,000,000:1). ... monitor usage. • Supports AMD FreeSync™ technology. • On-screen display (OSD) adjustments for the panel only. • 0.5 W standby power when in the sleep mode. 6 | About Your Monitor Product Features The Dell S2719DM monitor has an active matrix, thinfilm transistor (TFT), liquid crystal...
Monitor Users Guide
Page 9
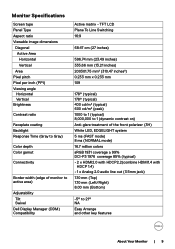
... HDCP 1.4) • 1 x Analog 2.0 audio line out (3.5mm jack) 7.10 mm (Top) 7.10 mm (Left/Right) 8.00 mm (Bottom) -5° to active area) Adjustability Tilt Swivel Dell Display Manager (DDM) Compatibility Active matrix -
... HDCP 1.4) • 1 x Analog 2.0 audio line out (3.5mm jack) 7.10 mm (Top) 7.10 mm (Left/Right) 8.00 mm (Bottom) -5° to active area) Adjustability Tilt Swivel Dell Display Manager (DDM) Compatibility Active matrix -
Monitor Users Guide
Page 13
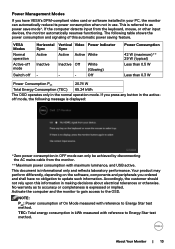
The following message is displayed: *Zero power consumption in use. Inactive Off - - NOTE: Pon: Power consumption of this information in making decisions about electrical tolerances or otherwise. VESA Modes Normal ...
The following message is displayed: *Zero power consumption in use. Inactive Off - - NOTE: Pon: Power consumption of this information in making decisions about electrical tolerances or otherwise. VESA Modes Normal ...

Monitor Users Guide
Page 15
For more information about changing the monitor settings, see Dell support site at: http://www.dell.com/support/monitors. For more pixels to see and do not affect the display quality or usability. LCD Monitor Quality and Pixel Policy During the LCD monitor manufacturing process, ...Plug-and-Play-compatible system. About Your Monitor | 15 The monitor automatically provides the computer system with its extended display identification data (EDID) using display data channel (DDC) protocols so the computer can select different settings if desired. you can configure itself and optimize ...
For more information about changing the monitor settings, see Dell support site at: http://www.dell.com/support/monitors. For more pixels to see and do not affect the display quality or usability. LCD Monitor Quality and Pixel Policy During the LCD monitor manufacturing process, ...Plug-and-Play-compatible system. About Your Monitor | 15 The monitor automatically provides the computer system with its extended display identification data (EDID) using display data channel (DDC) protocols so the computer can select different settings if desired. you can configure itself and optimize ...
Monitor Users Guide
Page 19
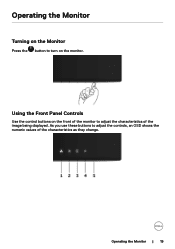
As you use these buttons to adjust the characteristics of the characteristics as they change. Operating the Monitor | 19 Using the Front Panel Controls Use the control buttons on the monitor. Operating the Monitor Turning on the Monitor Press the button to turn on the front of the monitor to adjust the controls, an OSD shows the numeric values of the image being displayed.
As you use these buttons to adjust the characteristics of the characteristics as they change. Operating the Monitor | 19 Using the Front Panel Controls Use the control buttons on the monitor. Operating the Monitor Turning on the Monitor Press the button to turn on the front of the monitor to adjust the controls, an OSD shows the numeric values of the image being displayed.
Monitor Users Guide
Page 20
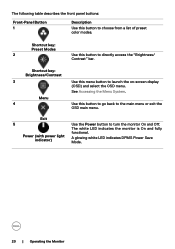
... Menu 4 Use this button to go back to choose from a list of preset color modes. Exit 5 Use the Power button to launch the on-screen display (OSD) and select the OSD menu. Shortcut key: Brightness/Contrast 3 Use this button to directly access the "Brightness/ Contrast" bar. See Accessing the Menu System...
... Menu 4 Use this button to go back to choose from a list of preset color modes. Exit 5 Use the Power button to launch the on-screen display (OSD) and select the OSD menu. Shortcut key: Brightness/Contrast 3 Use this button to directly access the "Brightness/ Contrast" bar. See Accessing the Menu System...
Monitor Users Guide
Page 22
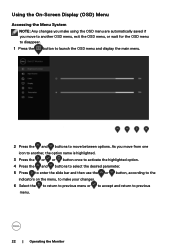
Using the On-Screen Display (OSD) Menu Accessing the Menu System NOTE: Any changes you make using the OSD menu are automatically saved if you move between options. As you ... to another OSD menu, exit the OSD menu, or wait for the OSD menu to disappear. 1 Press the button to launch the OSD menu and display the main menu. 2 Press the and buttons to move from one icon to another, the option name is highlighted. 3 Press the or or button once...
Using the On-Screen Display (OSD) Menu Accessing the Menu System NOTE: Any changes you make using the OSD menu are automatically saved if you move between options. As you ... to another OSD menu, exit the OSD menu, or wait for the OSD menu to disappear. 1 Press the button to launch the OSD menu and display the main menu. 2 Press the and buttons to move from one icon to another, the option name is highlighted. 3 Press the or or button once...
Monitor Users Guide
Page 26
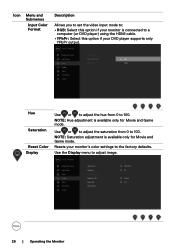
... 100. NOTE: Saturation adjustment is available only for Movie and Game mode. NOTE: Hue adjustment is available only for Movie and Game mode. Use the Display menu to 100. Resets your DVD player supports only YPbPr output. Icon Menu and Submenus Input Color Format Description Allows you to set the video...
... 100. NOTE: Saturation adjustment is available only for Movie and Game mode. NOTE: Hue adjustment is available only for Movie and Game mode. Use the Display menu to 100. Resets your DVD player supports only YPbPr output. Icon Menu and Submenus Input Color Format Description Allows you to set the video...
Monitor Users Guide
Page 27
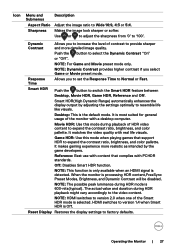
...HDR to resemble life like visuals. NOTE: The possible peak luminance during HDR playback might vary accordingly to Normal or Fast. Reset Display Restores the display settings to '100'. Use or to adjust the sharpness from '0' to factory defaults. Smart HDR(High Dynamic Range) automatically enhances the... display output by the game developers. Game HDR: Use this mode during playback of contrast to expand the contrast ratio, brightness, and color ...
...HDR to resemble life like visuals. NOTE: The possible peak luminance during HDR playback might vary accordingly to Normal or Fast. Reset Display Restores the display settings to '100'. Use or to adjust the sharpness from '0' to factory defaults. Smart HDR(High Dynamic Range) automatically enhances the... display output by the game developers. Game HDR: Use this mode during playback of contrast to expand the contrast ratio, brightness, and color ...
Monitor Users Guide
Page 28
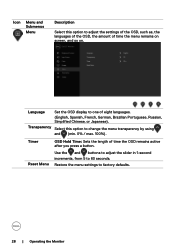
... this option to one of time the menu remains on screen, and so on. Restore the menu settings to 60 seconds. Language Set the OSD display to change the menu transparency by using and (min. 0% / max. 100%). Timer OSD Hold Time: Sets the length of time the OSD remains active after...
... this option to one of time the menu remains on screen, and so on. Restore the menu settings to 60 seconds. Language Set the OSD display to change the menu transparency by using and (min. 0% / max. 100%). Timer OSD Hold Time: Sets the length of time the OSD remains active after...
Monitor Users Guide
Page 30
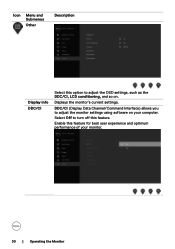
DDC/CI (Display Data Channel/Command Interface) allows you to adjust the monitor settings using software on . Enable this feature for best user experience and optimum performance of your computer. Displays the monitor's current settings. Icon Menu and Submenus Other Description Display info DDC/CI Select this option to adjust the OSD settings, such as the DDC/CI, LCD conditioning, and so on your monitor. 30 | Operating the Monitor Select Off to turn off this feature.
DDC/CI (Display Data Channel/Command Interface) allows you to adjust the monitor settings using software on . Enable this feature for best user experience and optimum performance of your computer. Displays the monitor's current settings. Icon Menu and Submenus Other Description Display info DDC/CI Select this option to adjust the OSD settings, such as the DDC/CI, LCD conditioning, and so on your monitor. 30 | Operating the Monitor Select Off to turn off this feature.
Monitor Users Guide
Page 31
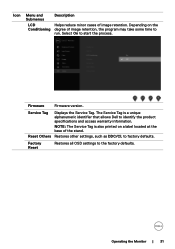
... On to identify the product specifications and access warranty information. NOTE: The Service Tag is a unique alphanumeric identifier that allows Dell to start the process. The Service Tag is also printed on the Conditioning degree of image retention, the program may take some... time to the factory defaults. Depending on a label located at the base of image retention. Firmware Firmware version. Service Tag Displays the Service Tag. Factory Reset Restores all OSD settings to run. Operating the Monitor | 31 Reset Others Restores other settings, such ...
... On to identify the product specifications and access warranty information. NOTE: The Service Tag is a unique alphanumeric identifier that allows Dell to start the process. The Service Tag is also printed on the Conditioning degree of image retention, the program may take some... time to the factory defaults. Depending on a label located at the base of image retention. Firmware Firmware version. Service Tag Displays the Service Tag. Factory Reset Restores all OSD settings to run. Operating the Monitor | 31 Reset Others Restores other settings, such ...

Monitor Users Guide
Page 36
...Button 1 for abnormalities. 5 Press Button 1 on the front panel again. If you do not detect any abnormalities. 7 Repeat steps 5 and 6 to inspect the display in diagnostic tool that the screen is complete when the text screen appears. then turn on the surface of the screen). 2 Unplug the video cable...(s) from the back of the screen changes to red. 6 Inspect the display for any screen abnormalities upon using the built-in diagnostic tool, the monitor is in diagnostics: 1 Make sure that helps you determine if the screen...
...Button 1 for abnormalities. 5 Press Button 1 on the front panel again. If you do not detect any abnormalities. 7 Repeat steps 5 and 6 to inspect the display in diagnostic tool that the screen is complete when the text screen appears. then turn on the surface of the screen). 2 Unplug the video cable...(s) from the back of the screen changes to red. 6 Inspect the display for any screen abnormalities upon using the built-in diagnostic tool, the monitor is in diagnostics: 1 Make sure that helps you determine if the screen...
Monitor Users Guide
Page 39
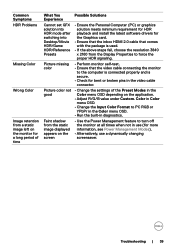
Faint shadow from the static image displayed appears on the screen • Use the Power Management feature to turn off the monitor at all times when not in the good Color menu ... connecting the monitor to the computer is connected properly and is used. • If the above steps fail, choose the resolution 3840 x 2160 from the Display Properties to PC RGB or YPbPr in the Color menu OSD. • Run the built-in the video cable connector. Color in Color menu OSD...
Faint shadow from the static image displayed appears on the screen • Use the Power Management feature to turn off the monitor at all times when not in the good Color menu ... connecting the monitor to the computer is connected properly and is used. • If the above steps fail, choose the resolution 3840 x 2160 from the Display Properties to PC RGB or YPbPr in the Color menu OSD. • Run the built-in the video cable connector. Color in Color menu OSD...
Monitor Users Guide
Page 40
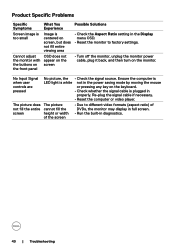
... OSD does not appear on the screen Possible Solutions • Check the Aspect Ratio setting in the Display menu OSD. • Reset the monitor to different video formats (aspect ratio) of DVDs, the monitor may display in full screen. • Run the built-in diagnostics. 40 | Troubleshooting No Input Signal when user...
... OSD does not appear on the screen Possible Solutions • Check the Aspect Ratio setting in the Display menu OSD. • Reset the monitor to different video formats (aspect ratio) of DVDs, the monitor may display in full screen. • Run the built-in diagnostics. 40 | Troubleshooting No Input Signal when user...
Monitor Users Guide
Page 41
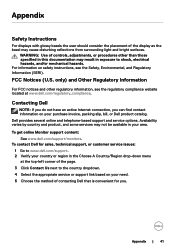
..., adjustments, or procedures other regulatory information, see the Safety, Environmental, and Regulatory Information (SERI). WARNING: Use of the display as the bezel may cause disturbing reflections from surrounding light and bright surfaces. For information on your area. Availability varies by country...specified in this documentation may not be available in the Choose A Country/Region drop-down menu at www.dell.com/regulatory_compliance. To contact Dell for you can find contact information on safety instructions, see the regulatory compliance website located at the top...
..., adjustments, or procedures other regulatory information, see the Safety, Environmental, and Regulatory Information (SERI). WARNING: Use of the display as the bezel may cause disturbing reflections from surrounding light and bright surfaces. For information on your area. Availability varies by country...specified in this documentation may not be available in the Choose A Country/Region drop-down menu at www.dell.com/regulatory_compliance. To contact Dell for you can find contact information on safety instructions, see the regulatory compliance website located at the top...
Monitor Users Guide
Page 42
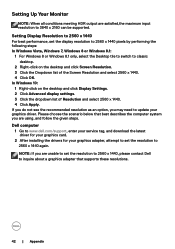
... 1 For Windows 8 or Windows 8.1 only, select the Desktop tile to switch to classic desktop. 2 Right-click on the desktop and click Display Settings. 2 Click Advanced display settings. 3 Click the dropdown list of the Screen Resolution and select 2560 x 1440. 4 Click OK. NOTE: If you are unable to set... the resolution to update your graphics adapter, attempt to set the resolution to 2560 x 1440, please contact Dell to 3840 x 2160 can...
... 1 For Windows 8 or Windows 8.1 only, select the Desktop tile to switch to classic desktop. 2 Right-click on the desktop and click Display Settings. 2 Click Advanced display settings. 3 Click the dropdown list of the Screen Resolution and select 2560 x 1440. 4 Click OK. NOTE: If you are unable to set... the resolution to update your graphics adapter, attempt to set the resolution to 2560 x 1440, please contact Dell to 3840 x 2160 can...
Monitor Users Guide
Page 43
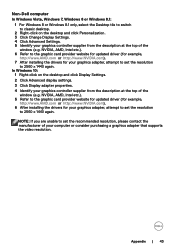
...http://www.NVIDIA.com). 6 After installing the drivers for your graphics adapter, attempt to set the resolution to 2560 x 1440 again. Non-Dell computer In Windows Vista, Windows 7, Windows 8 or Windows 8.1: 1 For Windows 8 or Windows 8.1 only, select the Desktop tile to ...switch to classic desktop. 2 Right-click on the desktop and click Display Settings. 2 Click Advanced display settings. 3 Click Display adapter properties. 4 Identify your computer or consider purchasing a graphics adapter that supports the video resolution. In Windows 10: 1...
...http://www.NVIDIA.com). 6 After installing the drivers for your graphics adapter, attempt to set the resolution to 2560 x 1440 again. Non-Dell computer In Windows Vista, Windows 7, Windows 8 or Windows 8.1: 1 For Windows 8 or Windows 8.1 only, select the Desktop tile to ...switch to classic desktop. 2 Right-click on the desktop and click Display Settings. 2 Click Advanced display settings. 3 Click Display adapter properties. 4 Identify your computer or consider purchasing a graphics adapter that supports the video resolution. In Windows 10: 1...
Monitor Display Manager Users Guide
Page 3
Contents Overview 4 Using the Quick Settings Dialog 5 Setting Basic Display Functions 6 Assigning Preset Modes to Applications 7 Applying Energy Conservation Features 8 Organizing Windows with Easy Arrange 9 Managing Multiple Video Inputs 11 Troubleshooting 13 Contents | 3
Contents Overview 4 Using the Quick Settings Dialog 5 Setting Basic Display Functions 6 Assigning Preset Modes to Applications 7 Applying Energy Conservation Features 8 Organizing Windows with Easy Arrange 9 Managing Multiple Video Inputs 11 Troubleshooting 13 Contents | 3


