

Monitor Users Guide
Page 3
... instructions 5 About your monitor 6 Package contents 6 Product features 8 Operating system compatibility 11 Identifying parts and controls 12 Front view 12 Back view 13 Side view 14 Bottom view 14 Monitor specifications 16 Resolution specifications 19 Supported video modes 19 Preset display modes 19 Electrical specifications 20 Physical characteristics 21 Environmental characteristics 22 Pin assignments 23 Plug-and-play capability 24 LCD monitor quality and pixel policy 24 Ergonomics 24 Handling and moving your display...
... instructions 5 About your monitor 6 Package contents 6 Product features 8 Operating system compatibility 11 Identifying parts and controls 12 Front view 12 Back view 13 Side view 14 Bottom view 14 Monitor specifications 16 Resolution specifications 19 Supported video modes 19 Preset display modes 19 Electrical specifications 20 Physical characteristics 21 Environmental characteristics 22 Pin assignments 23 Plug-and-play capability 24 LCD monitor quality and pixel policy 24 Ergonomics 24 Handling and moving your display...
Monitor Users Guide
Page 4
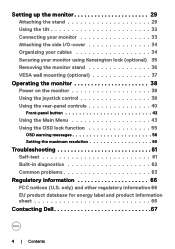
... the stand 29 Using the tilt 32 Connecting your monitor 33 Attaching the side I/O-cover 34 Organizing your cables 34 Securing your monitor using Kensington lock (optional) 35 Removing the monitor stand 36 VESA wall mounting (optional 37 Operating the monitor 38 Power on the monitor 38 Using the joystick control 38 Using the rear-panel controls 40 Front‑panel button 42 Using the Main Menu 43 Using the OSD lock function 55 OSD warning messages 58 Setting the maximum resolution 60 Troubleshooting 61...
... the stand 29 Using the tilt 32 Connecting your monitor 33 Attaching the side I/O-cover 34 Organizing your cables 34 Securing your monitor using Kensington lock (optional) 35 Removing the monitor stand 36 VESA wall mounting (optional 37 Operating the monitor 38 Power on the monitor 38 Using the joystick control 38 Using the rear-panel controls 40 Front‑panel button 42 Using the Main Menu 43 Using the OSD lock function 55 OSD warning messages 58 Setting the maximum resolution 60 Troubleshooting 61...

Monitor Users Guide
Page 5
... have an adverse effect on the liquid crystals of the display. • Connect the power cable from potential damage and to ensure your personal safety. The screen is fragile and can have read the safety information that is electrically rated to operate with the AC power available in your location. • Keep the monitor in the wall mounting section of the User's Guide.
... have an adverse effect on the liquid crystals of the display. • Connect the power cable from potential damage and to ensure your personal safety. The screen is fragile and can have read the safety information that is electrically rated to operate with the AC power available in your location. • Keep the monitor in the wall mounting section of the User's Guide.
Monitor Users Guide
Page 8
...; Digital connectivity with 2 HDMI ports. • Plug and play capability if supported by reducing potentially harmful blue light emissions without distortion of color accuracy. 8 | About your computer. • Integrated speakers (2 x 5W). • On-Screen Display (OSD) adjustments for ease of setup and screen optimization. • Removable stand and 100 mm Video Electronics Standards Association (VESA) mounting holes for flexible mounting solutions. • Tilt only. • Security-lock slot for Kensington locks (sold separately). • Offers Premium Panel...
...; Digital connectivity with 2 HDMI ports. • Plug and play capability if supported by reducing potentially harmful blue light emissions without distortion of color accuracy. 8 | About your computer. • Integrated speakers (2 x 5W). • On-Screen Display (OSD) adjustments for ease of setup and screen optimization. • Removable stand and 100 mm Video Electronics Standards Association (VESA) mounting holes for flexible mounting solutions. • Tilt only. • Security-lock slot for Kensington locks (sold separately). • Offers Premium Panel...

Monitor Users Guide
Page 10
... User Guide User guide Yes Yes Yes Remark ¹ Software controls the blue light emission by reducing excessive blue light, resulting in a more yellow tone. 2 Color gamut describes the availability of movement Gamma difference Luminance changes shall decrease less than 50%; The colour shift shall be less than the standard RGB color model, particularly in use on monitors, printers, and the World Wide Web. 5 DCI-P3, short for Digital...
... User Guide User guide Yes Yes Yes Remark ¹ Software controls the blue light emission by reducing excessive blue light, resulting in a more yellow tone. 2 Color gamut describes the availability of movement Gamma difference Luminance changes shall decrease less than 50%; The colour shift shall be less than the standard RGB color model, particularly in use on monitors, printers, and the World Wide Web. 5 DCI-P3, short for Digital...

Monitor Users Guide
Page 11
About your monitor | 11 Operating system compatibility • Windows 10 and later* * The operating system compatibility on Dell and Alienware branded monitors may vary based on factors such as: • Specific release date(s) when operating system versions, patches, or updates are available. • Specific release date(s) when Dell and Alienware branded monitor firmware, software application, or driver updates are available on the Dell support website.
About your monitor | 11 Operating system compatibility • Windows 10 and later* * The operating system compatibility on Dell and Alienware branded monitors may vary based on factors such as: • Specific release date(s) when operating system versions, patches, or updates are available. • Specific release date(s) when Dell and Alienware branded monitor firmware, software application, or driver updates are available on the Dell support website.
Monitor Users Guide
Page 13
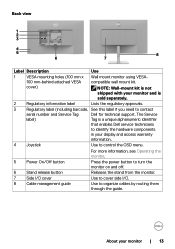
..., see Operating the monitor. 5 Power On/Off button Press the power button to control the OSD menu. Laite on and off. 6 Stand release button Releases the stand from the monitor. 7 Side I/O cover Use to cover side I/O. 8 Cable management guide Use to contact serial number and Service Tag Dell for EU Only: Raheen Business Park Limerick Ireland www.dell.com/regulatory_compliance 67923 6 7 8 Label Description 1 VESA mounting holes (100 mm x 100 mm-behind attached VESA cover) Use Wall mount monitor using VESAcompatible wall mount kit. ID...
..., see Operating the monitor. 5 Power On/Off button Press the power button to control the OSD menu. Laite on and off. 6 Stand release button Releases the stand from the monitor. 7 Side I/O cover Use to cover side I/O. 8 Cable management guide Use to contact serial number and Service Tag Dell for EU Only: Raheen Business Park Limerick Ireland www.dell.com/regulatory_compliance 67923 6 7 8 Label Description 1 VESA mounting holes (100 mm x 100 mm-behind attached VESA cover) Use Wall mount monitor using VESAcompatible wall mount kit. ID...
Monitor Users Guide
Page 18
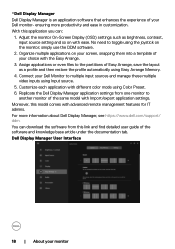
... on your screen, snapping them into a template of your Dell monitor- Replicate the Dell Display Manager application settings from this link and find detailed user guide of the same model with different color mode using Easy Arrange Memory. 4. Moreover, this application you can download the software from one monitor to the partitions of Easy Arrange, save the layout as brightness, contrast, input source setting and so on the monitor; Connect your monitor You can...
... on your screen, snapping them into a template of your Dell monitor- Replicate the Dell Display Manager application settings from this link and find detailed user guide of the same model with different color mode using Easy Arrange Memory. 4. Moreover, this application you can download the software from one monitor to the partitions of Easy Arrange, save the layout as brightness, contrast, input source setting and so on the monitor; Connect your monitor You can...
Monitor Users Guide
Page 29
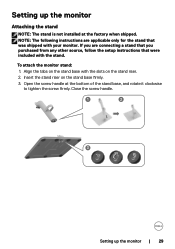
... the screw handle. 1 2 3 Setting up the monitor Attaching the stand NOTE: The stand is not installed at the bottom of the stand base, and rotate it clockwise to tighten the screw firmly. Align the tabs on the stand base firmly. 3. Insert the stand riser on the stand base with your monitor. Open the screw handle at the factory when shipped. If you purchased from any other source, follow the setup instructions...
... the screw handle. 1 2 3 Setting up the monitor Attaching the stand NOTE: The stand is not installed at the bottom of the stand base, and rotate it clockwise to tighten the screw firmly. Align the tabs on the stand base firmly. 3. Insert the stand riser on the stand base with your monitor. Open the screw handle at the factory when shipped. If you purchased from any other source, follow the setup instructions...

Monitor Users Guide
Page 43
... Source Color Display Audio Menu Personalize Others More Information HDMI 1 HDMI 2 Rename Inputs Auto Select Options for HDMI Reset Input Source HDMI 1 On Prompt for Multiple Inputs Exit Operating the monitor | 43 Move the joystick to activate Brightness/Contrast adjustment. 24/27 Monitor Brightness/Contrast Input Source Color Display Audio Menu Personalize Others More Information Brightness Contrast Input Source 75% 75% Exit Adjusts the luminance of difference between different video inputs that are connected to select between darkness and lightness on the monitor screen...
... Source Color Display Audio Menu Personalize Others More Information HDMI 1 HDMI 2 Rename Inputs Auto Select Options for HDMI Reset Input Source HDMI 1 On Prompt for Multiple Inputs Exit Operating the monitor | 43 Move the joystick to activate Brightness/Contrast adjustment. 24/27 Monitor Brightness/Contrast Input Source Color Display Audio Menu Personalize Others More Information Brightness Contrast Input Source 75% 75% Exit Adjusts the luminance of difference between different video inputs that are connected to select between darkness and lightness on the monitor screen...

Monitor Users Guide
Page 44
... the HDMI 2 input when using the HDMI 1 connector. Auto Select Options for available input sources. Press to select this function. Adjusts the color setting mode. 24/27 Monitor Brightness/Contrast Input Source Color Display Audio Menu Personalize Others More Information Color Presets Input Color Format Hue Saturation Reset Color Standard RGB 50 50 Exit 44 | Operating the monitor Icon Menu and Submenus Description HDMI 1 Select the HDMI 1 input when using the HDMI 2 connector. Press the joystick button to the factory defaults. Reset all settings under the Input Source menu to...
... the HDMI 2 input when using the HDMI 1 connector. Auto Select Options for available input sources. Press to select this function. Adjusts the color setting mode. 24/27 Monitor Brightness/Contrast Input Source Color Display Audio Menu Personalize Others More Information Color Presets Input Color Format Hue Saturation Reset Color Standard RGB 50 50 Exit 44 | Operating the monitor Icon Menu and Submenus Description HDMI 1 Select the HDMI 1 input when using the HDMI 2 connector. Press the joystick button to the factory defaults. Reset all settings under the Input Source menu to...

Monitor Users Guide
Page 45
... the list. 24/27 Monitor Brightness/Contrast Input Source Color Display Audio Menu Personalize Others More Information Color Presets Input Color Format Reset Color Standard Movie FPS RTS RPG Warm Cool Custom Color Exit • Standard: Default color setting. Press the joystick and buttons to manually adjust the color settings. The screen appears warmer with TUV HW LBL at Standard color preset mode. • Movie: Loads color setting ideal for movies. • FPS: Loads color setting ideal for First-Person...
... the list. 24/27 Monitor Brightness/Contrast Input Source Color Display Audio Menu Personalize Others More Information Color Presets Input Color Format Reset Color Standard Movie FPS RTS RPG Warm Cool Custom Color Exit • Standard: Default color setting. Press the joystick and buttons to manually adjust the color settings. The screen appears warmer with TUV HW LBL at Standard color preset mode. • Movie: Loads color setting ideal for movies. • FPS: Loads color setting ideal for First-Person...

Monitor Users Guide
Page 48
.../27 Monitor Brightness/Contrast Input Source Color Display Audio Menu Personalize Others More Information Volume Speaker Audio Pro les Reset Audio 50 On Standard Exit Volume Speaker Allows you to turn on or off speaker function. Audio Profiles Expand to show the various audio profiles. 24/27 Monitor Brightness/Contrast Input Source Color Display Audio Menu Personalize Others More Information Volume Speaker Audio Pro les Reset Audio Standard Movie Game Music Voice Custom Audio Reset Audio Exit • Standard: Default audio setting. • Movie: For motion picture viewing. •...
.../27 Monitor Brightness/Contrast Input Source Color Display Audio Menu Personalize Others More Information Volume Speaker Audio Pro les Reset Audio 50 On Standard Exit Volume Speaker Allows you to turn on or off speaker function. Audio Profiles Expand to show the various audio profiles. 24/27 Monitor Brightness/Contrast Input Source Color Display Audio Menu Personalize Others More Information Volume Speaker Audio Pro les Reset Audio Standard Movie Game Music Voice Custom Audio Reset Audio Exit • Standard: Default audio setting. • Movie: For motion picture viewing. •...

Monitor Users Guide
Page 52
You can disable this feature by the software on ) to be adjustable by selecting Off. Icon Menu and Submenus Others DDC/CI Description Select this option to adjust the OSD settings such as the DDC/CI, LCD Conditioning, and so on. 24/27 Monitor Brightness/Contrast Input Source Color Display Audio Menu Personalize Others More Information DDC/CI LCD Conditioning Self-Diagnostic Reset Others Factory Reset On O Select √ ENERGY STAR®...
You can disable this feature by the software on ) to be adjustable by selecting Off. Icon Menu and Submenus Others DDC/CI Description Select this option to adjust the OSD settings such as the DDC/CI, LCD Conditioning, and so on. 24/27 Monitor Brightness/Contrast Input Source Color Display Audio Menu Personalize Others More Information DDC/CI LCD Conditioning Self-Diagnostic Reset Others Factory Reset On O Select √ ENERGY STAR®...

Monitor Users Guide
Page 55
... the User's Guide. To unlock the Button, refer to lock the Menu Buttons? Select Yes to lock. 24/27 Monitor Brightness/Contrast Input Source Color Display Audio Menu Personalize Others More Information Language Rotation Transparency Timer Lock Reset Menu Menu Buttons Power Button Menu + Power Buttons Disable Exit 2. Operating the monitor | 55 The following message appears. Select the required option to lock the buttons. Yes No 3. Once locked, pressing any control button displays the lock icon . Using the OSD lock function You can lock the front-panel control buttons to prevent...
... the User's Guide. To unlock the Button, refer to lock the Menu Buttons? Select Yes to lock. 24/27 Monitor Brightness/Contrast Input Source Color Display Audio Menu Personalize Others More Information Language Rotation Transparency Timer Lock Reset Menu Menu Buttons Power Button Menu + Power Buttons Disable Exit 2. Operating the monitor | 55 The following message appears. Select the required option to lock the buttons. Yes No 3. Once locked, pressing any control button displays the lock icon . Using the OSD lock function You can lock the front-panel control buttons to prevent...

Monitor Users Guide
Page 60
... Display Resolution dropdown list and select 1920 x 1080. 4. Depending on the desktop and click Display Settings. 2. If you select S2425H/ S2725H. 3. Right-click on your computer, complete one of Windows you have more than one monitor connected, ensure that you are using a non-Dell computer (laptop or desktop): • Go to the support site for your computer and download the latest graphic drivers...
... Display Resolution dropdown list and select 1920 x 1080. 4. Depending on the desktop and click Display Settings. 2. If you select S2425H/ S2725H. 3. Right-click on your computer, complete one of Windows you have more than one monitor connected, ensure that you are using a non-Dell computer (laptop or desktop): • Go to the support site for your computer and download the latest graphic drivers...
Monitor Users Guide
Page 61
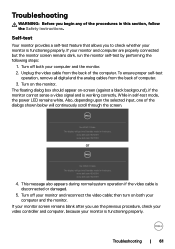
... on-screen (against a black background), if the monitor cannot sense a video signal and is disconnected or damaged. 5. Troubleshooting | 61 Self-test Your monitor provides a self-test feature that allows you use the previous procedure, check your video controller and computer, because your monitor and reconnect the video cable; While in this section, follow the Safety instructions. Turn off both your monitor and computer are properly connected but the monitor screen...
... on-screen (against a black background), if the monitor cannot sense a video signal and is disconnected or damaged. 5. Troubleshooting | 61 Self-test Your monitor provides a self-test feature that allows you use the previous procedure, check your video controller and computer, because your monitor and reconnect the video cable; While in this section, follow the Safety instructions. Turn off both your monitor and computer are properly connected but the monitor screen...

Monitor Users Guide
Page 62
... joystick control again. Observe if the screen has any screen abnormalities upon using the built-in diagnostic tool, the monitor is displayed. 6. Built-in diagnostics Your monitor has a built-in diagnostic tool that the screen is an inherent problem with your monitor, or with your computer and video card. 24/27 Monitor Brightness/Contrast Input Source Color Display Audio Menu Personalize Others More Information DDC/CI LCD Conditioning Self-Diagnostic Reset Others Factory Reset On...
... joystick control again. Observe if the screen has any screen abnormalities upon using the built-in diagnostic tool, the monitor is displayed. 6. Built-in diagnostics Your monitor has a built-in diagnostic tool that the screen is an inherent problem with your monitor, or with your computer and video card. 24/27 Monitor Brightness/Contrast Input Source Color Display Audio Menu Personalize Others More Information DDC/CI LCD Conditioning Self-Diagnostic Reset Others Factory Reset On...

Monitor Users Guide
Page 63
... Input Source menu. LCD screen has • Cycle power On-Off. Picture too dim • Reset the monitor to factory settings. LCD screen has • Cycle power on . • Ensure that the correct input source is selected in LCD technology. • For more information about Dell Monitor Quality and Pixel Policy, see Dell Support site at : https:// www.dell.com/support/monitors. spots • Pixel that is permanently off . or too bright • Adjust brightness and contrast controls through OSD. • Perform monitor...
... Input Source menu. LCD screen has • Cycle power On-Off. Picture too dim • Reset the monitor to factory settings. LCD screen has • Cycle power on . • Ensure that the correct input source is selected in LCD technology. • For more information about Dell Monitor Quality and Pixel Policy, see Dell Support site at : https:// www.dell.com/support/monitors. spots • Pixel that is permanently off . or too bright • Adjust brightness and contrast controls through OSD. • Perform monitor...

Monitor Users Guide
Page 64
... factory settings. • Perform monitor self-test feature check to computer RGB or YCbCr in the Color menu OSD. • Run the built-in Windows Power Options or Mac Energy Saver setting. • Alternatively, use a dynamically changing screensaver. Intermittent problems The monitor • Ensure that the video cable connecting the turns on and off after a few minutes of the Preset Modes in the Color menu OSD depending on image that the video cable connecting the monitor to factory settings. 64 | Troubleshooting Missing color Picture...
... factory settings. • Perform monitor self-test feature check to computer RGB or YCbCr in the Color menu OSD. • Run the built-in Windows Power Options or Mac Energy Saver setting. • Alternatively, use a dynamically changing screensaver. Intermittent problems The monitor • Ensure that the video cable connecting the turns on and off after a few minutes of the Preset Modes in the Color menu OSD depending on image that the video cable connecting the monitor to factory settings. 64 | Troubleshooting Missing color Picture...


