Monitor Users Guide
Page 3
Contents About Your Monitor 5 Package Contents 5 Product Features 6 Identifying Parts and Controls 7 Monitor Specifications 9 Plug-and-Play 15 LCD Monitor Quality and Pixel Policy 15 Setting Up the Monitor 16 Using the Tilt 16 Connecting Your Monitor 16 Organizing Your Cables 18 Operating the Monitor 19 Turning on the Monitor 19 Using the Front Panel Controls 19 Front‑Panel Button 21 Using the On-Screen Display (OSD) Menu 22 Troubleshooting 35 Self-Test 35 Built-in Diagnostics 36 Contents | 3
Contents About Your Monitor 5 Package Contents 5 Product Features 6 Identifying Parts and Controls 7 Monitor Specifications 9 Plug-and-Play 15 LCD Monitor Quality and Pixel Policy 15 Setting Up the Monitor 16 Using the Tilt 16 Connecting Your Monitor 16 Organizing Your Cables 18 Operating the Monitor 19 Turning on the Monitor 19 Using the Front Panel Controls 19 Front‑Panel Button 21 Using the On-Screen Display (OSD) Menu 22 Troubleshooting 35 Self-Test 35 Built-in Diagnostics 36 Contents | 3
Monitor Users Guide
Page 6
...-screen display (OSD) adjustments for the panel only. • 0.5 W standby power when in the sleep mode. 6 | About Your Monitor Reduced (Circuit boards are made from the monitor to the eyes, including eye fatigue or digital eye strain. The monitor features include: • 60.45 cm (23.8-inch) viewable area display (measured diagonally). 1920 x 1080 resolution with full-screen support for lower resolutions. • Mega dynamic contrast ratio (8,000,000:1). • Wide viewing...
...-screen display (OSD) adjustments for the panel only. • 0.5 W standby power when in the sleep mode. 6 | About Your Monitor Reduced (Circuit boards are made from the monitor to the eyes, including eye fatigue or digital eye strain. The monitor features include: • 60.45 cm (23.8-inch) viewable area display (measured diagonally). 1920 x 1080 resolution with full-screen support for lower resolutions. • Mega dynamic contrast ratio (8,000,000:1). • Wide viewing...
Monitor Users Guide
Page 8
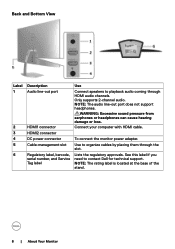
... HDMI cable. NOTE: The rating label is located at the base of the stand. 8 | About Your Monitor Only supports 2-channel audio. To connect the monitor power adapter. WARNING: Excessive sound pressure from earphones or headphones can cause hearing damage or loss. See this label if you need to contact Dell for technical support. Use to organize cables by placing them through HDMI audio channels. NOTE: The audio line-out port does not support...
... HDMI cable. NOTE: The rating label is located at the base of the stand. 8 | About Your Monitor Only supports 2-channel audio. To connect the monitor power adapter. WARNING: Excessive sound pressure from earphones or headphones can cause hearing damage or loss. See this label if you need to contact Dell for technical support. Use to organize cables by placing them through HDMI audio channels. NOTE: The audio line-out port does not support...
Monitor Users Guide
Page 9
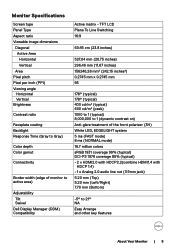
... other key features About Your Monitor | 9 Monitor Specifications Screen type Panel Type Aspect ratio Viewable image dimensions Diagonal Active Area Horizontal Vertical Area Pixel pitch Pixel per inch (PPI) Viewing angle Horizontal Vertical Brightness Contrast ratio Faceplate coating Backlight Response Time (Gray to Gray) Color depth Color gamut Connectivity Border width (edge of the front polarizer (3H) White LED, EDGELIGHT system 5 ms (FAST mode) 8 ms (NORMAL mode) 16.7 million colors sRGB 1931 coverage 99% (typical...
... other key features About Your Monitor | 9 Monitor Specifications Screen type Panel Type Aspect ratio Viewable image dimensions Diagonal Active Area Horizontal Vertical Area Pixel pitch Pixel per inch (PPI) Viewing angle Horizontal Vertical Brightness Contrast ratio Faceplate coating Backlight Response Time (Gray to Gray) Color depth Color gamut Connectivity Border width (edge of the front polarizer (3H) White LED, EDGELIGHT system 5 ms (FAST mode) 8 ms (NORMAL mode) 16.7 million colors sRGB 1931 coverage 99% (typical...
Monitor Users Guide
Page 13
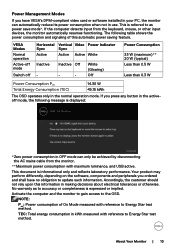
... VESA's DPM-compliant video card or software installed in your PC, the monitor can only be achieved by disconnecting the AC mains cable from the keyboard, mouse, or other input devices, the monitor automatically resumes functioning. Activate the computer and the monitor to gain access to update such information. About Your Monitor | 13 VESA Modes Normal operation Active-off mode Switch off Horizontal Vertical Video Power Indicator Sync Sync Active Active Active White...
... VESA's DPM-compliant video card or software installed in your PC, the monitor can only be achieved by disconnecting the AC mains cable from the keyboard, mouse, or other input devices, the monitor automatically resumes functioning. Activate the computer and the monitor to gain access to update such information. About Your Monitor | 13 VESA Modes Normal operation Active-off mode Switch off Horizontal Vertical Video Power Indicator Sync Sync Active Active Active White...
Monitor Users Guide
Page 20
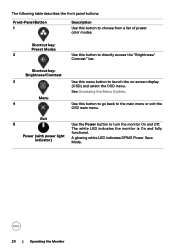
.... The white LED indicates the monitor is On and fully Power (with power light indicator) functional. See Accessing the Menu System. A glowing white LED indicates DPMS Power Save Mode. 20 | Operating the Monitor Exit 5 Use the Power button to turn the monitor On and Off. Shortcut key: Brightness/Contrast 3 Use this button to choose from a list of preset color modes. The following table describes the front panel buttons: Front‑Panel Button 1 Description Use this menu button to launch the on-screen display (OSD...
.... The white LED indicates the monitor is On and fully Power (with power light indicator) functional. See Accessing the Menu System. A glowing white LED indicates DPMS Power Save Mode. 20 | Operating the Monitor Exit 5 Use the Power button to turn the monitor On and Off. Shortcut key: Brightness/Contrast 3 Use this button to choose from a list of preset color modes. The following table describes the front panel buttons: Front‑Panel Button 1 Description Use this menu button to launch the on-screen display (OSD...
Monitor Users Guide
Page 24
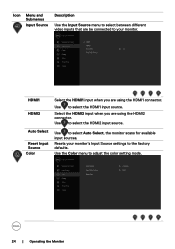
... available input sources. HDMI1 HDMI2 Select the HDMI1 input when you are using the HDMI1 connector. Select the HDMI2 input when you are using the HDMI2 connector. Auto Select Reset Input Source Color Use to adjust the color setting mode. 24 | Operating the Monitor Resets your monitor. Use to select the HDMI2 input source. Icon Menu and Submenus Input Source Description Use the Input Source menu to select between different video inputs that are be connected to your monitor's Input Source settings to the factory defaults. Use to select the HDMI1 input source.
... available input sources. HDMI1 HDMI2 Select the HDMI1 input when you are using the HDMI1 connector. Select the HDMI2 input when you are using the HDMI2 connector. Auto Select Reset Input Source Color Use to adjust the color setting mode. 24 | Operating the Monitor Resets your monitor. Use to select the HDMI2 input source. Icon Menu and Submenus Input Source Description Use the Input Source menu to select between different video inputs that are be connected to your monitor's Input Source settings to the factory defaults. Use to select the HDMI1 input source.
Monitor Users Guide
Page 25
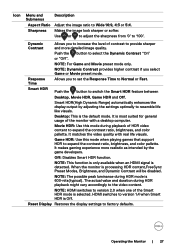
... from using the monitor for long periods of blue light emitted from your eyes when working with a blue tint. • Custom Color: Allows you to manually adjust the color settings. The screen appears warmer with backlight local dimming. NOTE: When Smart HDR is the default preset mode. • ComfortView: Decreases the level of time, we suggest you to : • Set the screen about 20 to 28 inches (50...
... from using the monitor for long periods of blue light emitted from your eyes when working with a blue tint. • Custom Color: Allows you to manually adjust the color settings. The screen appears warmer with backlight local dimming. NOTE: When Smart HDR is the default preset mode. • ComfortView: Decreases the level of time, we suggest you to : • Set the screen about 20 to 28 inches (50...
Monitor Users Guide
Page 27
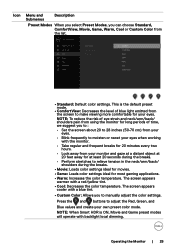
... the button to Wide 16:9, 4:3 or 5:4. It is the default mode. Operating the Monitor | 27 Game HDR: Use this mode during playback of the Smart HDR mode is processing HDR content,FreeSync Preset Modes, Brightness, and Dynamic Contrast will be disabled. When the monitor is selected. HDMI switches to Normal or Fast. It makes gaming experience more detailed image quality. Icon Menu and Submenus Description Aspect Ratio Adjust the image...
... the button to Wide 16:9, 4:3 or 5:4. It is the default mode. Operating the Monitor | 27 Game HDR: Use this mode during playback of the Smart HDR mode is processing HDR content,FreeSync Preset Modes, Brightness, and Dynamic Contrast will be disabled. When the monitor is selected. HDMI switches to Normal or Fast. It makes gaming experience more detailed image quality. Icon Menu and Submenus Description Aspect Ratio Adjust the image...
Monitor Users Guide
Page 29
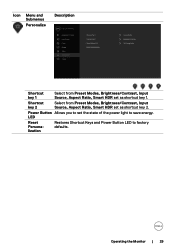
Icon Menu and Submenus Personalize Description Shortcut key 1 Select from Preset Modes, Brightness/Contrast, Input Source, Aspect Ratio, Smart HDR set as shortcut key 1. Operating the Monitor | 29 Shortcut key 2 Select from Preset Modes, Brightness/Contrast, Input Source, Aspect Ratio, Smart HDR set the state of the power light to save energy. Power Button Allows you to factory defaults. LED Reset Personalization Restores Shortcut Keys and Power Button LED to set as shortcut key 2.
Icon Menu and Submenus Personalize Description Shortcut key 1 Select from Preset Modes, Brightness/Contrast, Input Source, Aspect Ratio, Smart HDR set as shortcut key 1. Operating the Monitor | 29 Shortcut key 2 Select from Preset Modes, Brightness/Contrast, Input Source, Aspect Ratio, Smart HDR set the state of the power light to save energy. Power Button Allows you to factory defaults. LED Reset Personalization Restores Shortcut Keys and Power Button LED to set as shortcut key 2.
Monitor Users Guide
Page 30
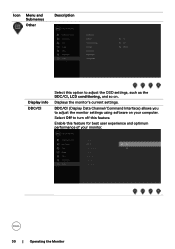
Displays the monitor's current settings. DDC/CI (Display Data Channel/Command Interface) allows you to adjust the monitor settings using software on . Icon Menu and Submenus Other Description Display info DDC/CI Select this option to adjust the OSD settings, such as the DDC/CI, LCD conditioning, and so on your monitor. 30 | Operating the Monitor Select Off to turn off this feature for best user experience and optimum performance of your computer. Enable this feature.
Displays the monitor's current settings. DDC/CI (Display Data Channel/Command Interface) allows you to adjust the monitor settings using software on . Icon Menu and Submenus Other Description Display info DDC/CI Select this option to adjust the OSD settings, such as the DDC/CI, LCD conditioning, and so on your monitor. 30 | Operating the Monitor Select Off to turn off this feature for best user experience and optimum performance of your computer. Enable this feature.
Monitor Users Guide
Page 35
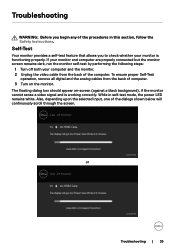
... the procedures in self-test mode, the power LED remains white. To ensure proper Self-Test operation, remove all digital and the analog cables from the back of the computer. Troubleshooting WARNING: Before you to check whether your computer and the monitor. 2 Unplug the video cable from the back of computer. 3 Turn on -screen (against a black background), if the monitor cannot sense a video signal and is functioning properly. The...
... the procedures in self-test mode, the power LED remains white. To ensure proper Self-Test operation, remove all digital and the analog cables from the back of the computer. Troubleshooting WARNING: Before you to check whether your computer and the monitor. 2 Unplug the video cable from the back of computer. 3 Turn on -screen (against a black background), if the monitor cannot sense a video signal and is functioning properly. The...
Monitor Users Guide
Page 36
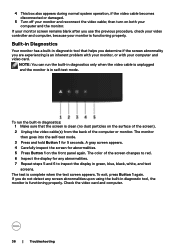
... problem with your monitor, or with your monitor and reconnect the video cable; The color of the computer or monitor. The test is in green, blue, black, white, and text screens. The monitor then goes into the self-test mode. 3 Press and hold Button 1 for abnormalities. 5 Press Button 1 on the front panel again. If your monitor screen remains blank after you use the previous procedure, check your video controller and computer, because your monitor is clean...
... problem with your monitor, or with your monitor and reconnect the video cable; The color of the computer or monitor. The test is in green, blue, black, white, and text screens. The monitor then goes into the self-test mode. 3 Press and hold Button 1 for abnormalities. 5 Press Button 1 on the front panel again. If your monitor screen remains blank after you use the previous procedure, check your video controller and computer, because your monitor is clean...

Monitor Users Guide
Page 38
..., see Dell Support site at: http://www.dell.com/support/monitors. • Reset the monitor to factory settings. • Adjust brightness & contrast controls via OSD. • Do not perform any troubleshooting steps. • Contact Dell immediately. • Ensure that the video cable connecting the monitor to the computer is connected properly and is secure. • Reset the monitor to factory settings. • Perform monitor self-test feature check to determine if the intermittent problem occurs in selftest mode. 38 | Troubleshooting
..., see Dell Support site at: http://www.dell.com/support/monitors. • Reset the monitor to factory settings. • Adjust brightness & contrast controls via OSD. • Do not perform any troubleshooting steps. • Contact Dell immediately. • Ensure that the video cable connecting the monitor to the computer is connected properly and is secure. • Reset the monitor to factory settings. • Perform monitor self-test feature check to determine if the intermittent problem occurs in selftest mode. 38 | Troubleshooting
Monitor Users Guide
Page 39
... latest software drivers for bent or broken pins in the video cable connector. Faint shadow from the static image displayed appears on the application. • Adjust R/G/B value under Custom. Troubleshooting | 39 Common Symptoms HDR Problems Missing Color Wrong Color Image retention from a static image left on the monitor for a long period of the Preset Modes in the good Color menu OSD depending on the screen • Use the Power Management feature to turn...
... latest software drivers for bent or broken pins in the video cable connector. Faint shadow from the static image displayed appears on the application. • Adjust R/G/B value under Custom. Troubleshooting | 39 Common Symptoms HDR Problems Missing Color Wrong Color Image retention from a static image left on the monitor for a long period of the Preset Modes in the good Color menu OSD depending on the screen • Use the Power Management feature to turn...
Monitor Users Guide
Page 40
... Input Signal when user controls are pressed No picture, the • Check the signal source. Ensure the computer is LED light is plugged in diagnostics. 40 | Troubleshooting The picture does The picture not fill the entire cannot fill the screen height or width of DVDs, the monitor may display in full screen. • Run the built-in properly. Re-plug the signal cable if necessary. • Reset the computer or video player. Product Specific Problems Specific Symptoms Screen image...
... Input Signal when user controls are pressed No picture, the • Check the signal source. Ensure the computer is LED light is plugged in diagnostics. 40 | Troubleshooting The picture does The picture not fill the entire cannot fill the screen height or width of DVDs, the monitor may display in full screen. • Run the built-in properly. Re-plug the signal cable if necessary. • Reset the computer or video player. Product Specific Problems Specific Symptoms Screen image...
Monitor Users Guide
Page 42
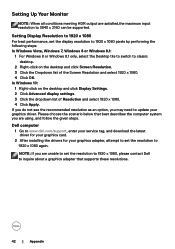
Setting Up Your Monitor NOTE: When all conditions meeting HDR output are satisfied,the maximum input resolution to 1920 x 1080 again. Please choose the scenario below that supports these resolutions. 42 | Appendix Dell computer 1 Go to www.dell.com/support, enter your service tag, and download the latest driver for your graphics card. 2 After installing the drivers for your graphics driver. In Windows 10: 1 Right-click on the...
Setting Up Your Monitor NOTE: When all conditions meeting HDR output are satisfied,the maximum input resolution to 1920 x 1080 again. Please choose the scenario below that supports these resolutions. 42 | Appendix Dell computer 1 Go to www.dell.com/support, enter your service tag, and download the latest driver for your graphics card. 2 After installing the drivers for your graphics driver. In Windows 10: 1 Right-click on the...
Monitor Users Guide
Page 43
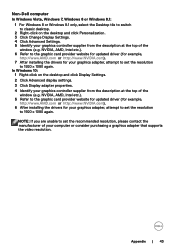
...). 6 After installing the drivers for your graphics controller supplier from the description at the top of the window (e.g. Non-Dell computer In Windows Vista, Windows 7, Windows 8 or Windows 8.1: 1 For Windows 8 or Windows 8.1 only, select the Desktop tile to switch to classic desktop. 2 Right-click on the desktop and click Display Settings. 2 Click Advanced display settings. 3 Click Display adapter properties. 4 Identify your computer or consider purchasing a graphics adapter that supports the video resolution.
...). 6 After installing the drivers for your graphics controller supplier from the description at the top of the window (e.g. Non-Dell computer In Windows Vista, Windows 7, Windows 8 or Windows 8.1: 1 For Windows 8 or Windows 8.1 only, select the Desktop tile to switch to classic desktop. 2 Right-click on the desktop and click Display Settings. 2 Click Advanced display settings. 3 Click Display adapter properties. 4 Identify your computer or consider purchasing a graphics adapter that supports the video resolution.
Monitor Display Manager Users Guide
Page 4
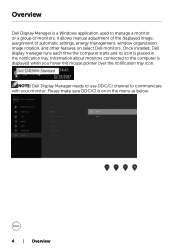
... select Dell monitors. Overview Dell Display Manager is a Windows application used to the computer is displayed when you hover the mouse pointer over the notification tray icon. It allows manual adjustment of the displayed image, assignment of monitors. NOTE: Dell Display Manager needs to use DDC/CI channel to communicate with your monitor. Once installed, Dell display manager runs each time the computer starts and its icon is placed in the menu...
... select Dell monitors. Overview Dell Display Manager is a Windows application used to the computer is displayed when you hover the mouse pointer over the notification tray icon. It allows manual adjustment of the displayed image, assignment of monitors. NOTE: Dell Display Manager needs to use DDC/CI channel to communicate with your monitor. Once installed, Dell display manager runs each time the computer starts and its icon is placed in the menu...
Monitor Display Manager Users Guide
Page 7
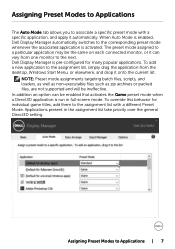
... full-screen mode. When Auto Mode is run in the assignment list take priority over the general Direct3D setting. The preset mode assigned to a particular application may be ineffective. NOTE: Preset mode assignments targeting...supported and will be the same on each connected monitor, or it can be enabled that activates the Game preset mode when a Direct3D application is enabled, Dell Display Manager automatically switches to the assignment list with a specific application, and apply it onto the current list. In addition an option can vary from the desktop, Windows Start Menu...
... full-screen mode. When Auto Mode is run in the assignment list take priority over the general Direct3D setting. The preset mode assigned to a particular application may be ineffective. NOTE: Preset mode assignments targeting...supported and will be the same on each connected monitor, or it can be enabled that activates the Game preset mode when a Direct3D application is enabled, Dell Display Manager automatically switches to the assignment list with a specific application, and apply it onto the current list. In addition an option can vary from the desktop, Windows Start Menu...


